
Updated with Godmaster content!
This guide aims to give a comprehensive explanation of achieving 112% completion (max completion percentage) in Hollow Knight. The first portion of the guide details the various abilities, collectibles, and bosses which count towards completion percentage and their locations. The second portion will provide a 112% completion route through the game that emphasizes pickups and upgrades to ease the difficulty of boss fights while also including as many (optional) NPC encounters as possible for lore.
General Tips

You can nail pogo
Attacking downwards while in the air is an important technique to learn for several reasons:
- Nail pogoing off of environment stuff (i.e. spikes, bouncy mushrooms, invincible enemies) is required for progression through areas and is needed to pass several challenge rooms for collectibles.
- Many enemies (including bosses) do not have a good counter when you’re above them, so it is an important strategy to killing them off safely.
- Nail pogoing allows for “skips” which let you get further into the game without first getting certain abilities.
At the start of the game you’ll find yourself fairly short on the geo amount you want to have in order to afford several useful items from Sly and Salubra. While you can farm enemies for geo, further areas in the gradually scale up the amount of geo dropped from common enemies so if you’re patient there isn’t a need to farm. Nevertheless, important sources to consider for geo early game include:
- “Mini-boss” enemies
- Breakable geo caches
- Geo chest rewards from bosses
- Relics
- Grubfather geo rewards
The single largest “required” purchase for beating the game (if you don’t want to navigate dark rooms blind) is the Lumafly Lantern from Sly at 1800 Geo while the single largest required cost for 107% is the Pure Nail upgrade at 4000 Geo (upgrading Fragile charms to Unbreakable is not required). The lantern is available after finding Sly early game, so you will have to save up Geo for buying it, but other “large” costs occur later in the game when you have started to build up a good surplus. Do not be surprised if by late-game you find yourself with several thousand Geo left over and every shop bought out.
Always be sure to retrieve your shade as soon as possible after dying if you’re playing in normal mode
When you die, it might be tempting to just move on and not bother with retrieving your shade. We recommend, however, that you take the time to backtrack and collect your shade before doing anything else because of two important facts:
- You will be “crippled” in terms of your soul meter only being able to fill up to 2/3 full (equal to 2 heals/spells) until you retrieve your shade
- If you die a second time, then you will lose the Geo you collected up until that point. In early game when you don’t have a surplus and don’t have banked Geo in the form of relics, Geo is fairly important so losing all the collected Geo may force you to farm enemies.
In some cases, your Shade will spawn in a poor location that makes retrieving it hard (e.g. inside a boss room). In these circumstances, there are a few options:
- Get close enough to your shade to attract its attention, and then let it follow you to a location which is more reasonable for you to kill it or let it kill itself on an environment hazard. This method may require you to take damage from enemies/the environment. If retrieving your shade in this manner puts you in a bad spot (e.g. locked into a boss fight you don’t want to finish at that time), quit to menu to reset your location back to the last bench you sat at.
- Fire a spell shot at the shade to deal damage to it. This actions serves as enough to get the Shade to lock onto you.
- Open up Jiji’s cave with a Simple Key on the far right of Dirtmouth and spend a rancid egg for her to summon your Shade. (Note that there are 4 Simple Keys in the game for 4 Simple Locks, with one key required for 112% and one key recommended for easy access to an area, so choose your key usages wisely. Rancid eggs are also rare finds in the overworld until you find the rancid egg vendor which sells eggs for 80-100 Geo up to ~80 eggs total.)
If you find yourself in a very bad spot, don’t hesitate to quit to menu and reload your save. Doing so will respawn you at the last bench you sat down at while still saving any collectibles you found as well as filling out any new parts of the map you’ve explored. Reloading your save also allows you to skip some backtracking in the game if planned out correctly.
Scattered throughout the kingdom are secret rooms and passages. The entrances to these secrets are hidden in three ways: fake walls/ceilings/floors, breakable walls/ceilings, and breakable floors.
Fake walls/ceilings/floors are locations where the foreground covers up an opening which you can just pass through. If there isn’t an explicit colored object blocking a part of the wall/ceiling/floor (i.e. there’s just a black patch in the foreground), then it’s possible you’re dealing with a fake wall/ceiling/floor. In some cases passing through the opening results in the secret found tone and the foreground objects covering the view of the opening disappear permanently.
In contrast, breakable walls/ceilings are parts of the environment which need to be hit several times with a nail or damaged with a spell in order to break open. (Note: In one specific case you need to use an enemy to break open the wall for you.) Breaking them open results in the secret found tone and the passage/room beyond is revealed. Look for things that indicate that something is breakable:
- A crumbling sound when striking the breakable wall/ceiling with your nail
- Cracks over a specific part of wall/ceiling
- In some cases the breakable part of the wall/ceiling is set into a small alcove noticeably separate from the rest of the environment
Lastly, breakable floors require you to use a dive spell (i.e. Desolate Dive/Descending Dark) in order to break them open (not to be confused with shortcuts that open when you stand on them). The key indicator for these is a crumbling sound and shaking when you walk over the breakable part of the floor. In some cases, however, you don’t get this indication and you need to rely on the other indicator which is the presence of unusual cracks over a small part of the floor.
There are many things opening up these fake and breakable parts of the environment can get you:
- Geo caches
- Shortcuts
- Relics
- Vendor
- Grubs
- Pale Ore
- Charms
- Spells
- Bosses
- An entire sub-area
Completion Percentage List
(37% total):
- 4 Masks (consisting of 16 Mask Shards) = 4%
- 3 Soul Vessels (consisting of 9 Vessel Fragments) = 3%
- Vengeful Spirit + Shade Soul = 2%
- Desolate Dive + Descending Dark = 2%
- Howling Wraiths + Abyss Shriek = 2%
- Dream Nail + Awoken Dream Nail = 2%
- Mothwing Cloak = 2%
- Mantis Claw = 2%
- Crystal Heart = 2%
- Isma’s Tear = 2%
- Monarch Wings = 2%
- King’s Brand = 2%
- Shade Cloak = 2%
- Godtuner = 1%
- Nail upgrades (Sharpened, Channeled, Coiled, Pure) = 4%
- Nail Arts (Great Slash, Cyclone Dash, Dash Slash) = 3%
Charms
(1% each charm = 40% total):
- Wayward Compass
- Gathering Swarm
- Stalwart Shell
- Soul Catcher
- Shaman Stone
- Soul Eater
- Dashmaster
- Sprintmaster
- Grubsong
- Grubberfly’s Elegy
- Fragile/Unbreakable Heart
- Fragile/Unbreakable Greed
- Fragile/Unbreakable Strength
- Spell Twister
- Steady Body
- Heavy Blow
- Quick Slash
- Longnail
- Mark of Pride
- Fury of the Fallen
- Thorns of Agony
- Baldur Shell
- Flukenest
- Defender’s Crest
- Glowing Womb
- Quick Focus
- Deep Focus
- Lifeblood Heart
- Lifeblood Core
- Joni’s Blessing
- Hiveblood
- Spore Shroom
- Sharp Shadow
- Shape of Unn
- Nailmaster’s Glory
- Weaversong
- Dream Wielder
- Dreamshield
- Grimmchild (or Carefree Melody)
- Kingsoul (or Void Heart)
Bosses
(1% each = 17% total):
- Gruz Mother
- False Knight
- Hornet (Greenpath encounter)
- Brooding Mawlek
- Mantis Lords
- Soul Master
- Dung Defender
- Nosk
- Broken Vessel
- Watcher Knight
- Uumuu
- Hive Knight
- Hornet (Kingdom’s Edge encounter)
- The Collector
- Traitor Lord
- Grimm
- Nightmare King (or banish Grimm Troupe)
Warrior’s Graves
(1% each = 7% total):
- Xero
- Elder Hu
- Gorb
- No Eyes
- Galien
- Marmu
- Markoth
Dreamers (Lurien the Watcher, Monomon the Teacher, and
Herrah the Beast) = 3%
Colosseum of Fools trials (Trial of the Warrior, Trial of the Conqueror, and
Trial of the Fool) = 3%
Seer Ascension (2400 essence) = 1%
Godhome Pantheons (Pantheon of the Master, Pantheon of the Artist,
Pantheon of the Sage, and Pantheon of the Knight) = 4%
Mask Shards
There are 16 total mask shards in the game. For each 4 mask shards you collect, you gain an additional point of max health as well as 1% completion. Since you start with 5 max health, collecting all 16 mask shards increases your max health up to 9 without health-boosting charms.
Sly’s shop (left most house in Dirtmouth):
- 2 Mask Shards available for 150/500 Geo after talking to Sly in hut after Gruz Mother boss
- 2 Mask Shards available for 800/1500 Geo after finding the Shopkeeper’s Key in Crystal Peak (requires Mantis Claw)
Location:
Bretta’s hut (right most house in Dirtmouth):
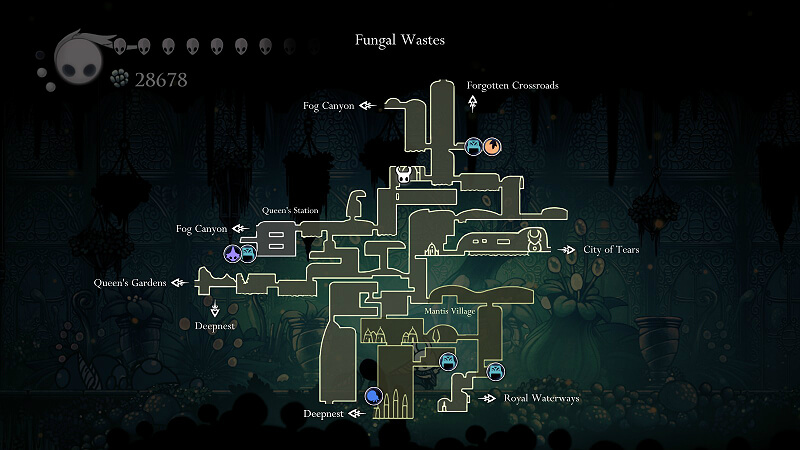
1 Mask Shard after rescuing Bretta from bottom right of Fungal Wastes behind fake wall next to Dashmaster statue (requires Mantis Claw)
Location:
Grubfather:
1 Mask Shard as a reward for finding 5 Grubs
Location:
Goam challenge:
1 Mask Shard in room under hot spring past several Goams (“requires” Mantis Claw, but can kite a Vengefly to nail pogo into challenge early)
Location:
Brooding Mawlek:
1 Mask Shard as the reward for beating the Brooding Mawlek boss (“requires” Mantis Claw, but can nail pogo off of wall spikes to reach boss early)
Location:
Stone Sanctuary:
1 Mask Shard after platforming in a dark room (“requires” Lumafly Lantern, but can use trial-and-error to make your way through the dark room blind)
Location:
Queen’s Station:
1 Mask Shard after platforming challenge using wall jump (requires Mantis Claw)
Location:
Entrance to Deepnest:
1 Mask Shard after passing through Fungal Core sub-area which is entered from Fungal Wastes using double jump (requires Monarch Wings)
Location:
Crystal Guardian (v2):
1 Mask Shard after defeating Crystal Guardian for the 2nd time in the room that is accessible via double jump above the upper bench of the area (requires Monarch Wings)
Location:
Seer:
1 Mask Shard rewarded for collecting 1500 Essence
Location:

Delicate Flower quest:
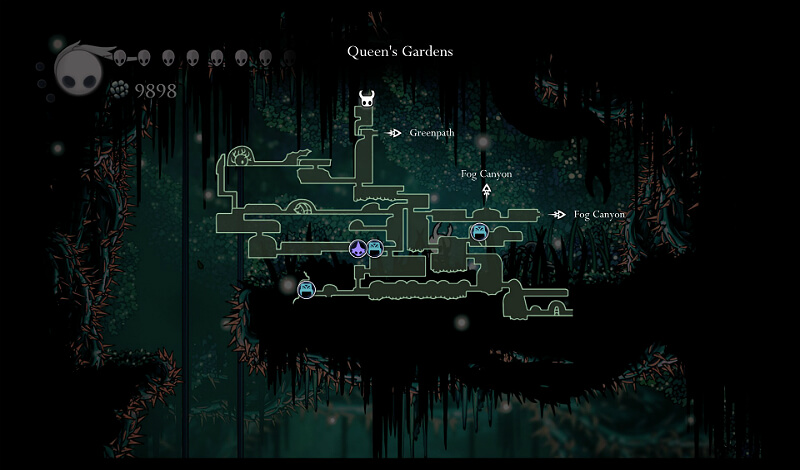
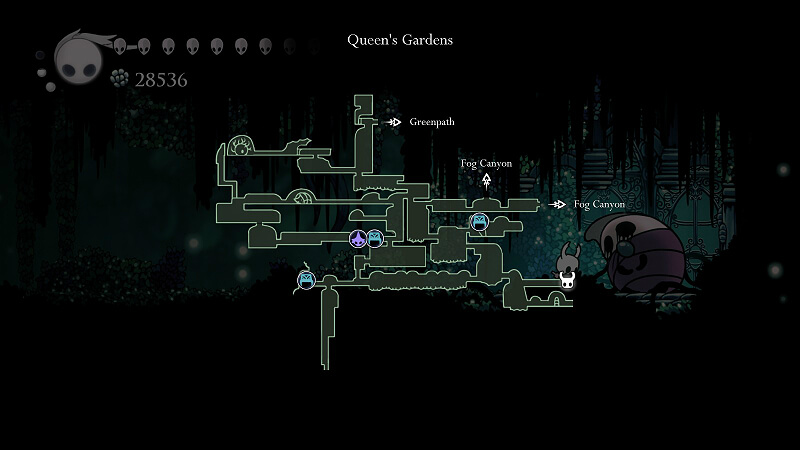
1 Mask Shard rewarded by the Grey Mourner after successfully taking the Delicate Flower to the Traitor Lord’s child’s grave in Queen’s Gardens without taking damage and without using the stagways/dream gate fast travel systems (requires access to Queen’s Gardens [Fog Canyon entrances: Isma’s Tear or Shade Cloak / Deepnest entrance next to Mask Maker: destroy hidden plank of wood]).
Note: Trip can be made safer by killing all enemies along your chosen path before starting the quest.Do not sit at any benches while you’re clearing the path and during the actual quest, otherwise you respawn the enemies that don’t naturally respawn when you re-enter a room.
Start Location:
End Location:

Hidden room:
1 Mask Shard hidden at the left end of the long water passage on the left side of the area, directly below the connection to the room with Cornifer.
Location:
Hive:
1 Mask Shard behind a breakable wall that requires you to aggro a Hive Guardian (big bouncing bee) into the wall (“requires” Monarch Wings, but can pogo off of bees to progress into the Hive)
Location:
Soul Vessel Fragments
There are 9 Vessel Fragments in the game. For each 3 Vessel Fragments you collect, you gain a full Soul Vessel that allows you to focus/spell-cast one additional time as well as 1% completion. Unlike your Soul Meter, Soul Vessels do not break when you die.
Sly’s shop (left most house in Dirtmouth):
- 1 Vessel Fragment available for 550 Geo after talking to Sly in hut after Gruz Mother boss
- 1 Vessel Fragment available for 900 Geo after finding the Shopkeeper’s Key in Crystal Peak (requires Mantis Claw)
Location:

City elevator:
1 Vessel Fragment after unlocking the elevator from the City of Tears side with 150 Geo
Location:
Durandoo acid challenge room:
1 Vessel Fragment after platforming in a room with acid and floating Durandoos (requires Mantis Claw; nail pogoing off the Durandoos can be skipped for 2/3 of the room with Crystal Heart; nail pogoing is unnecessary after Isma’s Tear)
Location:
Garpede challenge room:
1 Vessel Fragment after completing platforming challenge by nail pogoing off of a horizontally moving Garpede past several spike hazards followed by nail pogoing on a vertically moving Garpede
Location:
Seer:
1 Vessel Fragment rewarded for collecting 700 Essence
Location:

Enemy gauntlet:
1 Vessel Fragment after completing a room with 4 waves of Sentry enemies (requires access to right side of City)
Location:
Fountain:
1 Vessel Fragment after depositing a cumulative sum of 3000 Geo into the fountain
Location:
Stag Nest:
1 Vessel Fragment after Stag remembers the location of Stag Nest stag station (requires unlocking all other stag stations; can access early if you combine double jumps with a nail pogo off a Vengefly near Gorb’s warrior’s grave)
Location:

Spells & Abilities
See the Hollow Knight wiki for spell damage values (also includes charm interaction)
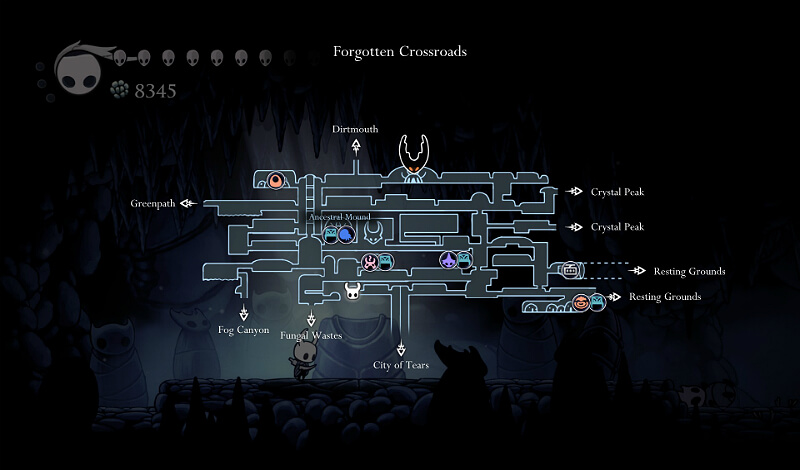
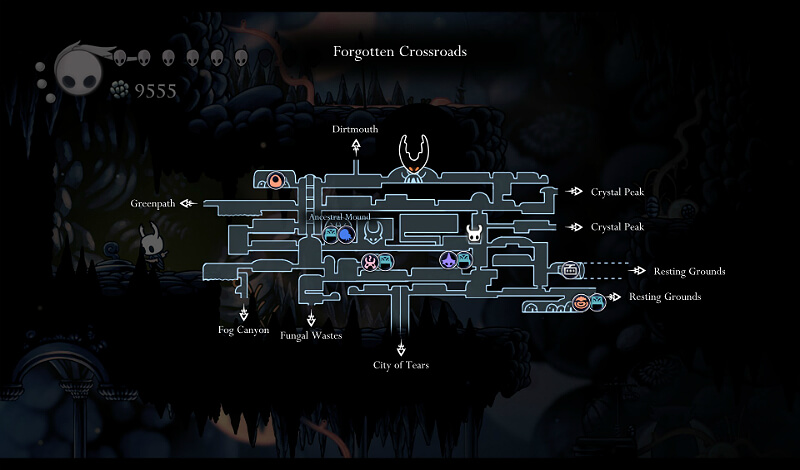
- Vengeful Spirit – Rewarded after entering Ancestral Mound (Forgotten Crossroads) and talking to Snail Shaman; only required spell for game progression
Location:
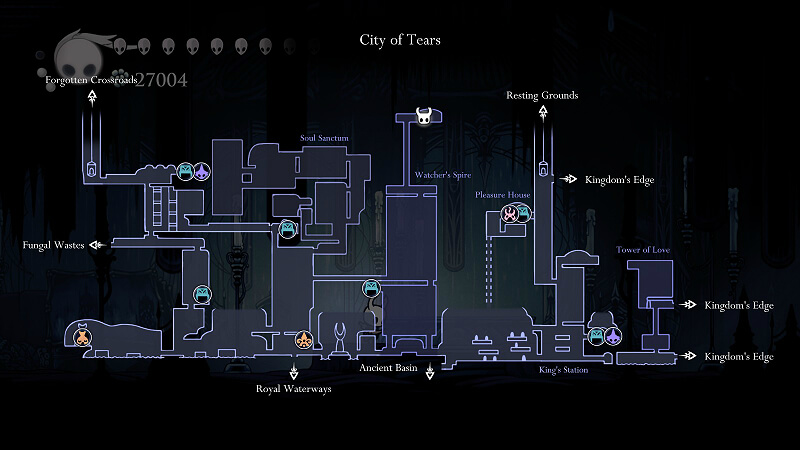
- Desolate Dive – Reward for defeating Soul Master boss at the end of Soul Sanctum (City of Tears)
Location:

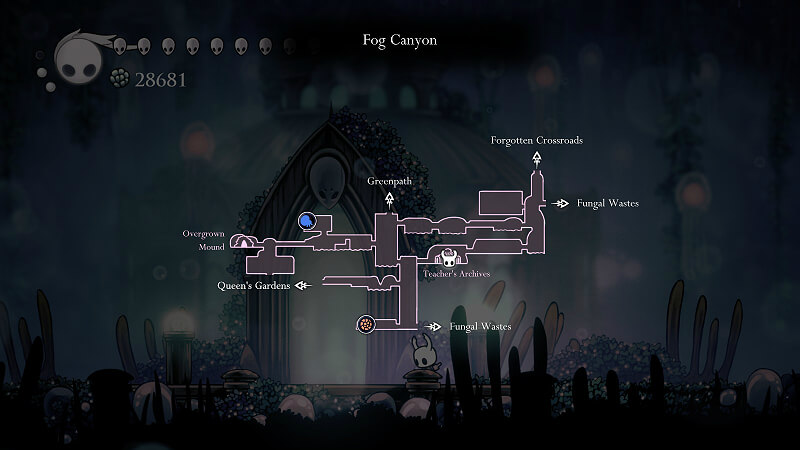
- Howling Wraiths – Reward for beating Squit enemy gauntlet in Overgrown Mound (Fog Canyon); requires Mantis Claw
Location:
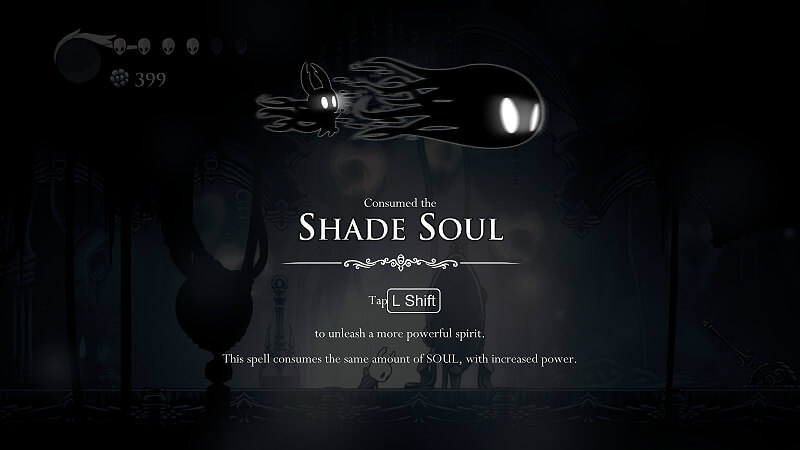
- Shade Soul – Upgrade to Vengeful Spirit; reward for beating Soul Warrior mini-boss with random spawning Follies in Soul Sanctum (City of Tears); requires Elegant Key from Sly’s shop which is unlocked after finding the Shopkeeper’s Key in Crystal Peak and costs 800 Geo
Location:
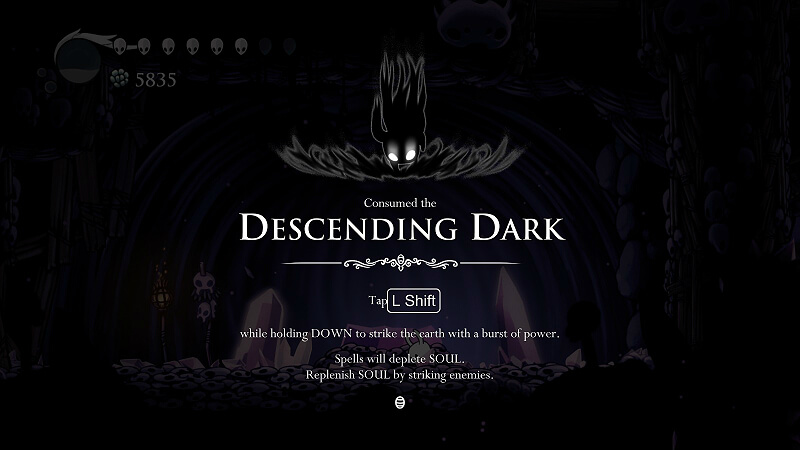
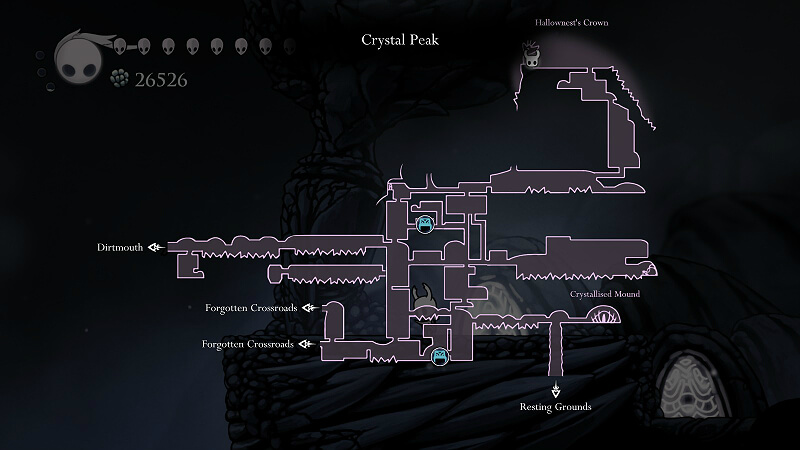
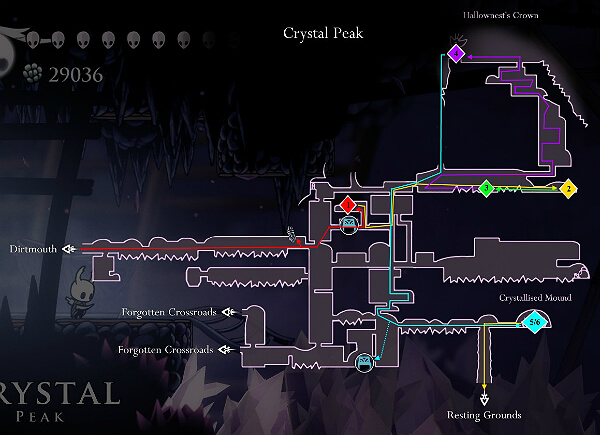
- Descending Dark – Upgrade to Desolate Dive; reward for completing flipping platform challenge inside Crystallised Mound (Crystal Peak); requires Lumafly Lantern and Crystal Heart (the lantern can be skipped if you’re willing to traverse a dark room blind)
Location:
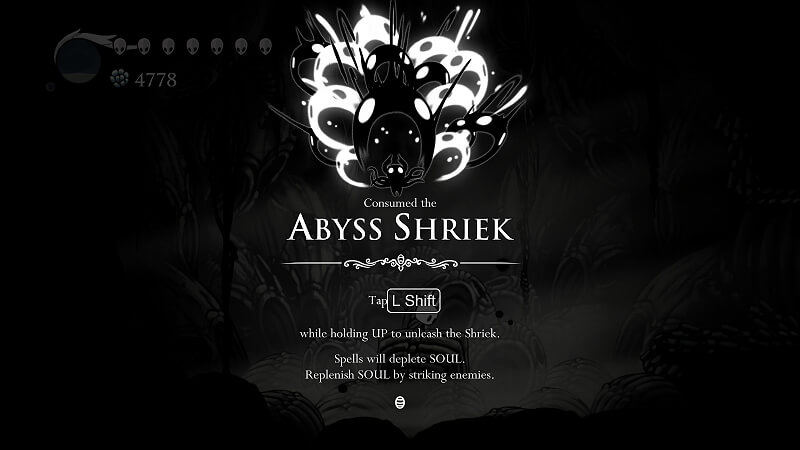
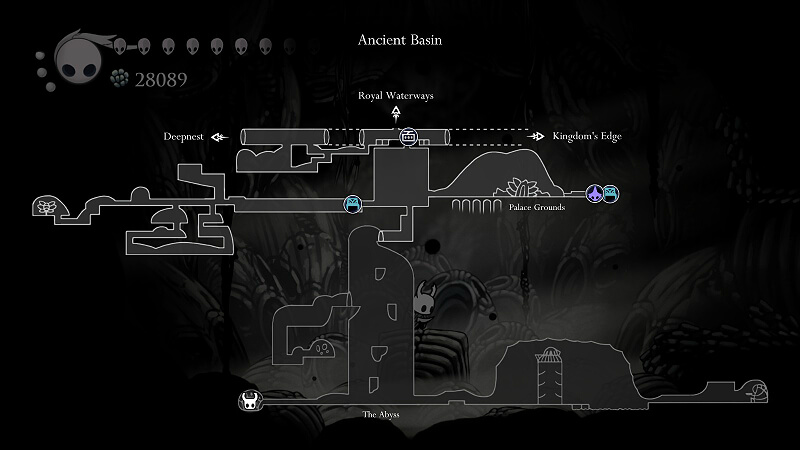
- Abyss Shriek – Upgrade to Howling Wraiths; acquired by using Howling Wraiths in Abyss (Ancient Basin) room with stone heads; requires King’s Brand
Location:
Ability Pickups
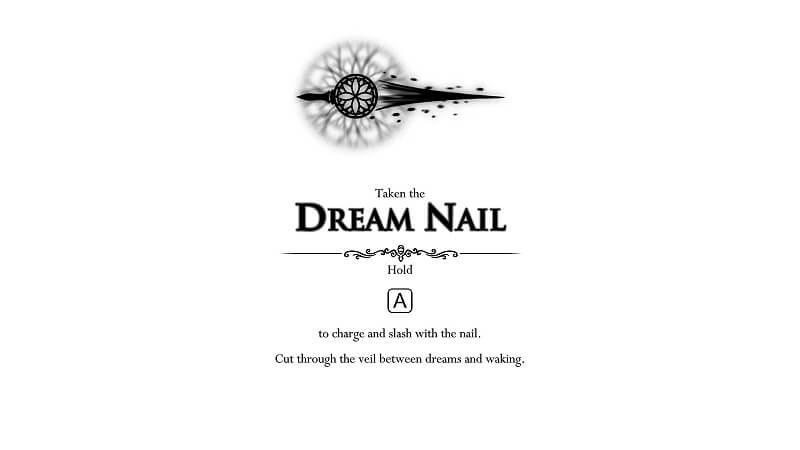
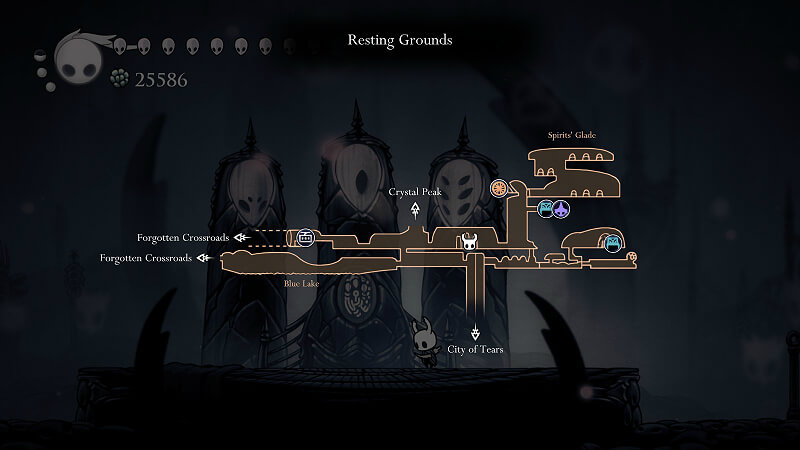
- Dream Nail – Acquired upon first entry to Resting Grounds when you stand next to the Dreamer statues
Location:
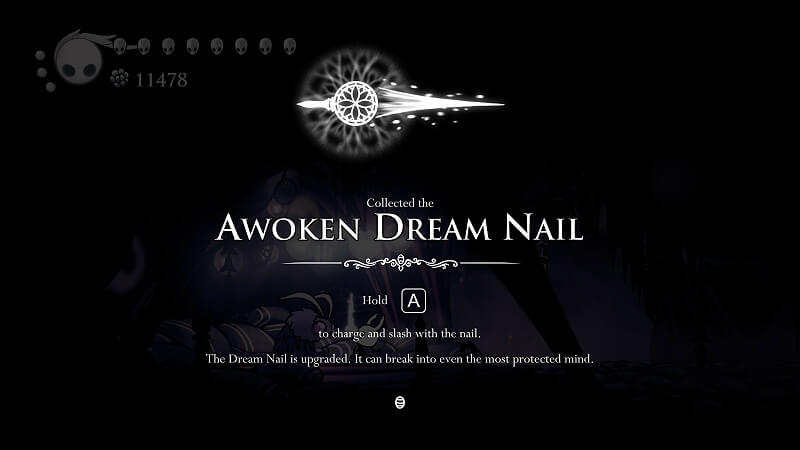
- Awoken Dream Nail – Reward from the Seer for collecting 1800 essence
Location:
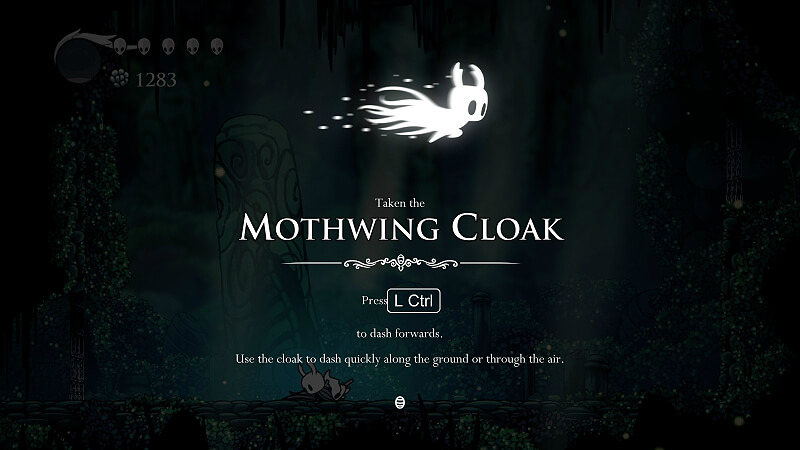
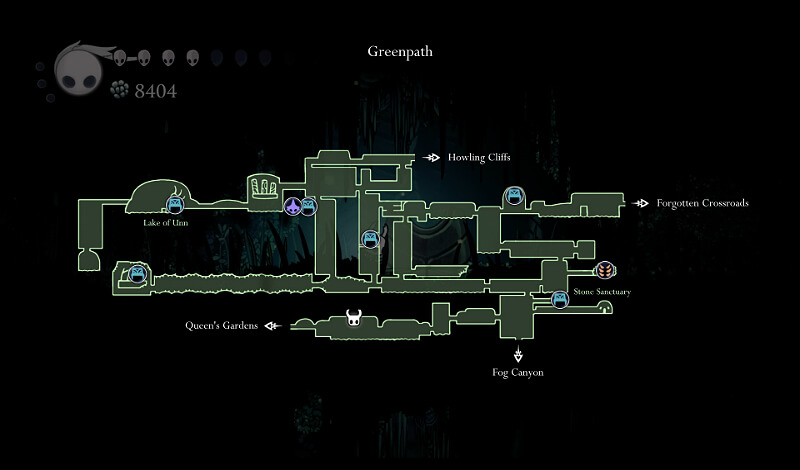
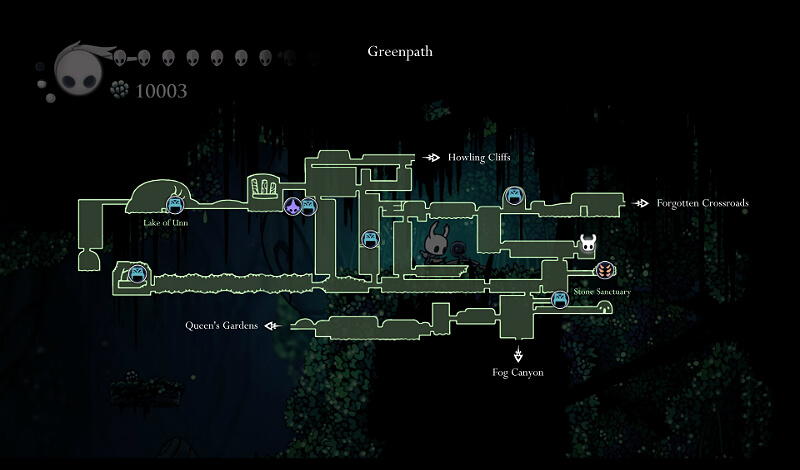
- Mothwing Cloak – Reward for defeating Hornet boss in Greenpath
Location:

- Mantis Claw – Reward for clearing top part of Mantis Village (Fungal Wastes), requires Mothwing Cloak
Location:
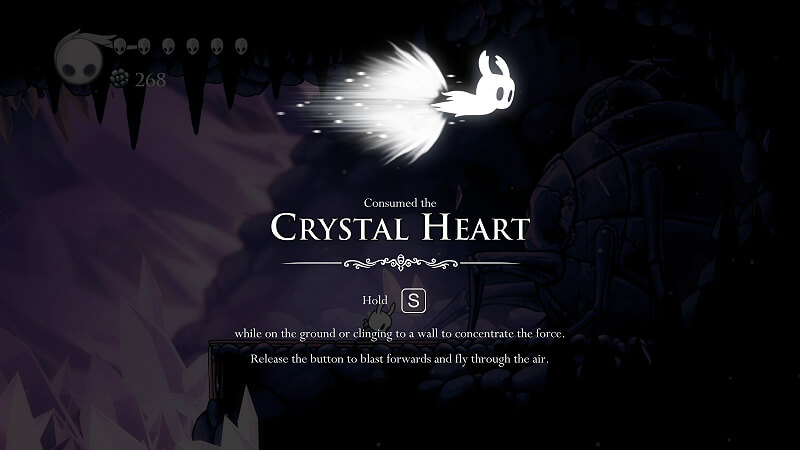
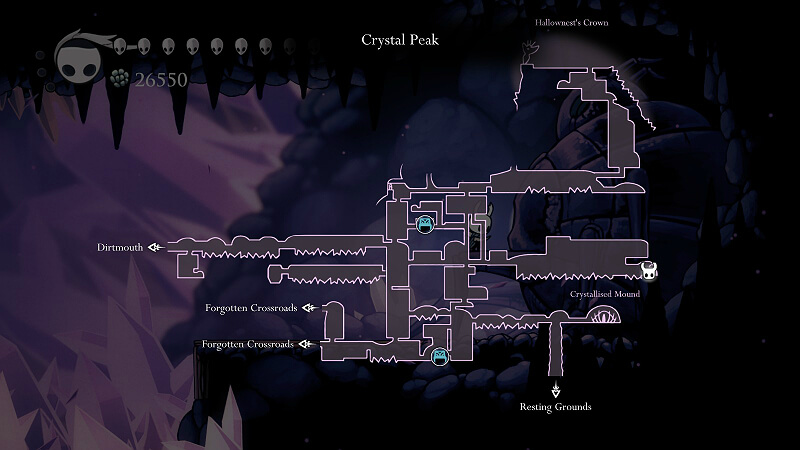
- Crystal Heart (Super Dash) – Reward for clearing out most of Crystal Peak and completing challenge room, requires Mantis Claw
Location:
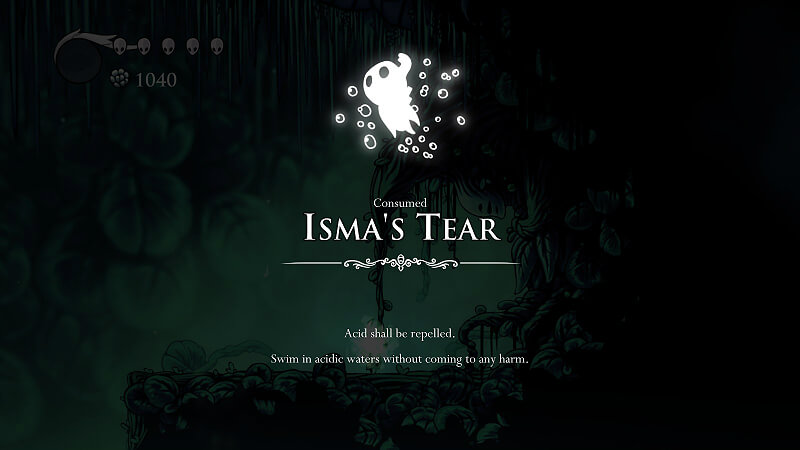
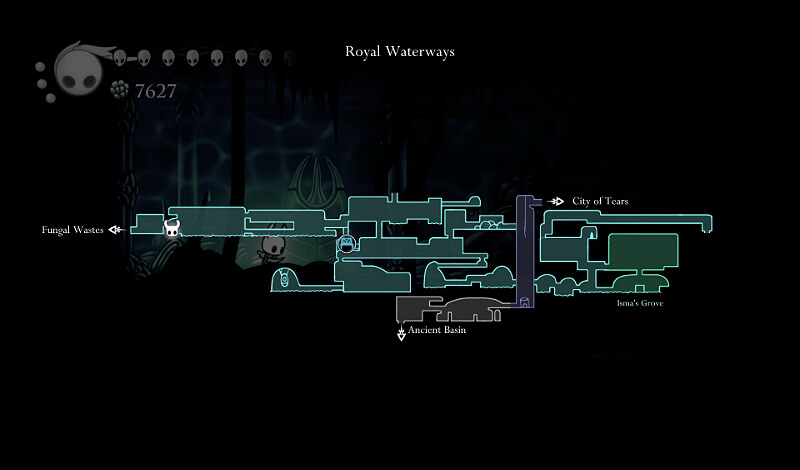
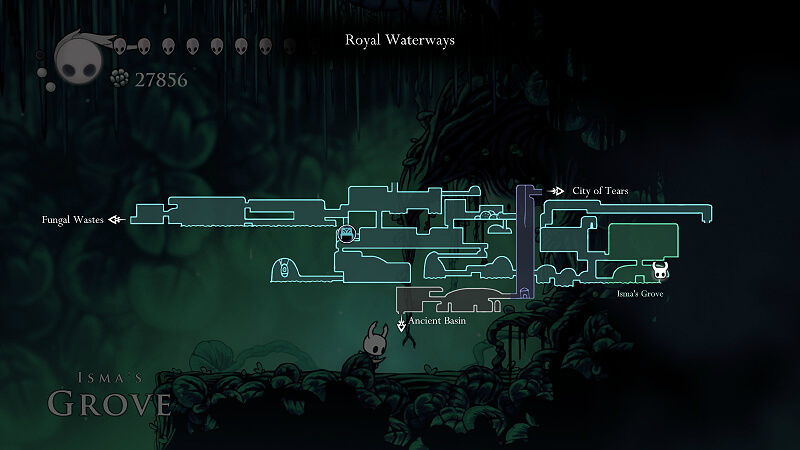
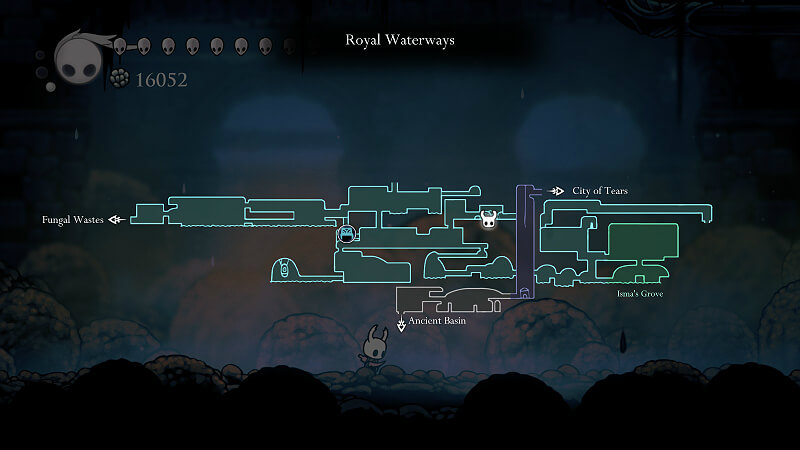
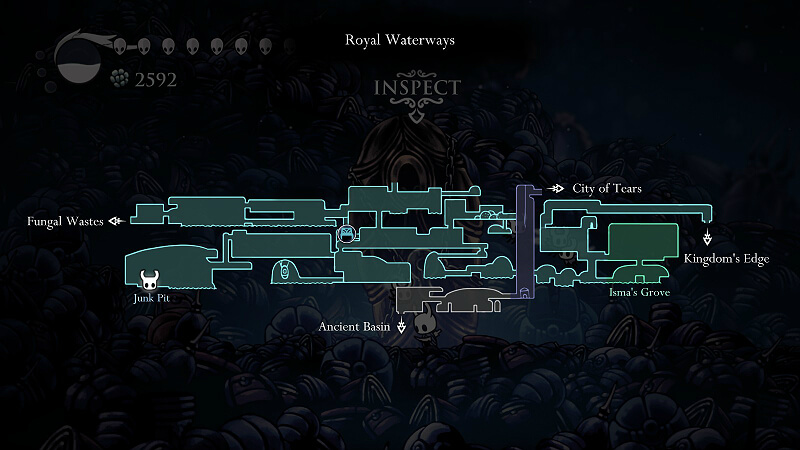
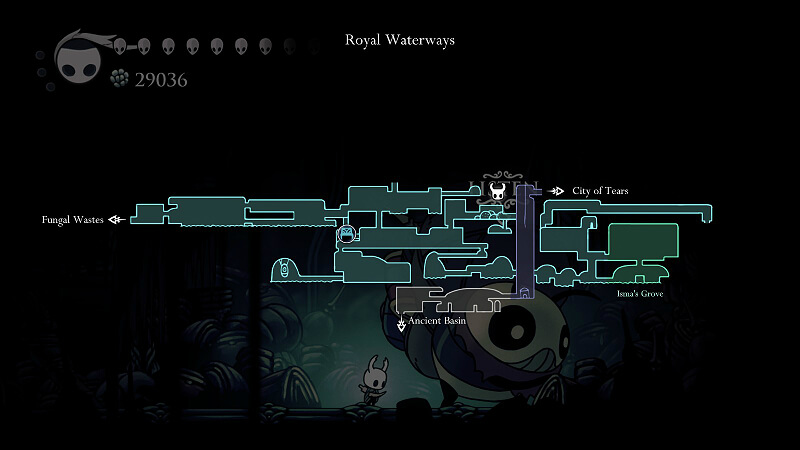
- Isma’s Tear – Reward for defeating Dung Defender boss (large switch drains acid from Isma’s Grove) and Sentry enemy gauntlet in Royal Waterways, requires Crystal Heart
Location:
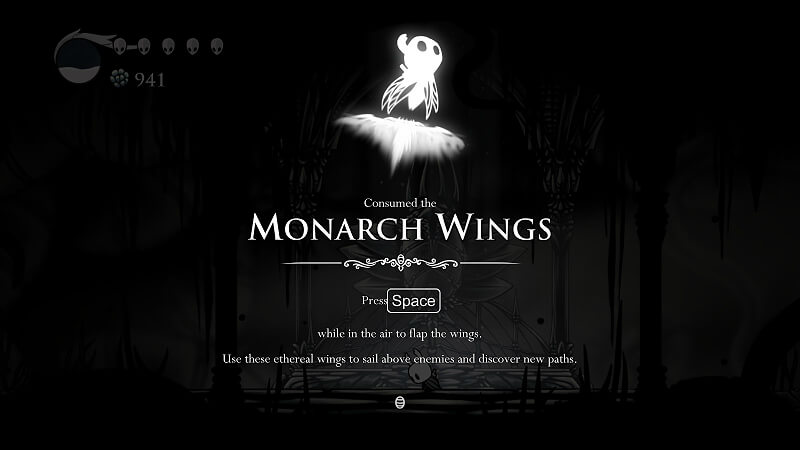
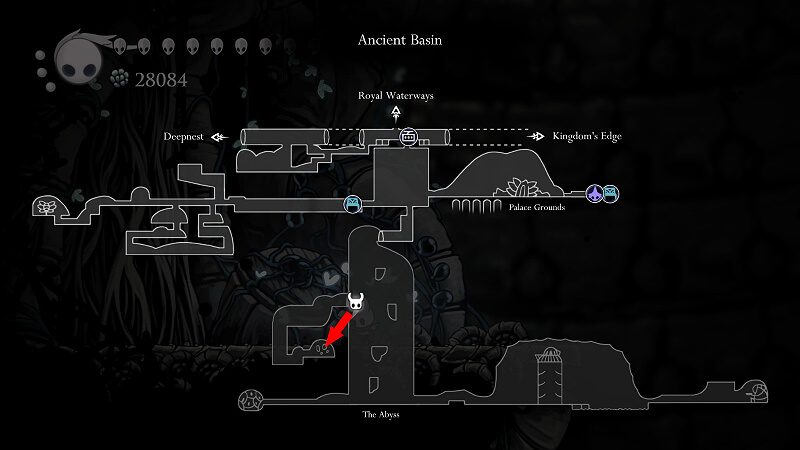
- Monarch Wings – Reward for defeating Broken Vessel boss in Ancient Basin, requires Crystal Heart
Location:
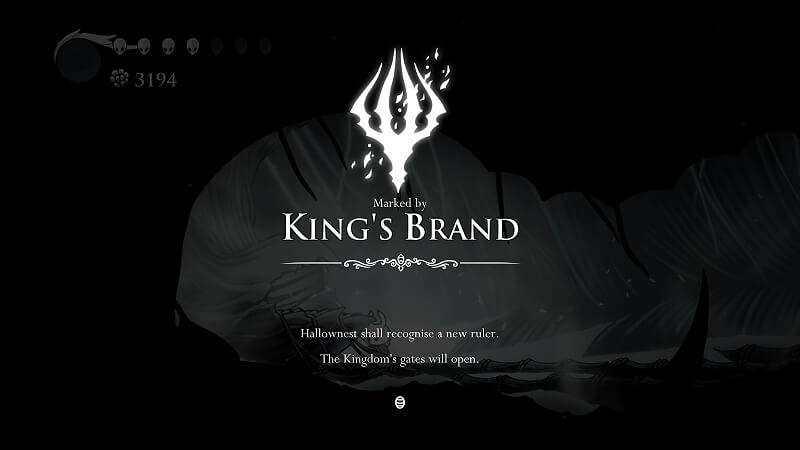
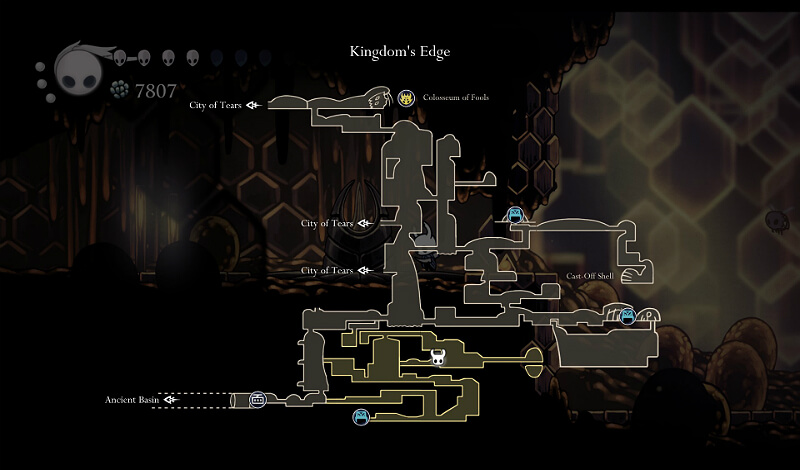
- King’s Brand – Reward for defeating Hornet boss in Kingdom’s Edge, “requires” Monarch Wings (can pogo off Primal Aspid as skip)
Location:
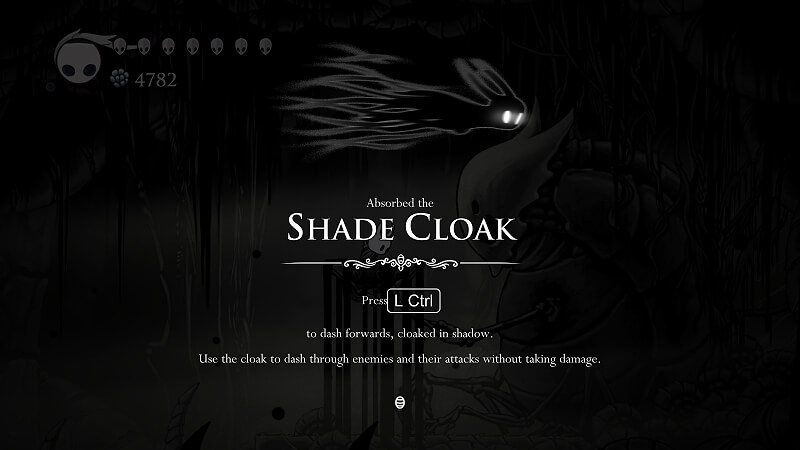
- Shade Cloak – Reward for clearing out most of the Abyss (Ancient Basin), requires King’s Brand
Location:

Nail Upgrades and Pale Ore Locations
The starting nail is called the Old Nail (5 damage per hit), but the Nailsmith can upgrade your nail by +4 damage per hit over four upgrade tiers each of which adds 1% completion:
- Sharpened Nail (9 damage per hit) = 250 Geo
- Channeled Nail (13 damage per hit) = 800 Geo,
1 Pale Ore - Coiled Nail (17 damage per hit) = 2000 Geo,
2 Pale Ores - Pure Nail (21 damage per hit) = 4000 Geo,
3 Pale Ores
Nailsmith location:
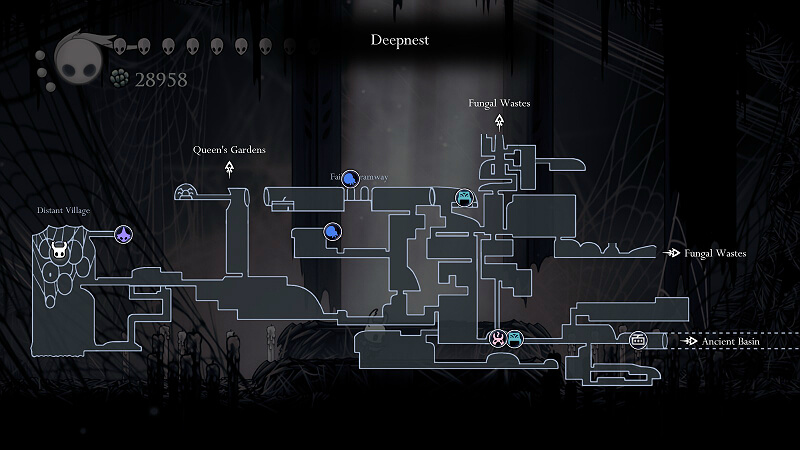
Deepnest: Reward for defeating Nosk boss, requires Crystal Heart
Ancient Basin: Left tramway room after clearing out 2 Lesser Mawlek mini-boss room
Hallownest’s Crown: Reward for clearing out the final top right part of Crystal Peak using double jump, requires Monarch Wings
Seer: Reward for collecting 300 essence
Colosseum of Fools: Reward for beating the Trial of the Conqueror (2nd trial)
Grubfather: Reward for finding 31 Grubs

Nail Arts
The three nail arts (charged nail attacks) are granted by the three Nailmasters who are found in their respective huts spread across Hallownest. Each nail art acquired gives 1% completion. Collecting all three nail arts and then visiting Sly’s shop results in Sly giving you the Nailmaster’s Glory charm.
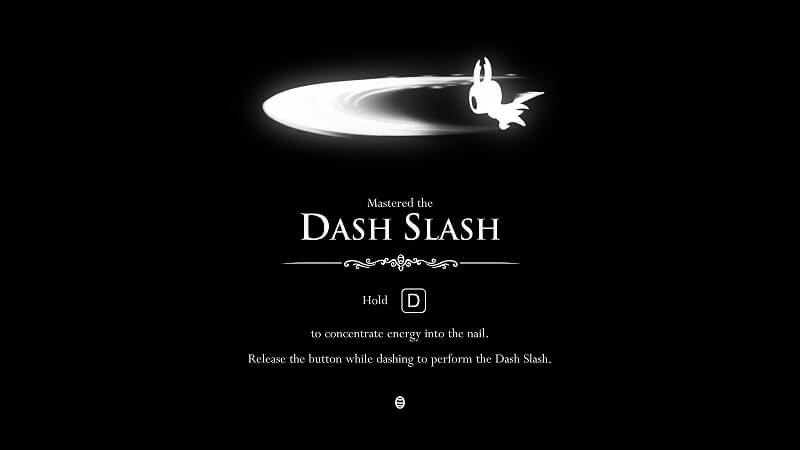
- Dash Slash – Nailmaster Oro in Kingdom’s Edge, costs 800 Geo; 2.5 x Nail damage
Location:
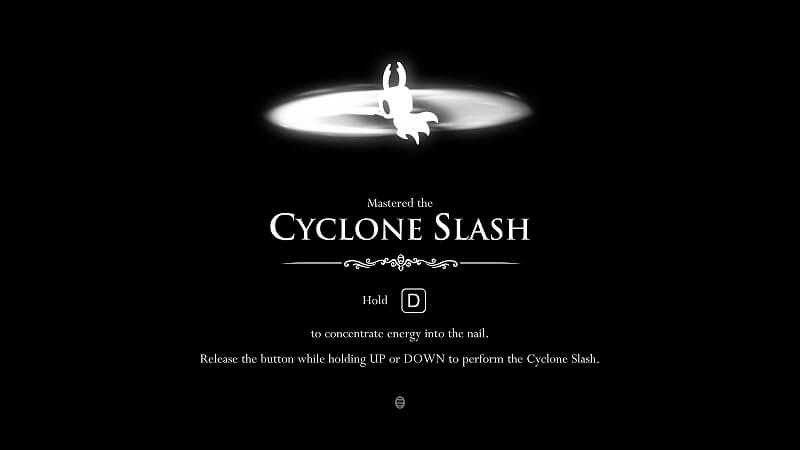
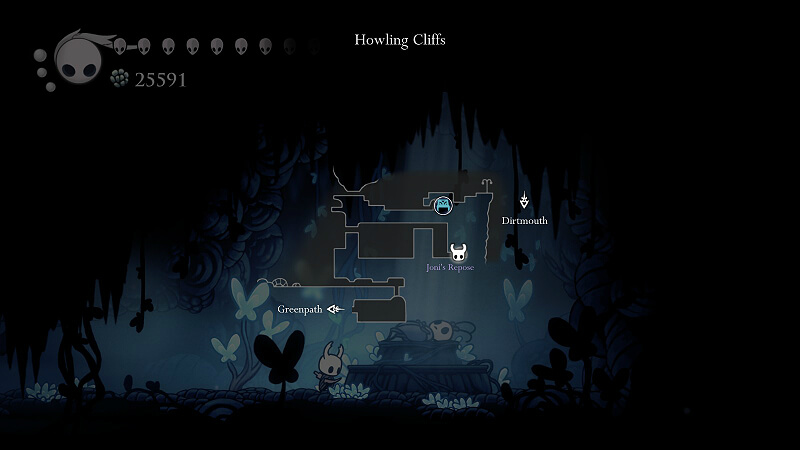
- Cyclone Slash – Nailmaster Mato in Howling Cliffs, requires Mantis Claw; Nail damage per spin (up to 7)
Location:
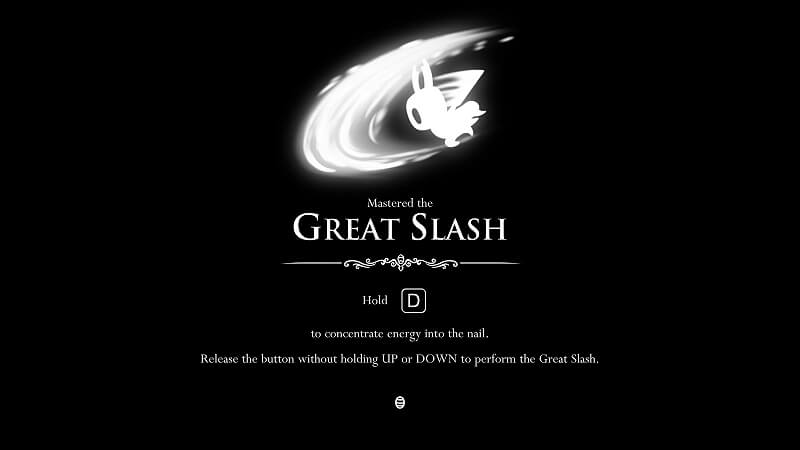
- Great Slash – Nailmaster Sheo in Greenpath, requires Crystal Heart; 2.5 x Nail damage
Location:
Charms (Part 1)
There are 40 charms total in the game, each contributing 1% to completion. You can equip as many charms as you can into the available charm notches given each charm’s notch cost. You start the game with 3 notches, but can get up to 11 notches. Upon finding 40 charms, you can acquire Salubra’s Blessing from Salubra’s shop for 800 Geo (not required for 100%) which automatically fills your Soul meter every time you rest at a bench.
Row 1

- Wayward Compass (1 notch): Gives current location on map
Location: Sold by Iselda’s shop in Dirtmouth for 220 Geo
- Gathering Swarm (1 notch): Collects all Geo in the room automatically
Location: Sold by Sly’s shop in Dirtmouth for 300 Geo

- Stalwart Shell (2 notches): Increases invincibility recovery time after taking damage
Location: Sold by Sly’s shop in Dirtmouth for 200 Geo
(See Gathering Swarm above for location)
- Soul Catcher (2 notches): Increases amount of Soul gained from striking enemies by 33%
Location: At the end of the Ancestral Mound after defeating the Elder Baldur mini-boss

- Shaman Stone (3 notches): Increases spell damage by 33%
Location: Sold by Salubra’s shop (Mothwing Cloak for access) in Forgotten Crossroads for 220 Geo

- Soul Eater (4 notches): Increases amount of Soul gained from striking enemies by 66%
Location: Behind several breakable walls at the far right end of the crypts sub-area in Resting Grounds; requires Desolate Dive
- Dashmaster (2 notches): Reduces cooldown time for dashing by 50%; allows you to dash downwards
Location: At the bottom right of Fungal Wastes near Bretta and the bench
- Sprintmaster (1 notch): Increases walking speed by 20%
Location: Sold by Sly’s shop in Dirtmouth for 400 geo; requires finding the Shopkeeper’s Key in Crystal Peak
(See Gathering Swarm above for location)
- Grubsong (1 notch): Gain 15% of your Soul meter worth of Soul for each damaging hit you take
Location: The Grubfather gives this charm as a reward for rescuing 10 Grubs

- Grubberfly’s Elegy (3 notches): When at full health, each nail slash produces a beam with a range of about 3 times the normal nail range that does half the damage of a normal nail hit
Location: The Grubfather gives this charm as a reward for rescuing all 46 Grubs
(See Grubsong above for location)
Row 2

- Fragile/Unbreakable Heart (2 notches): Increases maximum health by 2; fragile version will break upon death and needs to be repaired
Location: Fragile version sold by Leg Eater in Fungal Wastes for 350 Geo (or 280 Geo with Defender’s Crest equipped); repair costs 200/160 Geo; converts to unbreakable version if gifted to Divine (part of Grimm Troupe in Dirtmouth) followed by 12,000 Geo cost
- Fragile/Unbreakable Greed (2 notches): Increases Geo amount dropped by common enemies by 25%; fragile version will break upon death and needs to be repaired
Location: Fragile version sold by Leg Eater in Fungal Wastes for 250 Geo (or 200 Geo with Defender’s Crest equipped); repair costs 150/120 Geo; converts to unbreakable version if gifted to Divine (part of Grimm Troupe in Dirtmouth) followed by 9,000 Geo cost
(See Fragile Heart above for location)
- Fragile/Unbreakable Strength (3 notches): Increases regular nail damage by 50%; fragile version will break upon death and needs to be repaired
Location: Fragile version sold by Leg Eater in Fungal Wastes for 600 Geo (or 480 Geo with Defender’s Crest equipped); repair costs 350/280 Geo; converts to unbreakable version if gifted to Divine (part of Grimm Troupe in Dirtmouth) followed by 15,000 Geo cost
(See Fragile Heart above for location)
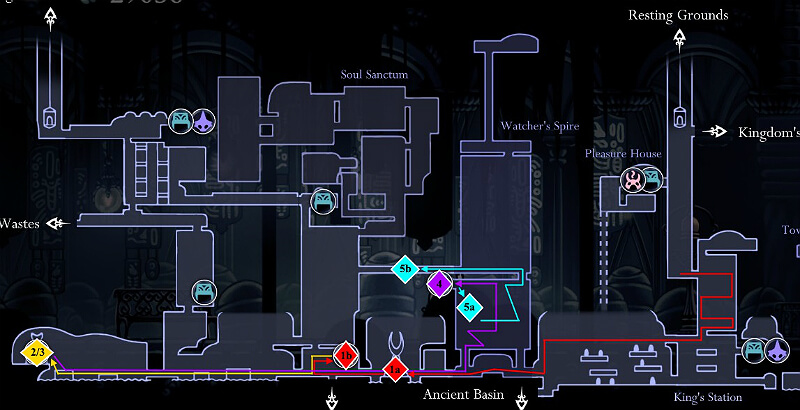
- Spell Twister (2 notches): Decreases Soul cost of casting spells by 33%
Location: Top room of Soul Sanctum, entered by opening in ceiling right before Soul Master boss room
- Steady Body (1 notch): Removes knockback from hitting enemies with nail
Location: Sold by Salubra’s shop (Mothwing Cloak for access) in Forgotten Crossroads for 120 Geo
(See Shaman Stone above for location)
- Heavy Blow (2 notches): Increases the knockback enemies receive when they are hit by your nail
Location: Sold by Sly’s shop in Dirtmouth for 350 geo; requires finding the Shopkeeper’s Key in Crystal Peak
(See Gathering Swarm above for location)
- Quick Slash (3 notches): Increases the slashing speed of your nail
Location: In side room in the bottom right of Kingdom’s Edge; requires Desolate Dive
- Longnail (2 notches): Increases the range of your nail by 15%
Location: Sold by Salubra’s shop (Mothwing Cloak for access) in Forgotten Crossroads for 300 Geo
(See Shaman Stone above for location)
- Mark of Pride (3 notches): Increases the range of your nail by 25%
Location: Inside chest in right side room of Mantis Village which is unlocked after defeating Mantis Lords boss

- Fury of the Fallen (2 notches): When at 1 health, increase regular nail damage by 75%
Location: King’s Pass past fake wall behind pits filled with spikes; either pogo off the spikes with your nail or wait until you have Mantis Claw to re-enter King’s Pass and dash over the spikes
Charms (Part 2)
Row 3

- Thorns of Agony (1 notch): Upon taking a hit, spawns a damaging radial spread of thorns around self
Location: Platforming challenge room in Greenpath; requires Mothwing Cloak
- Baldur Shell (2 notches): Avoid damage while focusing to heal for up to 4 times between resting at benches
Location: Behind a 2 Elder Baldur mini-boss room in the top right of Greenpath; requires Mothwing Cloak
- Flukenest (3 notches): Turns the spell shot (i.e. Vengeful Spirit/Shade Soul) into a swarm of damaging flukes
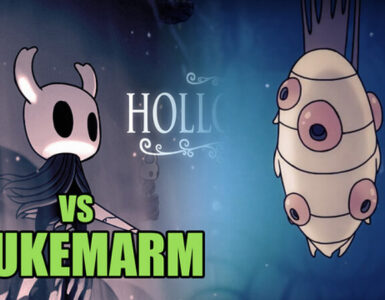
Location: Reward for defeating the Flukemarm boss in the bottom left sub-area of Royal Waterways; access requires Desolate Dive
- Defender’s Crest (1 notch): Creates a damaging aura around you as well as in a short trail behind you
Location: Reward for defeating Dung Defender in the top right of the Royal Waterways
- Glowing Womb (2 notches): Spawn small flying versions of yourself at the cost of some Soul that suicide into nearby enemies
Location: Reward for beating an enemy gauntlet room in the central passage of the Crossroads; requires Crystal Heart
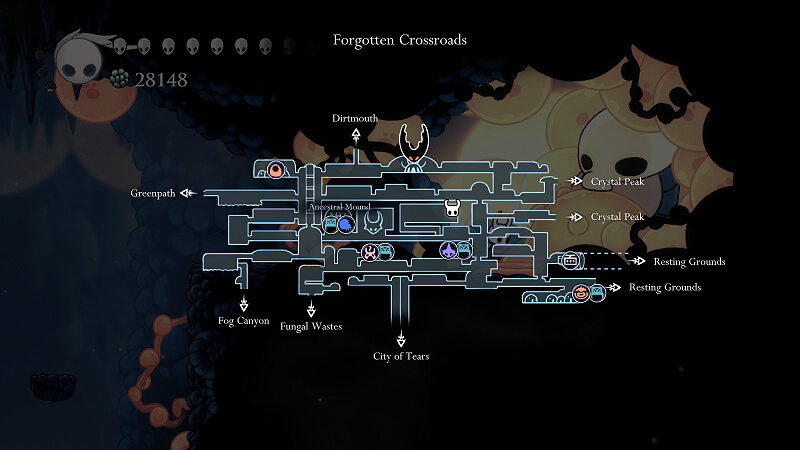
- Quick Focus (3 notches): Focus Soul to heal at twice the normal speed
Location: Sold by Salubra’s shop (Mothwing Cloak for access) in Crossroads for 800 Geo
(See Shaman Stone above for location)
- Deep Focus (4 notches): Focus Soul to heal 2 HP, but at half the normal speed
Location: After laser challenge room behind breakable wall under passage leading to Dirtmouth in Crystal Peak; requires Crystal Heart

- Lifeblood Heart (2 notches): Gain 2 Lifeblood hearts every time you rest at a bench
Location: Sold by Salubra’s shop (Mothwing Cloak for access) in Crossroads for 250 Geo
(See Shaman Stone above for location)
- Lifeblood Core (3 notches): Gain 4 Lifeblood hearts every time you rest at a bench
Location: Behind a door in the Abyss that requires you to have 15 Lifeblood hearts to open; Abyss access requires King’s Brand
- Joni’s Blessing (4 notches): Converts all your health into Lifeblood hearts while increasing the starting bench health; new starting health is your normal max health x 1.5.
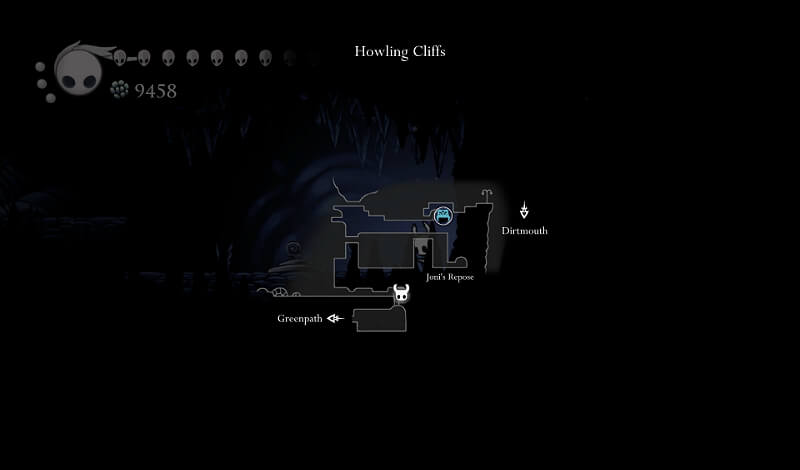
Location: Found in Joni’s Repose in Howling Cliffs after a large dark room; “requires” Lumafly Lantern, but could be navigated blind
Row 4

- Hiveblood (4 notches): Heals the last point of health lost without focusing Soul after a wait period; pacifies bee enemies
Location: Reward for defeating Hive Knight boss; requires Monarch Wings
- Spore Shroom (1 notch): Upon focusing Soul to heal, releases a large damaging cloud around yourself
Location: Bottom right of room near Moss Prophet; requires Mantis Claw
- Sharp Shadow (2 notches): Shade dash through enemies now does nail damage; increases your dash length
Location: Shade dash challenge room below the Deepnest lower tramway station; requires Shade Cloak
- Shape of Unn (2 notches): Allows you to move while focusing Soul to heal
Location: Secret room on the left side of the Lake of Unn in Greenpath; requires Isma’s Tear
- Nailmaster’s Glory (1 notch): Significantly reduces the charge time for Nail Arts
Location: Basement of Sly’s shop in Dirtmouth after collecting the 3 Nail Arts
(See Gathering Swarm above for location)
- Weaversong (2 notches): Spawns 3 weaverlings that deal low damage to enemies
Location: Upper level balcony of Weaver’s Den; entrance is behind a fake wall in Deepnest

- Dream Wielder (1 notch): Doubles Soul gained per Dream Nail of enemies and decreases its charge time; increases the drop rate of Essence from random enemies
Location: Reward from the Seer in Resting Grounds for 500 Essence

- Dreamshield (3 notches): Spawns a shield that circles around you blocking projectiles and dealing nail damage to enemies
Location: Behind fake wall opposite of Resting Grounds stag station
- Grimmchild (2 notches) or Carefree Melody (3 notches): Grimmchild is a flying companion that shoots projectiles that do increasing damage with Grimm Troupe Ritual progression (charm unlocks Ritual progression); Carefree Melody gives a chance of avoiding damage from enemies
Location: Grimmchild gifted by Grimm in Dirtmouth (summoning Troupe requires Dream Nail and Mantis Claw); lost if Grimm Troupe banished, but replaced by Carefree Melody gifted by new bug in Dirtmouth

- Kingsoul (5 notches): Slowly refills your Soul; when equipped opens a hidden sub-area of the Abyss that when completed transforms the charm into the Void Heart (0 notches). Void Heart no longer refills your Soul but opens up the alternate endings (Note: Void Heart cannot be unequipped)
Location: Half is given to you by the White Lady past the Traitor Lord boss in Queen’s Gardens; requires Shade Cloak

The other half is the reward for completing the White Palace, which is accessed by using the Awoken Dream Nail on the dead Kingsmould in the Palace Grounds (Ancient Basin); requires 1800 Essence and Monarch Wings
Grubs (Part 1)
There are 46 total Grubs in the game which you can free by hitting their jars with your nail. Returning to the Grubfather after freeing Grubs nets you increasing geo rewards. Scattered between the geo rewards are also some collectible rewards, several of which count towards completion:
- 5 = Mask Shard
- 10 = Grubsong charm
- 16 = Rancid Egg
- 23 = Hallownest Seal relic
- 31 = Pale Ore
- 38 = King’s Idol relic
- 46 = Grubberfly’s Elegy charm
Grubfather Location:

Listed below are the requirements and locations of all 46 grubs in the game. Note that the requirements do not include the abilities which are required to access the overall area.
5 Grubs total
Requirements:
- None
- None (use nail pogo)
- None (behind breakable wall)
- None (guarded by Husk Guard)
- Mothwing Cloak (or kite a Vengefly and nail pogo)
Locations:
4 Grubs total
Requirements:
- None (cut down platform behind fake wall)
- None (cut down several platforms)
- None (guarded by Moss Knight)
- Mothwing Cloak (nail pogo off Duradoos; wait until Crystal Heart to avoid nail pogoing; Isma’s Tear nullifies danger of acid)
Locations:
2 Grubs total
Requirements:
- None (use nail pogo on bouncy mushrooms)
- Mantis Claw (use nail pogo on bouncy mushrooms over acid; Isma’s Tear nullifies danger of falling into acid)
Locations:
8 Grubs total (3 Grubs together in Tower of Love)
Requirements:
- None (guarded by Winged Sentry)
- Desolate Dive (in Soul Sanctum room after beating Soul Master boss)
- None (need access to right side of City; guarded by Great Husk Sentry, but can quit to menu after breaking jar to skip fight)
- None (need access to right side of City)
- Monarch Wings (need access to right side of City; guarded by Great Husk Sentry & Lance Sentry; can “skip” Wings by nail pogo off background vase on ground level)
- Love Key (need access to right side of City; key found in Queen’s Gardens; Grub preceded by The Collector boss)
- (Same as #6)
- (Same as #6)
Locations:
7 Grubs total
Requirements:
- Mantis Claw (spike conveyer challenge)
- Crystal Heart
- Mantis Claw (crusher challenge)
- Crystal Heart (mimic in front of breakable wall, real one is behind the wall)
- Mantis Claw (crusher challenge)
- Monarch Wings (dash/super dash challenge)
- Lumafly Lantern & Crystal Heart & Desolate Dive (flipping platform challenge in Crystallised Mound; can skip the lantern if willing to navigate the dark room before the Mound blind)
Locations:
1 Grub total
Requirements:
- Desolate Dive (behind breakable ceiling)
Locations:
3 Grubs total
Requirements:
- None (behind breakable wall)
- Isma’s Tear (swim under Isma in Isma’s Grove for vertical passage)
- Tram Pass & Crystal Heart & Monarch Wings (access Kingdom’s Edge via lower Tramway to enter from right side of long acid passage; cancel super dash below opening in ceiling; Isma’s Tear allows you to directly swim in acid instead of super dashing; can “skip” Wings if you nail pogo off Hwurmp)
Locations:

5 Grubs total
Requirements:
- Crystal Heart (behind breakable wall)
- Crystal Heart
- None (behind breakable wall; 3 mimics also in room [real one is 3rd from left])
- None (behind Stalking Devout at top of room; spike pit trap before Devout has secret side passage that goes under the Devout)
- None (inside Beast’s Den)
Locations:
Grubs (Part 2)
2 Grubs total
Requirements:
- Desolate Dive (guarded by Lesser Mawlek)
- Monarch Wings (uses dash -> double jump in midair to reach)
Locations:
4 Grubs total
Requirements:
- Tram Pass & Monarch Wings (access Kingdom’s Edge via lower tramway; opening in ceiling of room before Hive Queen Vespa; can nail pogo off bees to skip Wings)
- Tram Pass & Desolate Dive & Isma’s Tear (access Kingdom’s Edge via lower tramway; breakable floor before shortcut into rest of Kingdom’s Edge; swim through acid pool to enter side room of Hive)
- Desolate Dive (past a Great Hopper spiked floor challenge room)
- None (behind breakable wall; guarded by Primal Aspid in room with floor spikes)
Locations:
1 Grub total
Requirements:
- None
Locations:
1 Grub total
Requirements:
- Isma’s Tear or Shade Cloak (abilities used to access right side of area; can “skip” the abilities listed with precise Crystal Heart super dash in Crossroads acid room; access Grub by using super dash from ledge on right side of room)
Locations:
3 Grubs total
Requirements:
- None (behind fake wall in passage above enemy gauntlet room)
- None (behind fake ceiling leading to vertical passage)
- Crystal Heart (Monarch Wings highly recommended for killing Mossfly enemies and final set of jumps)
Locations:
Miscellaneous Important Locations
The three dreamers form the seal on the Hollow Knight final boss in the Black Egg Temple and need to be put to rest (requires the Dream Nail) in order to complete the game. Each Dreamer put to rest gives 1% completion.
- Lurien the Watcher (“requires” Monarch Wings, can use nail pogo to perform skip; guarded by Watcher Knight boss)
- Monomon the Teacher (“requires” Isma’s Tear or Shade Cloak, can perform somewhat precise super dash in Forgotten Crossroads acid room as skip; guarded by Uumuu boss)
- Herrah the Beast (“requires” Lumafly Lantern, but if you’re brave you can navigate several dark rooms in Deepnest without the lantern to reach Distant Village)
- Simple Key (Sly’s shop [950 Geo] / City Storerooms / Ancient Basin / Colosseum of Fools)
[Simple Locks: Royal Waterways entrance in City of Tears / Pleasure House entrance in City of Tears / Godseeker in Royal Waterways / Jiji’s cave in Dirtmouth] – One key needed for 112% completion (Godseeker), but it is recommended to pick up at least two so that a different key can be used to easily access the Royal Waterways


- Shopkeeper’s Key (Crystal Peak; requires Mantis Claw; unlocks half of Sly’s inventory)
- Elegant Key (Sly’s shop; requires Shopkeeper’s Key and costs 800 Geo; used to unlock door in Soul Sanctum for Shade Soul)
- Tram Pass (Failed Tramway in Deepnest; lower tramway is the only first-time access point for the bottom left section of Kingdom’s Edge which includes the Hive)
- Love Key (Queen’s Gardens; requires Isma’s Tear; unlocks Tower of Love with the Collector and 3 Grubs)
The Colosseum is an enemy arena with many waves of harder variants of enemies you find over the rest of Hallownest as well as some mini-bosses and bosses. There are three trials: Trial of the Warrior (Charm Notch), Trial of the Conqueror (Pale Ore), and Trial of the Fool which give 1% completion each.

The Godhome is a dream realm area in which you face sets of boss rushes (called “Pantheons”). There are five pantheons: Pantheon of the Master, Pantheon of the Artist, Pantheon of the Sage, Pantheon of the Knight, and Pantheon of Hallownest. The first four pantheons give 1% completion each, while the last pantheon gives the “Embrace the Void” ending and achievement. The first four pantheons consist of 10 bosses each while the fifth pantheon consists of 42 bosses (all bosses from the first four pantheons + Nightmare King Grimm + Radiance). Every five bosses in a pantheon you (usually) get a hot spring and bench (does NOT count as a respawn checkpoint). (Note: Bindings do not count towards completion.)
Godhome is accessed by using the Dream Nail on the Godseeker, who you have to free from a coffin using a Simple Key (access to coffin requires Desolate Dive). Freeing the Godseeker drops the Godtuner, which immediately awards 1% completion and keeps track of how many pantheons you’ve completed.
The bosses for the five pantheons are listed below (all underlined bosses must be defeated in the overworld to access the pantheon).
Pantheon of the Master:
- Vengefly King
- Gruz Mother
- False Knight
- Massive Moss Charger
- Hornet (Greenpath)
- Gorb
- Dung Defender
- Soul Warrior (Soul Sanctum mini-boss)
- Brooding Mawlek
- Nailmaster Oro -> Brothers Mato & Oro
Pantheon of the Artist:
- Xero
- Crystal Guardian
- Soul Master
- Oblobbles (Trial of the Conquerer boss)
- Mantis Lords
- Marmu
- Nosk
- Flukemarm
- Broken Vessel
- Paintmaster Sheo
Pantheon of the Sage:
- Hive Knight
- Elder Hu
- The Collector
- God Tamer (Trial of the Fool boss)
- Troupe Master Grimm
- Galien
- Grey Prince Zote
- Uumuu
- Hornet (Kingdom’s Edge)
- Great Nailsage Sly
Pantheon of the Knight:
- Enraged Guardian (Crystal Guardian v2)
- Lost Kin
- No Eyes
- Traitor Lord
- White Defender
- Failed Champion
- Markoth
- Watcher Knight
- Soul Tyrant
- Pure Vessel
Pantheon of Hallownest (no completion percentage; requires Void Heart):
- Vengefly King
- Gruz Mother
- False Knight
- Massive Moss Charger
- Hornet (Greenpath)
- Gorb
- Dung Defender
- Soul Warrior
- Brooding Mawlek
- Brothers Oro & Mato
- Xero
- Crystal Guardian
- Soul Master
- Oblobbles
- Sisters of Battle
- Marmu
- Flukemarm
- Broken Vessel
- Galien
- Paintmaster Sheo
- Hive Knight
- Elder Hu
- The Collector
- God Tamer
- Troupe Master Grimm
- Watcher Knight
- Uumuu
- Nosk (Winged)
- Great Nailsage Sly
- Hornet (Kingdom’s Edge)
- Enraged Guardian
- Lost Kin
- No Eyes
- Traitor Lord
- White Defender
- Soul Tyrant
- Markoth
- Grey Prince Zote
- Failed Champion
- Nightmare King Grimm
- Pure Vessel
- Absolute Radiance
(8 notches can be found for a max of 11 notches; NOT required for 100%)
- Salubra’s shop (4 notches for 120, 500, 900, 1400 Geo; requires 5, 10, 18, and 25 charms to unlock)
- Fungal Wastes (2 Shrumal Ogres mini-boss room)
- Fog Canyon (exploding egg platforming challenge room)
- Troupe Master Grimm boss fight (Dirtmouth, 6 flame Grimmchild)
- Colosseum of Fools (Trial of the Warrior)
- Relic Seeker Lemm: Buys relics for Geo (Wanderer’s Journal = 200 Geo; Hallownest Seal = 450 Geo; King’s Idol = 800 Geo; Arcane Egg = 1200 Geo)
- Confessor Jiji (Normal mode) / Steel Soul Jinn (Steel Soul mode): Cave is unlocked by a Simple Key; Jiji summons your Shade to her cave at the cost of a Rancid Egg; Jinn trades 300-450 Geo for each Rancid Egg you give her
- Tuk (Normal mode only): Behind a breakable wall in the top right of the first room of Royal Waterways when entering from the Simple Key entrance; sells you a rancid egg for 80-100 Geo (when the rancid egg total in your inventory hits 80, eggs sold by Tuk no longer add to the total)
Useful Skips (Glitchless)
While the normal means of entering the Beast’s Den is to sit on the bench and let yourself get trapped, there is a very narrow vertical passage in the ceiling of the entrance room near the right wall that can be reached with a combination of a dash (or super dash) & double jump:
By using this secret, you can avoid passing through a good portion of the Beast’s Den, with only one Stalking Devout blocking your way to the Dreamer (Herrah the Beast) and the Grub.
(Note: If you slay Herrah without entering the Den by being trapped in the entrance room, you will be permanently locked out of a Hallownest Seal relic [relics don’t count towards completion].)
After climbing up the vertical passage, head left and break down the wall for a bench (no trap this time). Head left and up from the bench until you can’t go any further up, then head right (you’ll need to kill a Stalking Devout here) for Herrah. To the right of Herrah, drop down to the bottom and then head right and up for the Grub.
See the following videos for skips that considerably shorten the White Palace:
Note: Two of the skips in the first video were patched out (skipping the entire right challenge area using a precise double jump [0:07] and using Dash Slash to hit a lever on the other side of a gate [1:50]). A skip which can be performed in the right challenge area (since it can’t be completely skipped anymore) is shown in the second video.
For a full playthrough of the White Palace which uses all the currently available skips (has a completion time of about 5 minutes) see this video:
Additionally, for a full playthrough of the White Palace without skips and without nail bouncing (to provide a reference point for where the skips are located relative to the “regular” route) see this video:
Inside the exploding egg platforming challenge room for the charm notch, there is a useful skip you can perform if you have the dive spell and have enough Soul to use two spells. After the first vertical climb past some eggs and two big jellyfish enemies, you’ll find yourself at this location:
Normally at this point you’d head left and be forced to perform several precise dashes between exploding eggs to circle around the room. However, if you have the dive spell you can take advantage of the fact that you’re invincible during the dive and dive into the shortcut in the middle of the room:
Follow up the dive spell with a fireball spell to the left to clear the remainder of the shortcut passage. From there, just go down and left to the charm notch pick-up location:
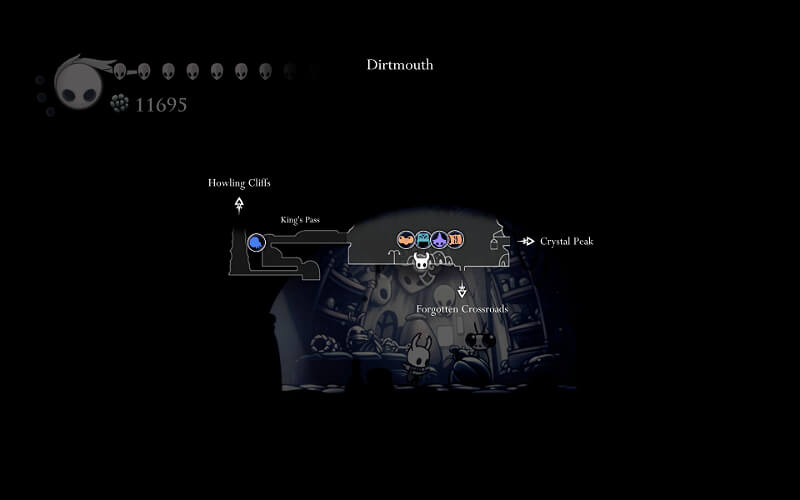
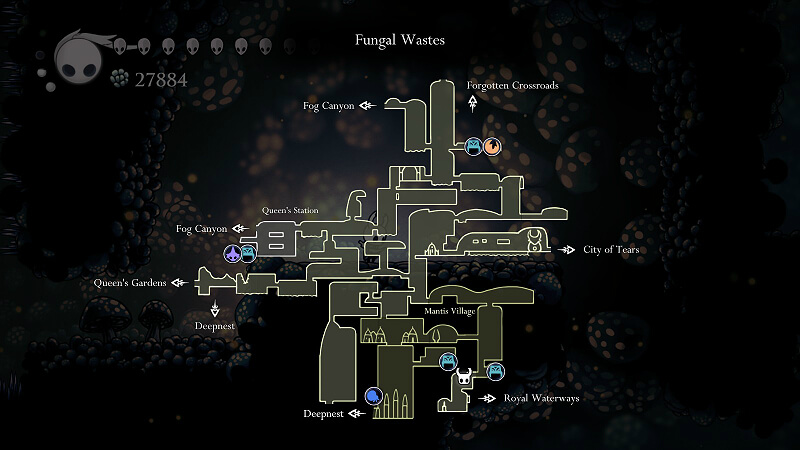
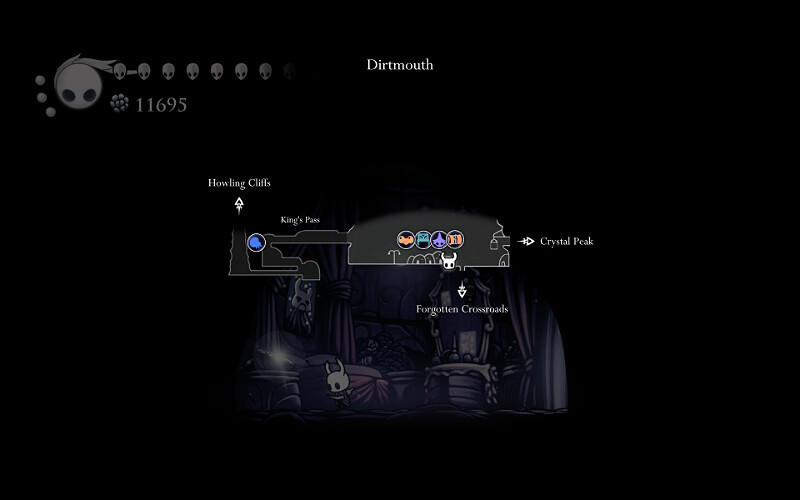
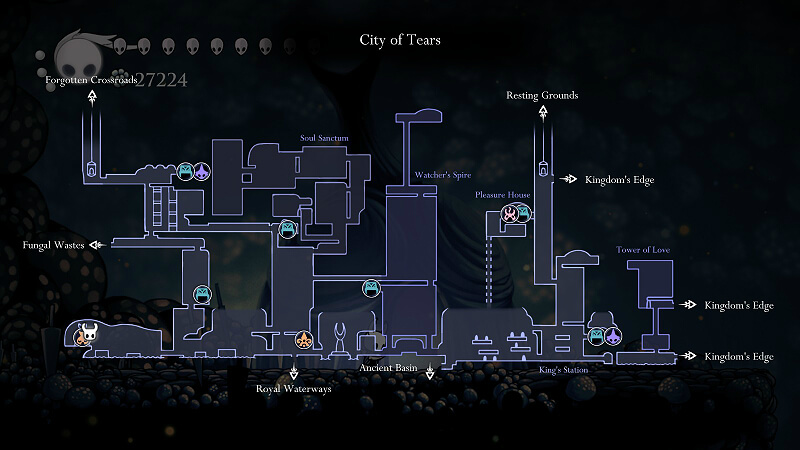
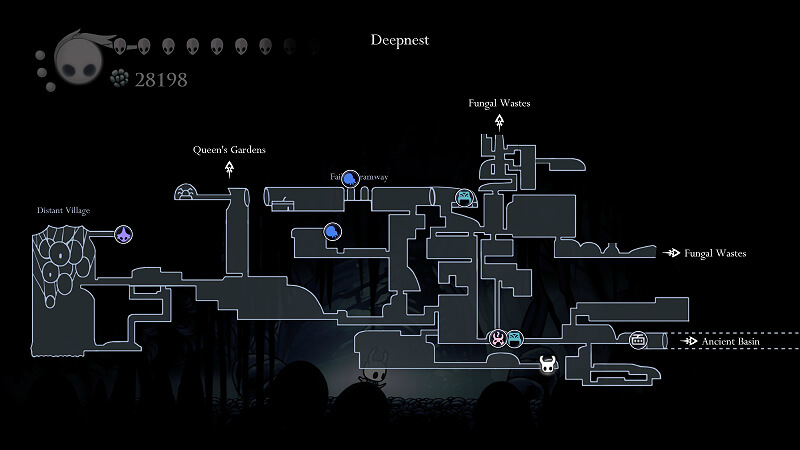
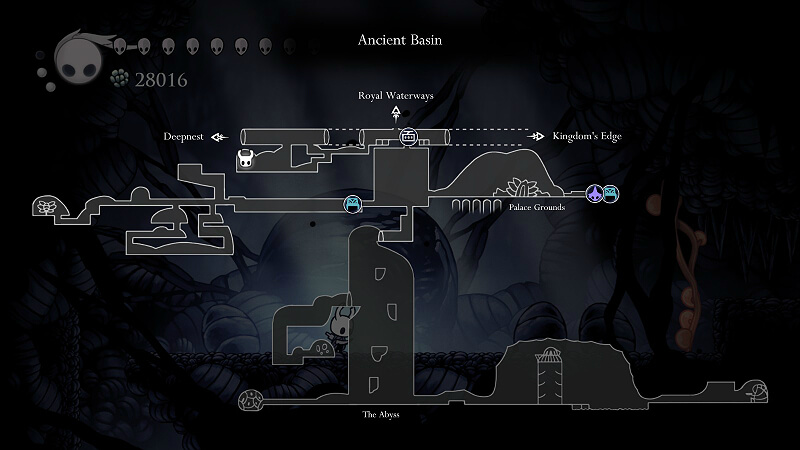
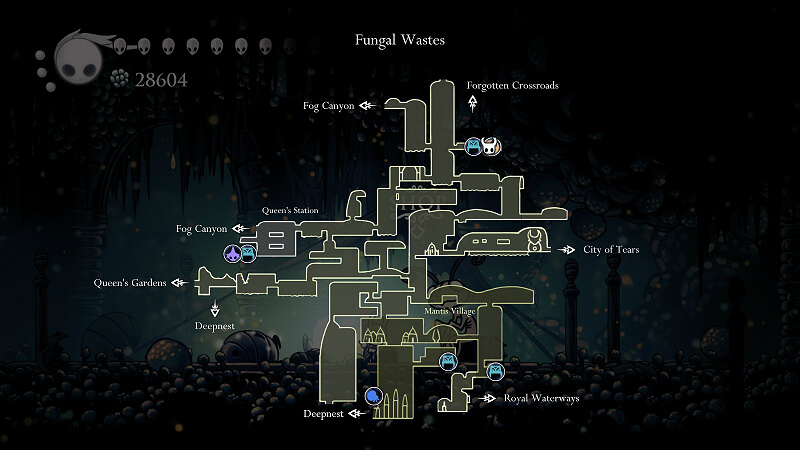
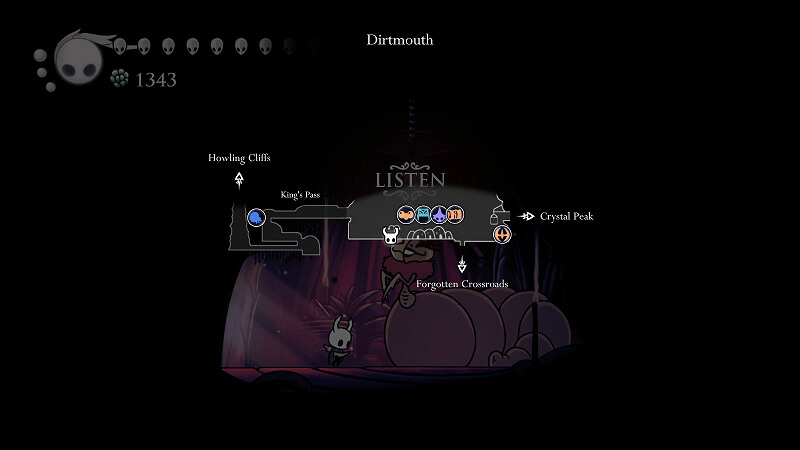
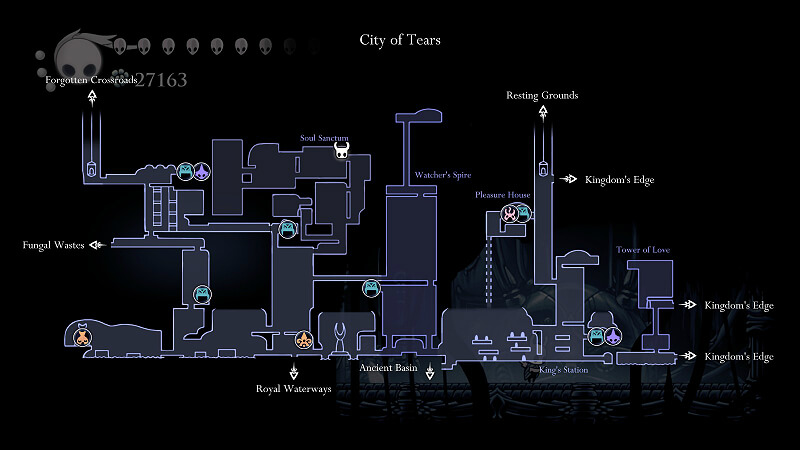
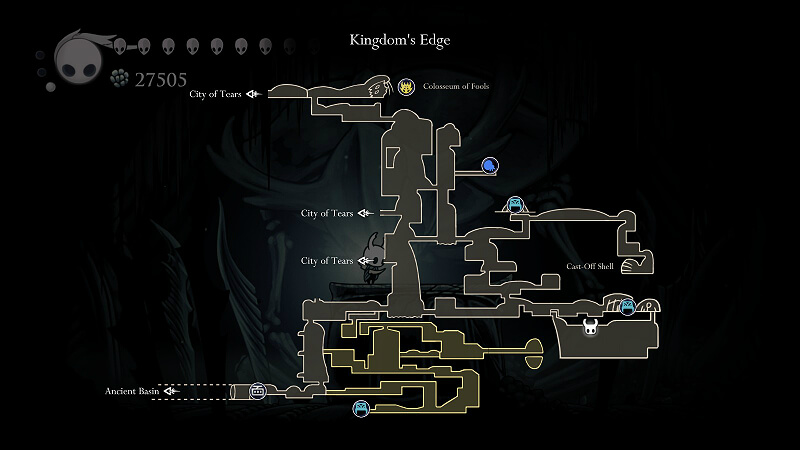
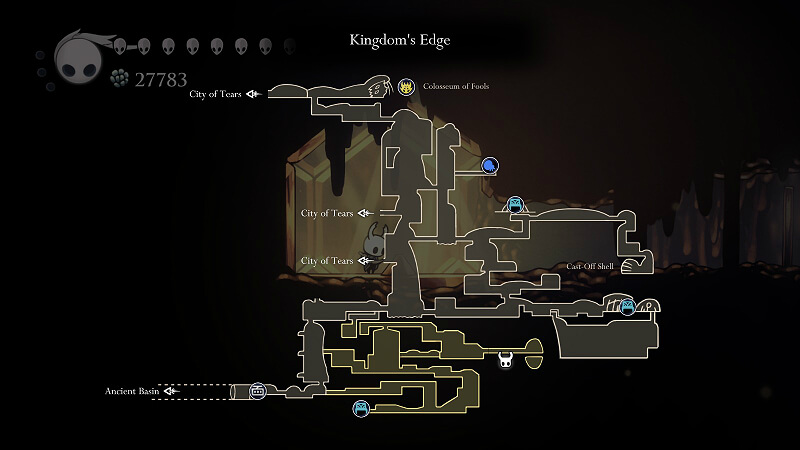
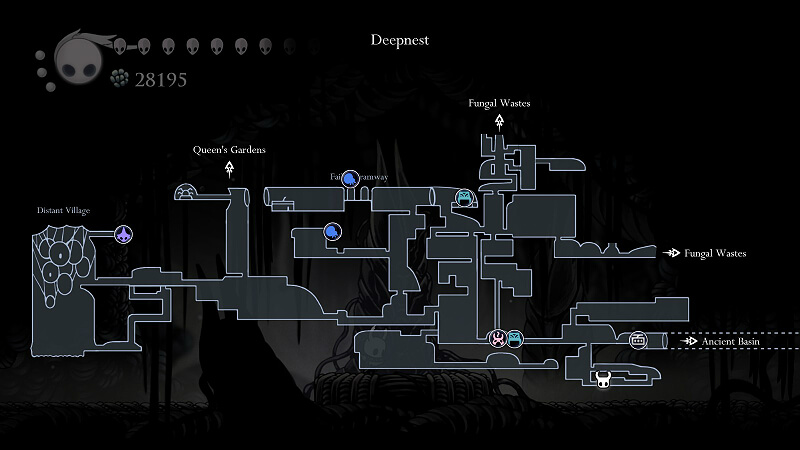
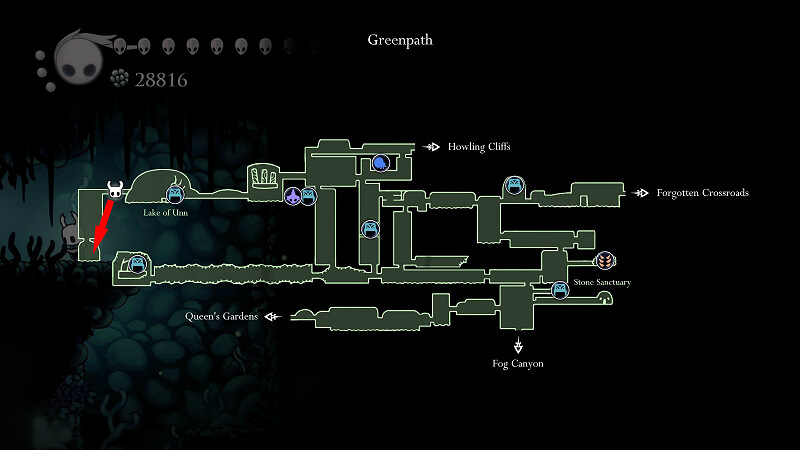
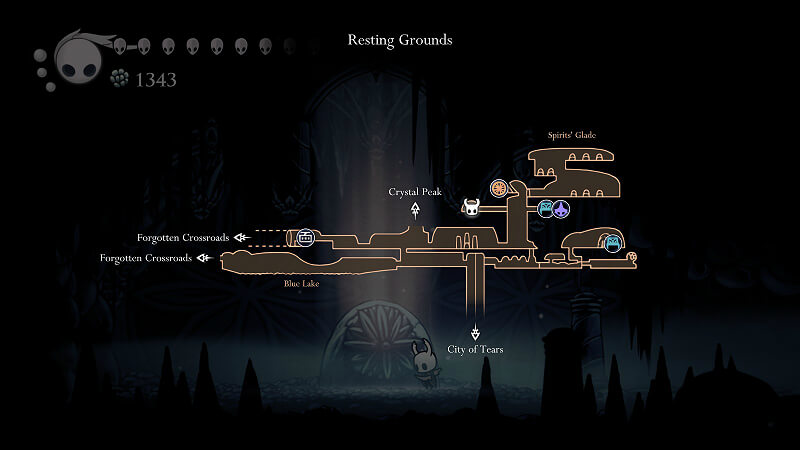
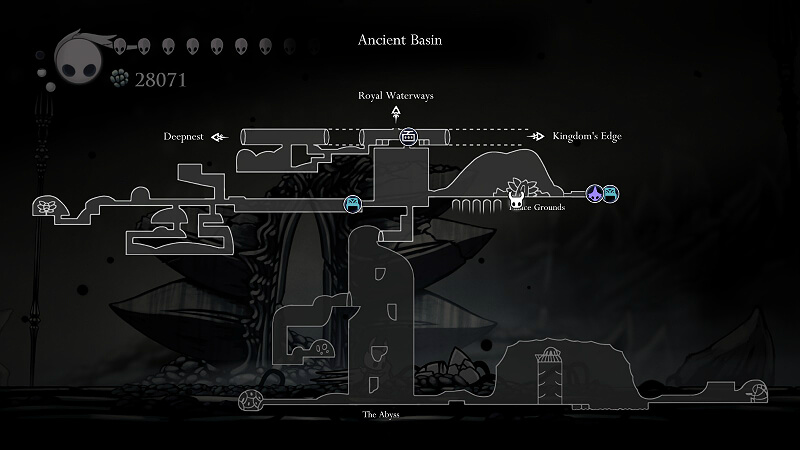
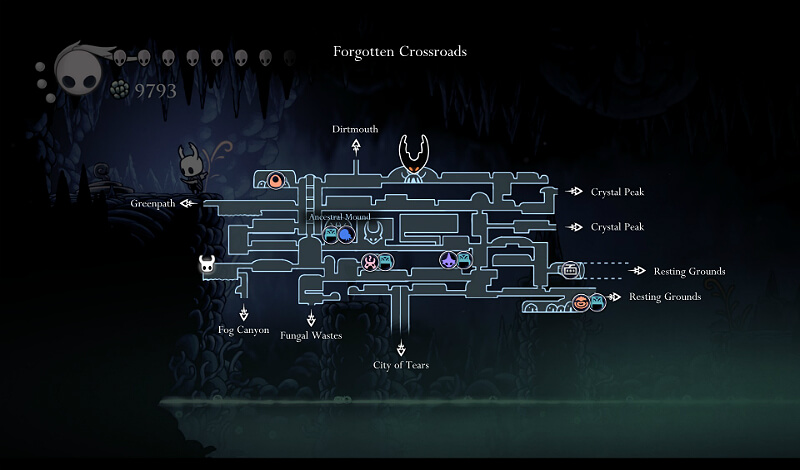
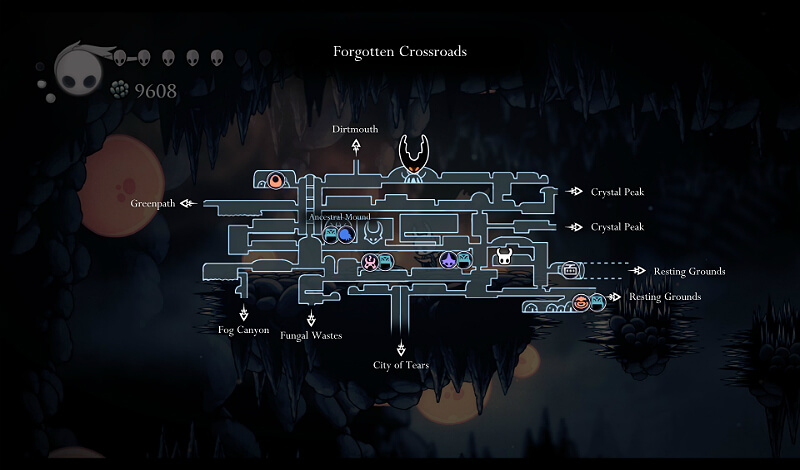
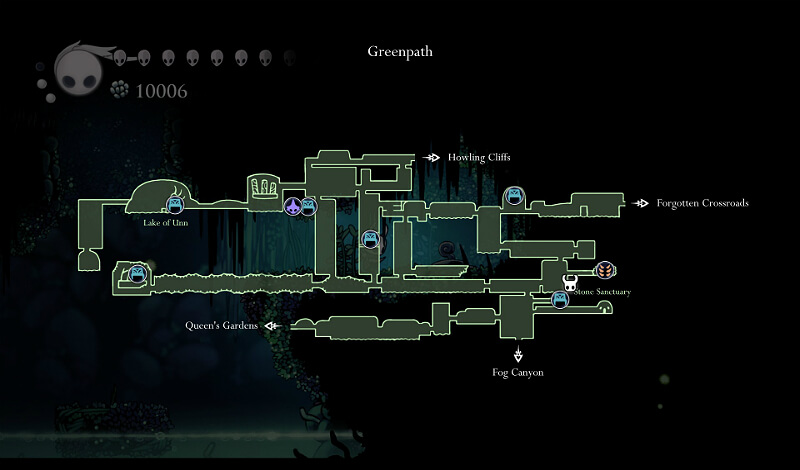
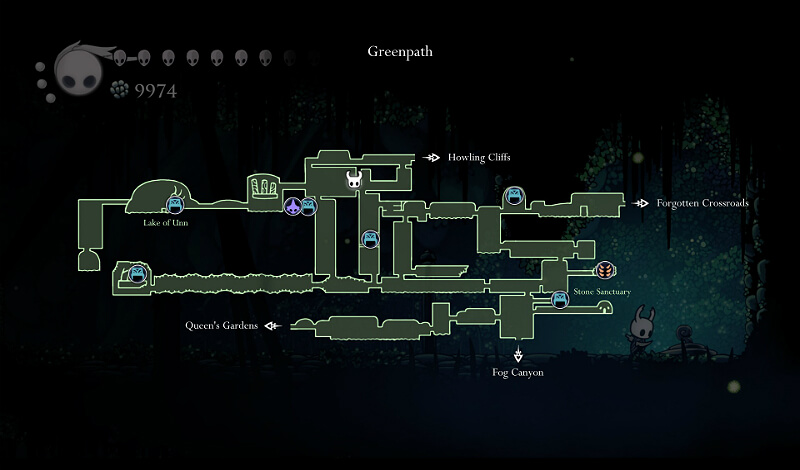
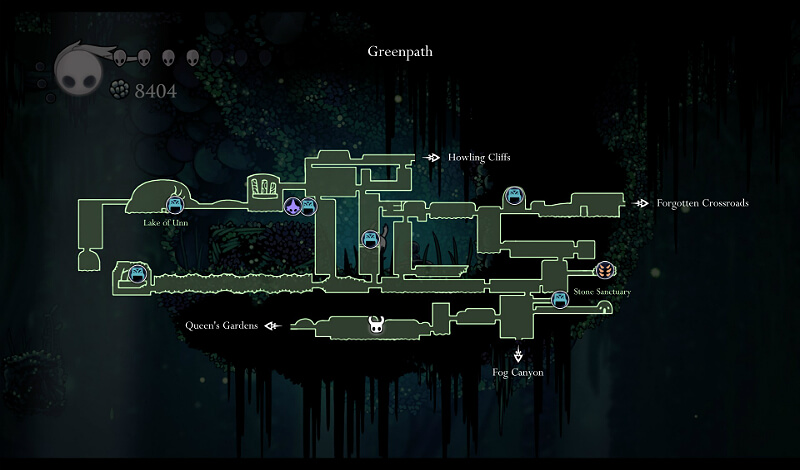
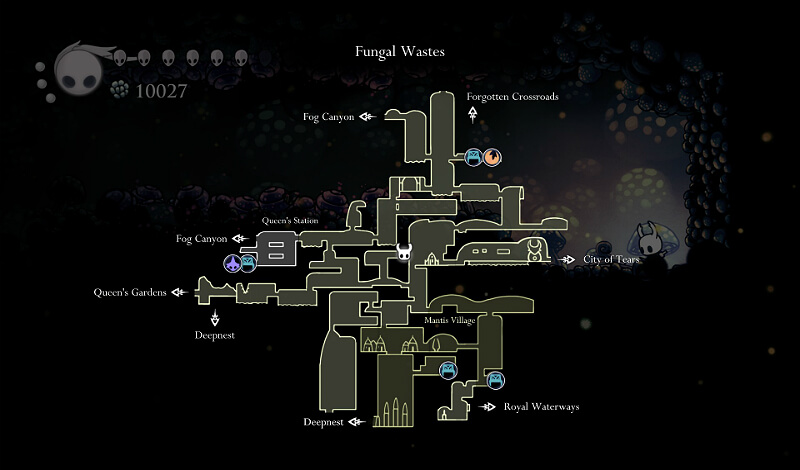
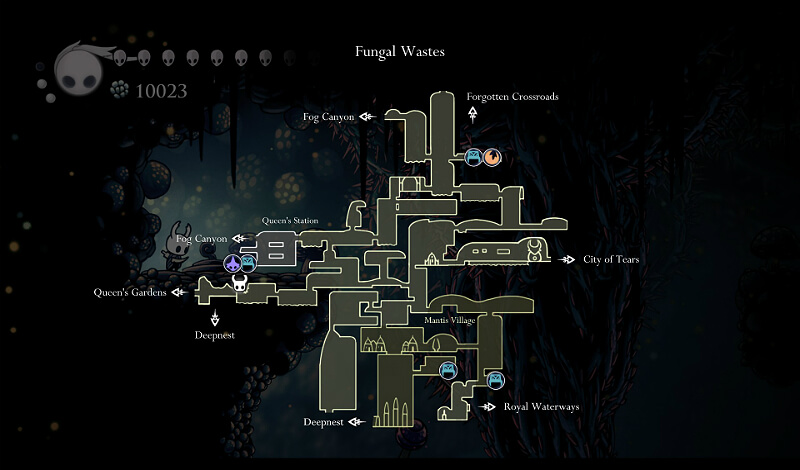
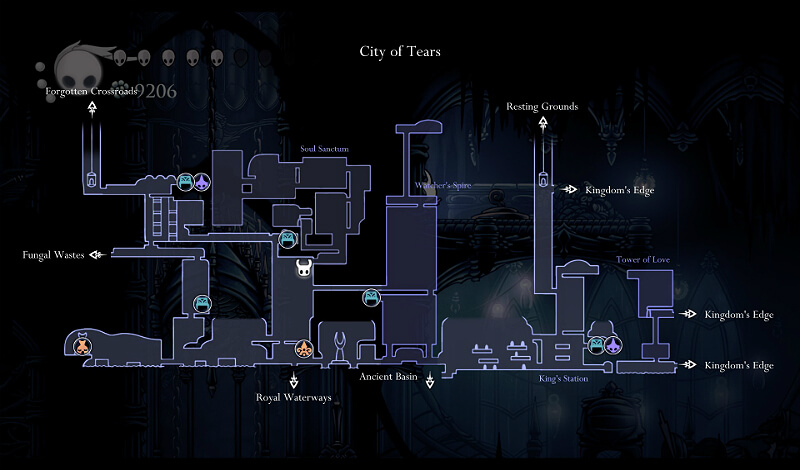
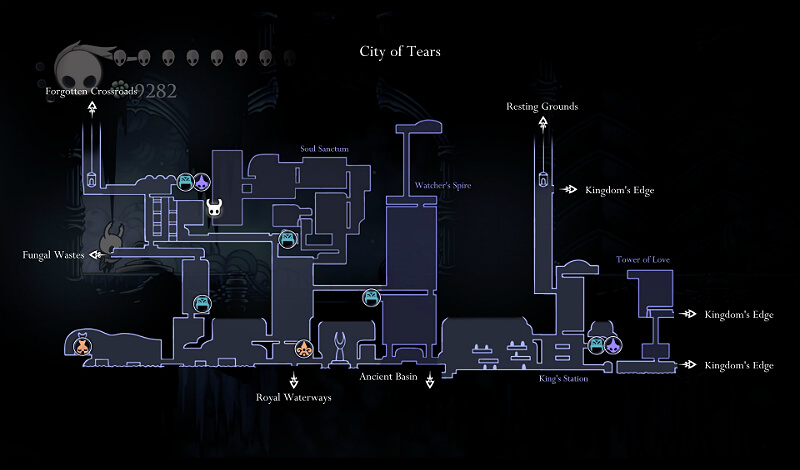
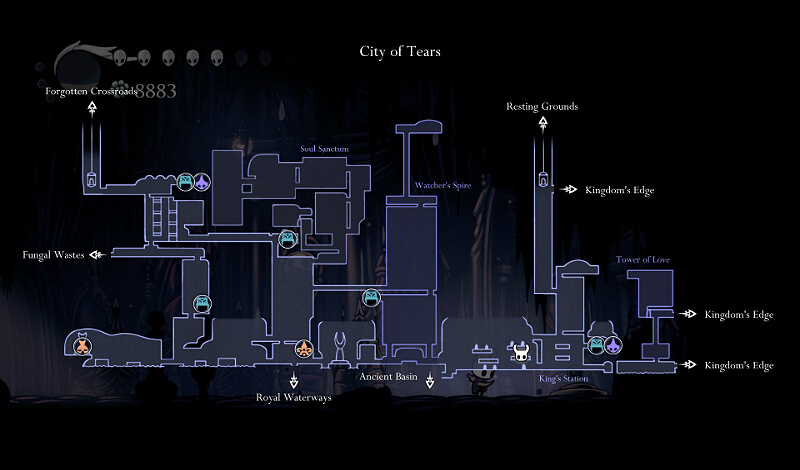
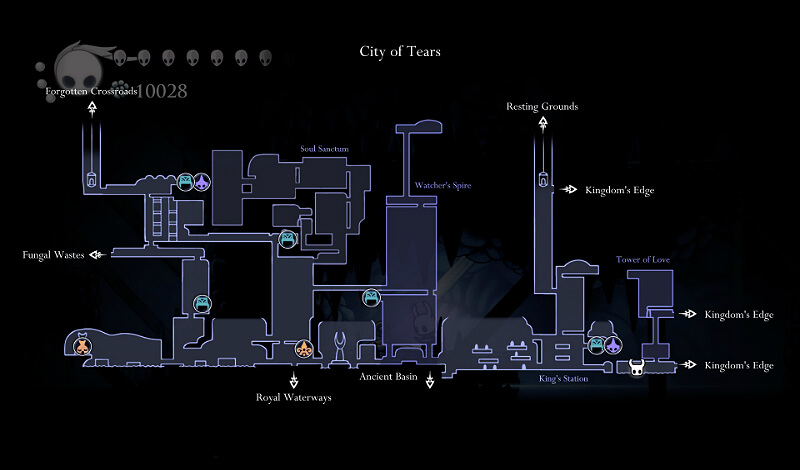
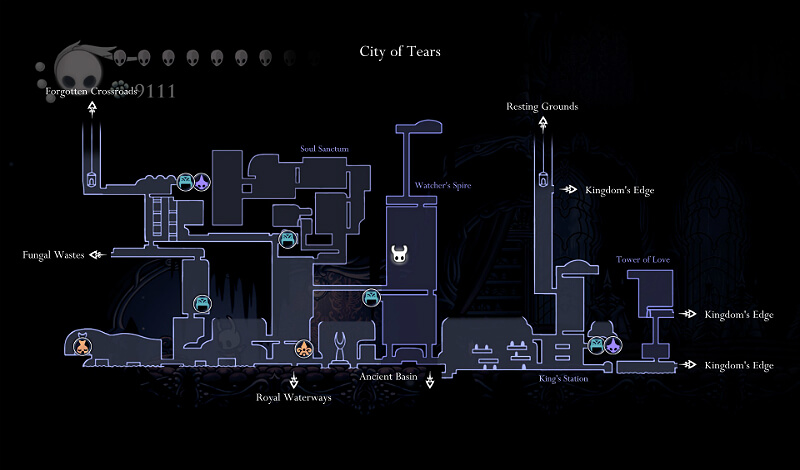
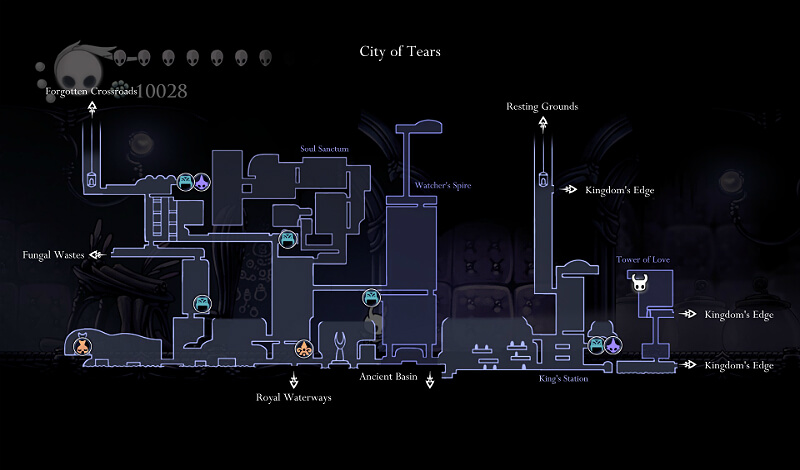
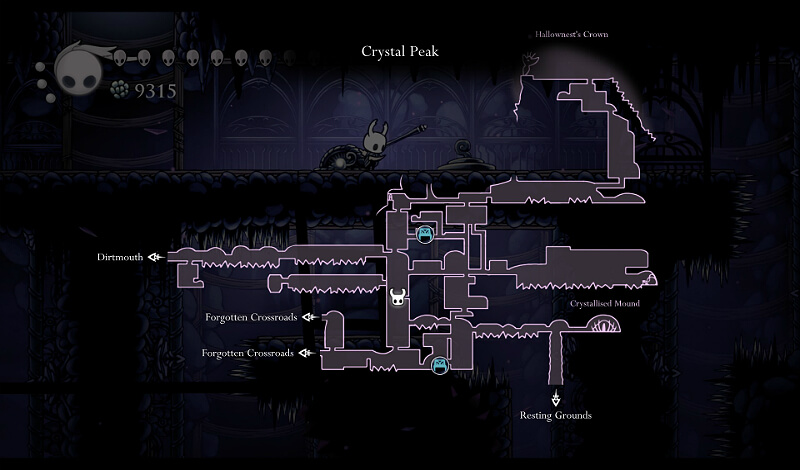
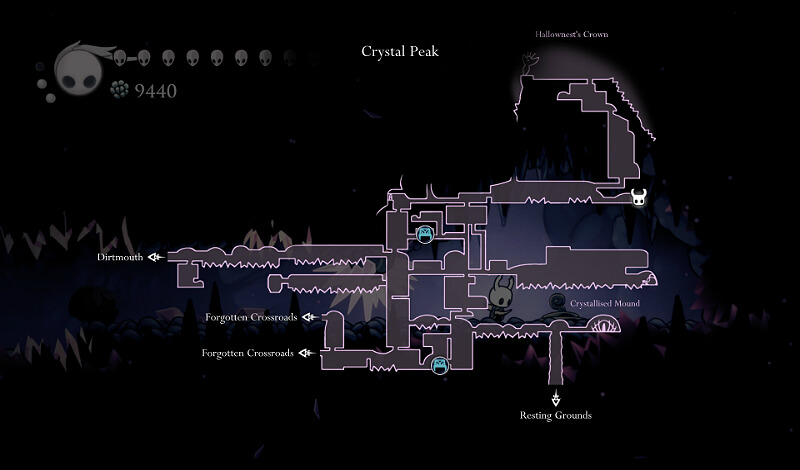
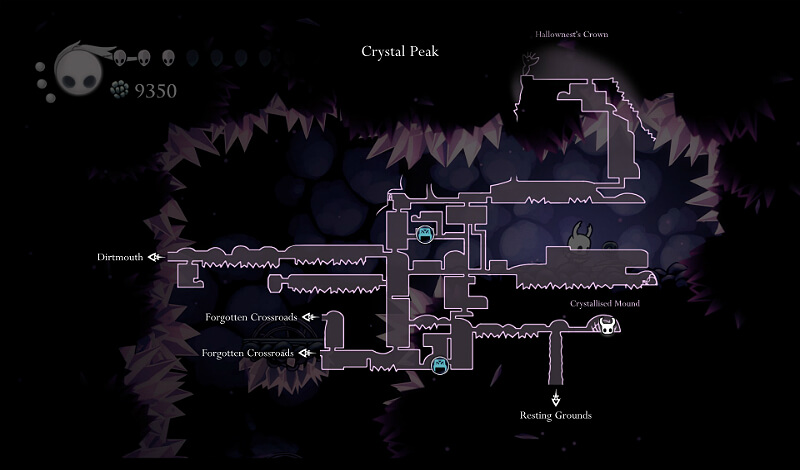
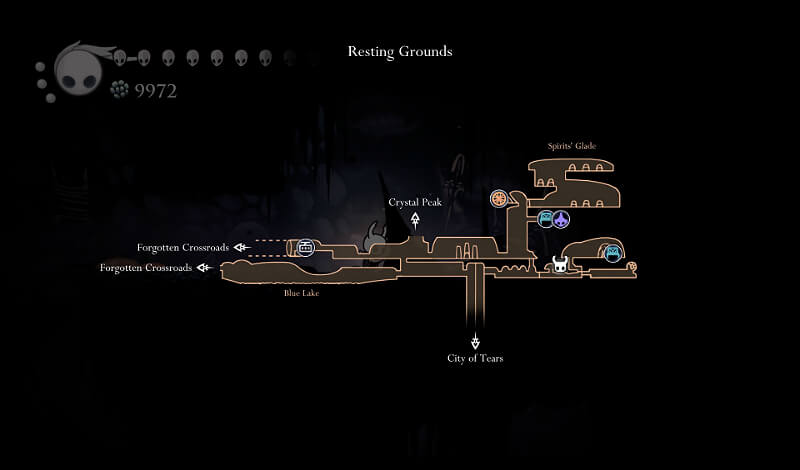
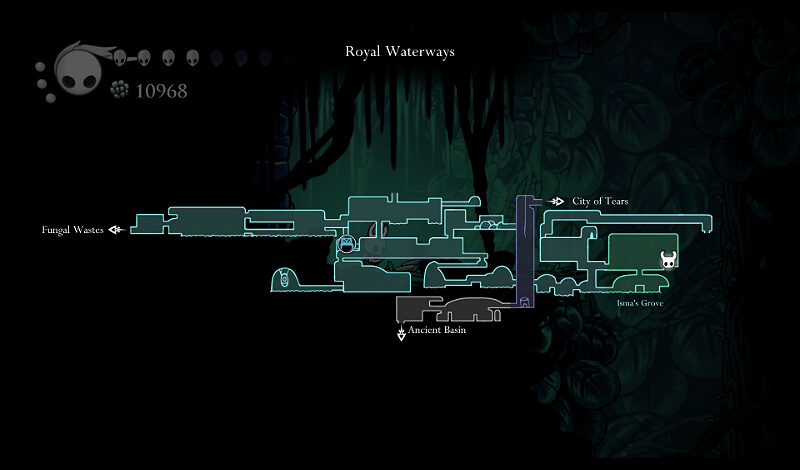
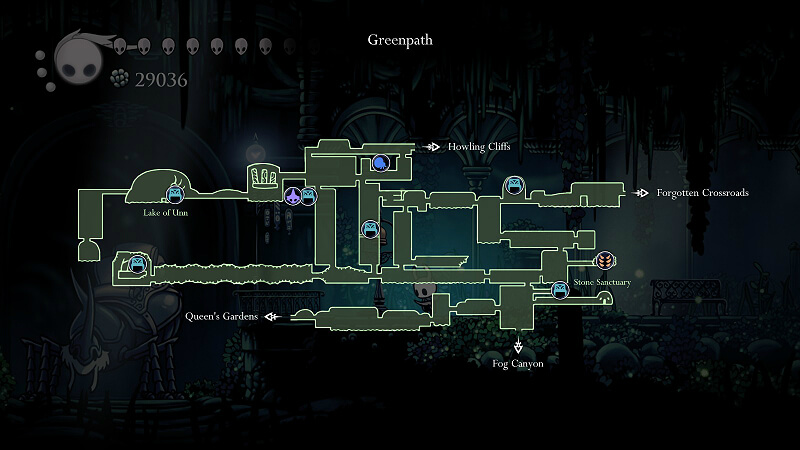
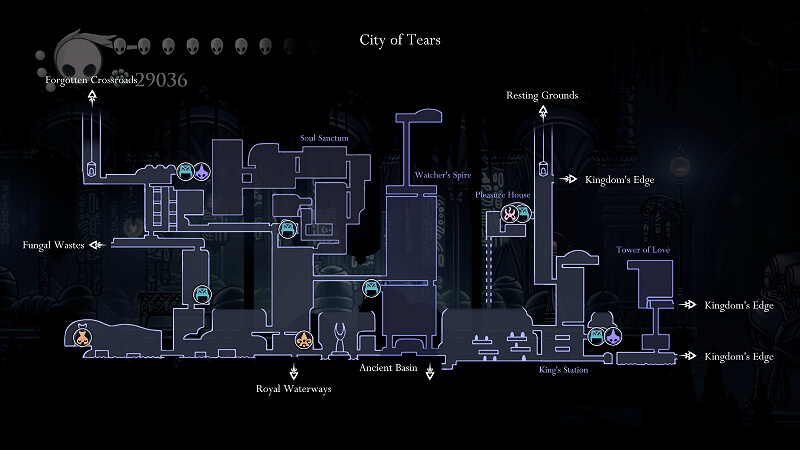
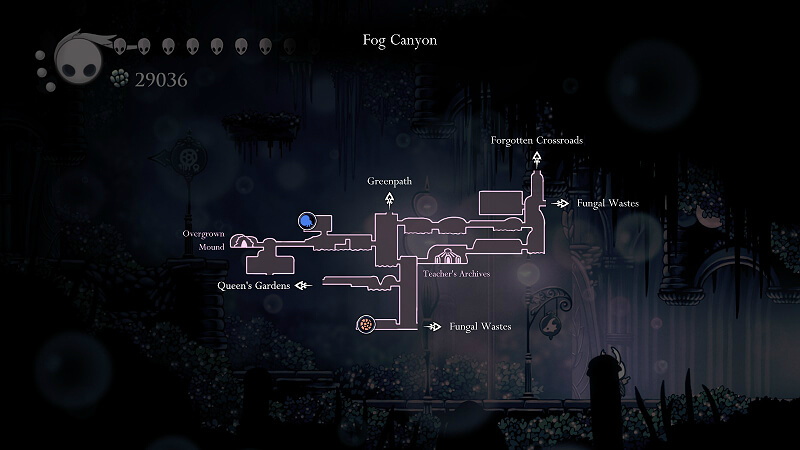
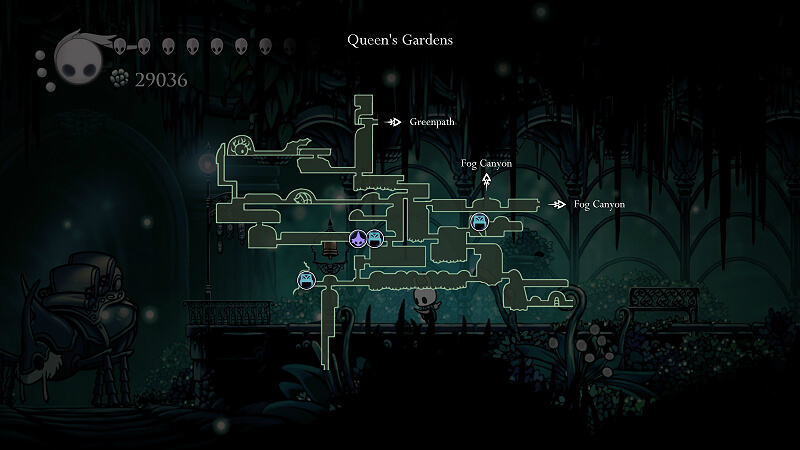
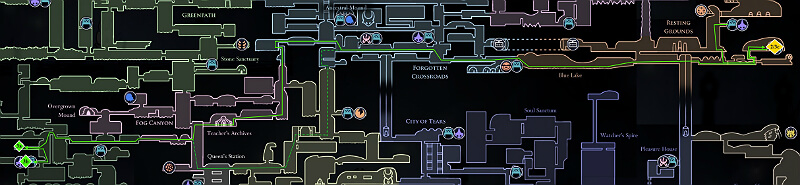
Regions of Hallownest (Maps)
Shown below are the completely mapped out
areas of Hallownest as well as an overall map
of the entirety of the kingdom. Requirements to
enter/fully explore each area are also listed.
Note: Only permanent pins are shown on the map
(i.e. Warrior’s Grave, Whispering Root, Grub,
and Dreamer pins are not shown).
Overall Hallownest Map
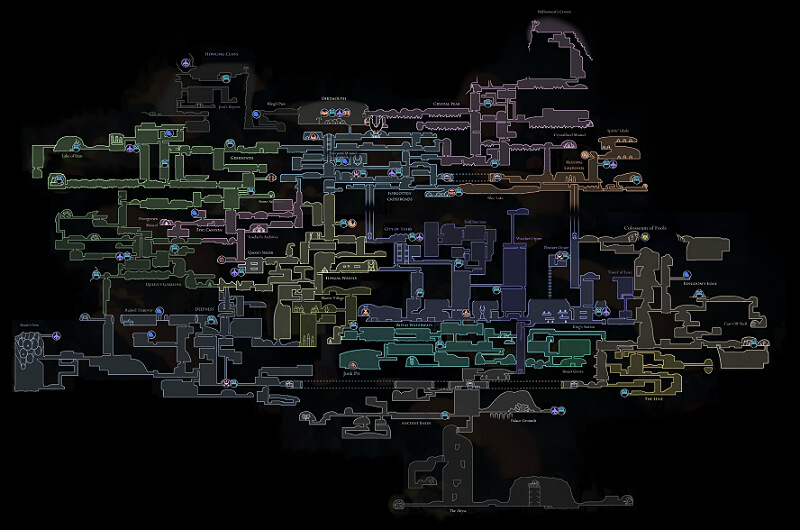
For a complete map which also shows the locations of all the major collectibles directly on the map, please refer to this excellent map guide: Link
Additionally, an interactive map of Hallownest is available at this website: Link
Entry requirements: None
Full exploration requirements: Mantis Claw
Entry requirements: None
Full exploration requirements: Lumafly Lantern & Desolate Dive & Isma’s Tear & Monarch Wings
Entry requirements: Vengeful Spirit
Full exploration requirements: Lumafly Lantern & Isma’s Tear
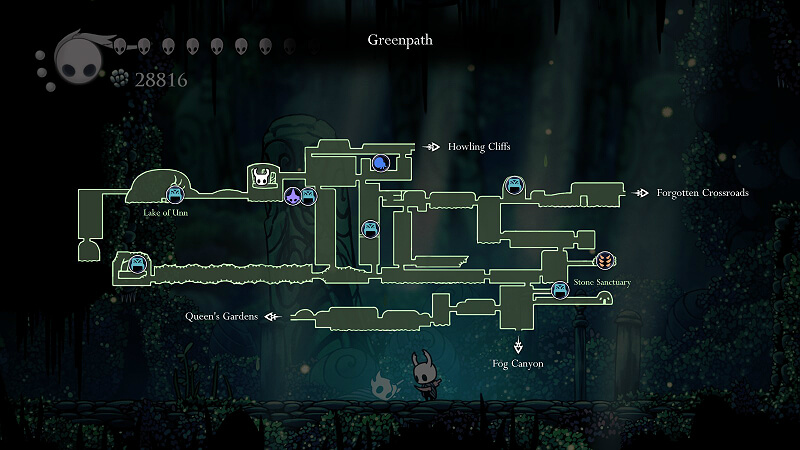
Entry requirements: Mothwing Cloak
Full exploration requirements: Isma’s Tear & Monarch Wings
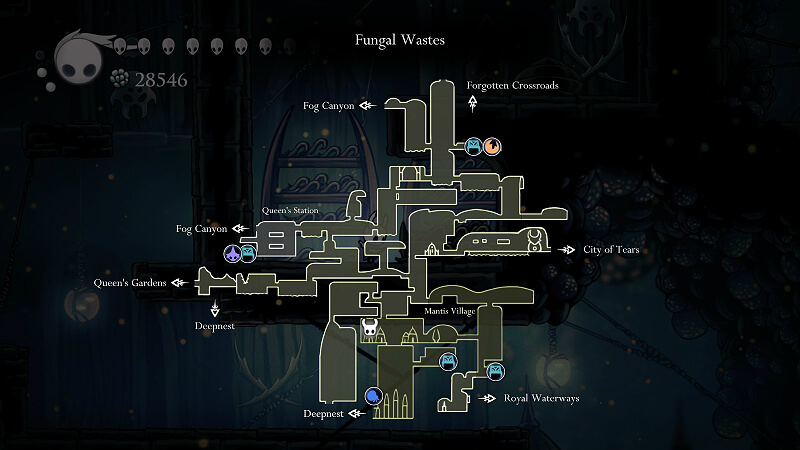
Entry requirements: Mantis Claw & (City Crest or Tram Pass)
Full exploration requirements: Monarch Wings & Simple Key & Elegant Key & Love Key
Entry requirements: Lumafly Lantern or Desolate Dive
Full exploration requirements: Lumafly Lantern & Desolate Dive & Monarch Wings
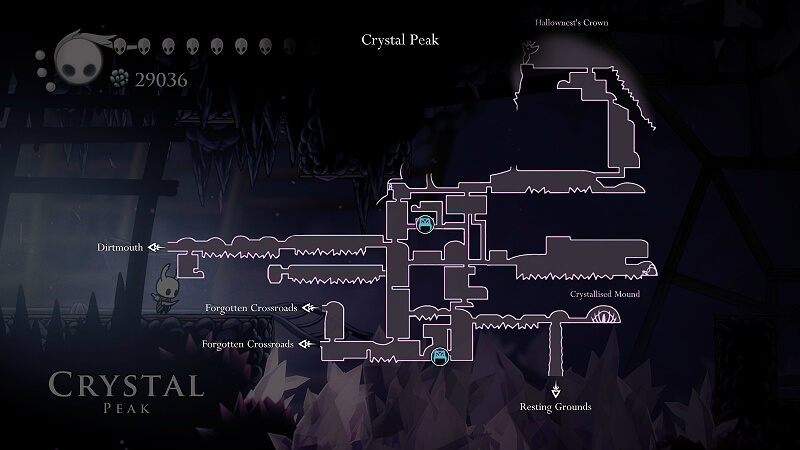
Entry requirements: Lumafly Lantern or Tram Pass or Crystal Heart
Full exploration requirements: Desolate Dive & Crystal Heart
Entry requirements: (Mantis Claw & Simple Key) or (Tram Pass & Crystal Heart)
Full exploration requirements: Desolate Dive & Isma’s Tear & Monarch Wings
Entry requirements: Mantis Claw
Full exploration requirements: Shade Cloak

Entry requirements: Tram Pass or Access to City of Tears right side
Full exploration requirements: Desolate Dive & Howling Wraiths & Shade Cloak & Awoken Dream Nail
Entry requirements: Tram Pass or Access to City of Tears right side
Full exploration requirements: Tram Pass & Desolate Dive & Isma’s Tear & Shade Cloak
Entry requirements: Mantis Claw
Full exploration requirements: Lumafly Lantern & All Stag Stations

Entry requirements: Access to Greenpath
Full exploration requirements: Isma’s Tear or Shade Cloak
Entry requirements: Isma’s Tear or Shade Cloak or (Mantis Claw & Lumafly Lantern)
Full exploration requirements: Isma’s Tear & Shade Cloak
112% Route (Overview)
The following sections detail a route through the game which gets you all of the things that count towards 112% completion. Note that since this game is a metroidvania, there are plenty of route variations that one can take. This particular route tries to take a balance between getting upgrades (to ease boss battles/difficult platforming) and reducing backtracking.
Notes:
- It is generally a good idea to rest at benches you pass near to if the detour is not significant, even if the route doesn’t tell you to explicitly sit at them. The only exceptions are when you want to take advantage of reloading your save to strategically skip some backtracking.
- Underlined items within each step are required pickups/actions for completion percentage (either directly or indirectly) or route progression.
- Be sure to read through each step completely. Just because a step starts with an optional encounter doesn’t mean the entire step is optional; in fact, in several cases optional encounters are listed in the same step as required pickups.
- This route does not cover geo cache pickups due to the fact that it would add many more steps to the guide and they aren’t strictly necessary for 112%. This means you may find yourself short on geo for some of the purchases along the route if you don’t manage to find the geo caches hidden along the route, but you shouldn’t need to farm if you’re thorough in your exploration and you kill a decent fraction of the enemies along the route (as long as you don’t lose your geo by dying a second time before retrieving your shade). Furthermore, the route now explicitly includes relics which will give large amounts of geo when you sell them to Relic Seeker Lemm.
- This route was planned out without any usage of dream gates prior to the Grimm Troupe Ritual, however several legs of the route can be shortened if you make use of that ability. The essence from fixed sources along the route give you an excess of 2 essence to use on 2 dream gates once you’ve acquired the ability (i.e. you will have a guaranteed total of 1802 essence when you go to collect the Awoken Dream Nail), but additional essence for more dream gates can be acquired via random enemy drops or getting the Whispering Roots/dream bosses that are listed as optional in the route.
- The collection of all the Grimm Troupe quest flames is put near the end of the 112% route. While this definitely is inefficient time-wise because many of these flames could be collected earlier during your exploration, we chose not to incorporate flame-collection earlier because it requires equipping the Grimmchild charm. We feel that losing 2 notches for a significant portion of the game is a worse option than waiting until end-game and doing all the flame-collection at that point.
- With the addition of the Grimm Troupe, Lifeblood, and Godmaster content, there is now a maximum completion percentage of 112%. Most completion achievements only require 100%, so getting everything that contributes to completion percentage is only required to get the “Pure Completion” achievement. If you only care about getting 100%, then the recommended items to skip which contribute completion percentage are:
- 4 Mask Shards [1%] (includes Delicate Flower mask shard, 1500 Essence mask shard from Seer, and Crystal Guardian v2 boss fight)
- 3 Vessel Fragments [1%] (includes Deepnest Garpede challenge and Ancient Basin 3000 Geo Fountain)
- Traitor Lord [1%] (half of Kingsoul charm [0.5%])
- Trial of the Fool [1%]
- White Palace (half of Kingsoul charm [0.5%], 1800 Essence requirement for Awoken Dream Nail [1%]) – Note: Not obtaining the Kingsoul charm prevents you from getting the alternate endings
- Ascension [1%] (2400 Essence)
- Nightmare King boss [1%] (Grimm Troupe Ritual with 9 flames collected)
- 4 Godhome Pantheons [4%]
If you skip the items above the only Essence requirement is 700 Essence to collect a Soul Vessel Fragment from the Seer, which means you do not have to fight any dream versions of bosses or complete any Whispering Roots since Warrior’s Graves give you 1100 Essence.
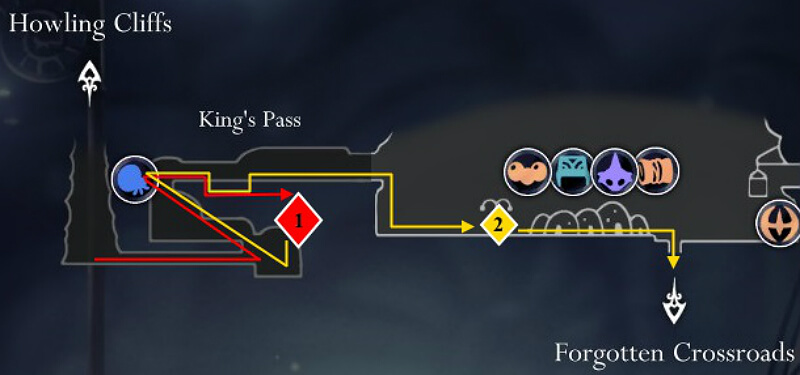
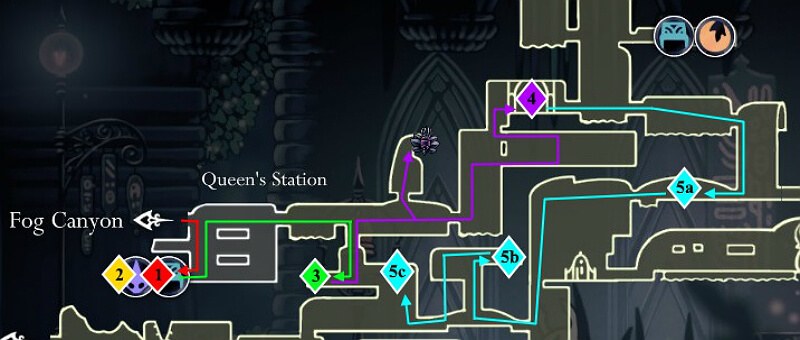
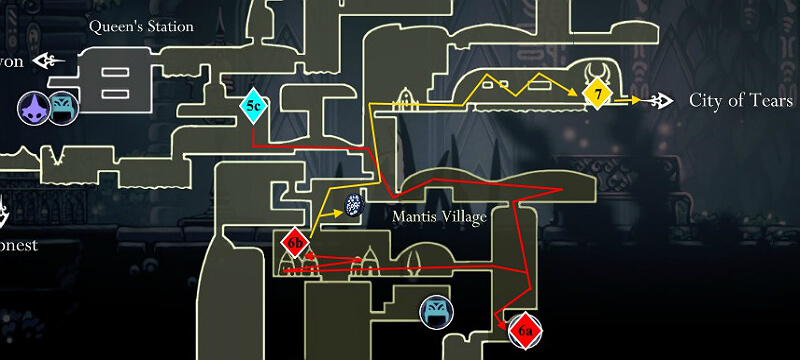
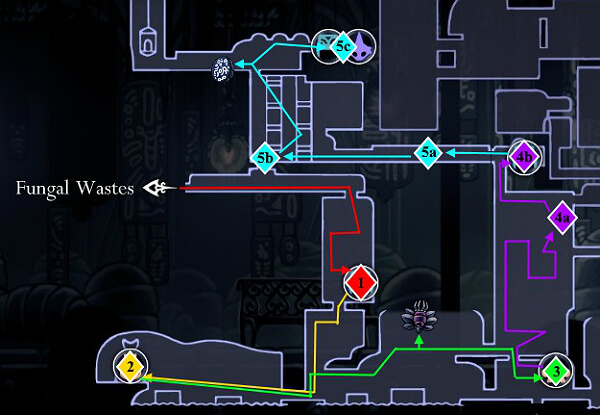
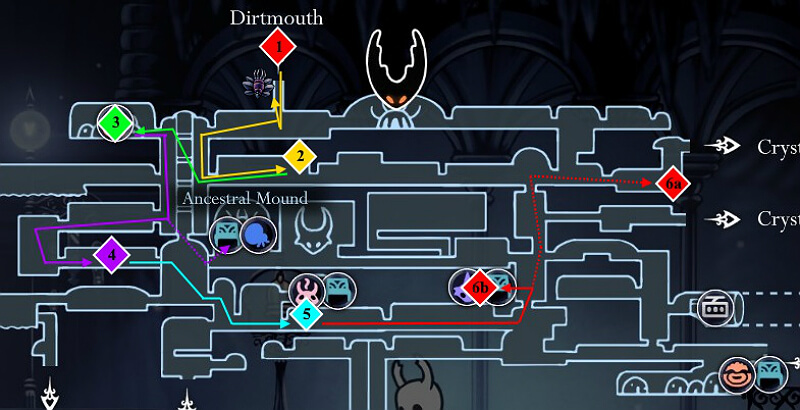
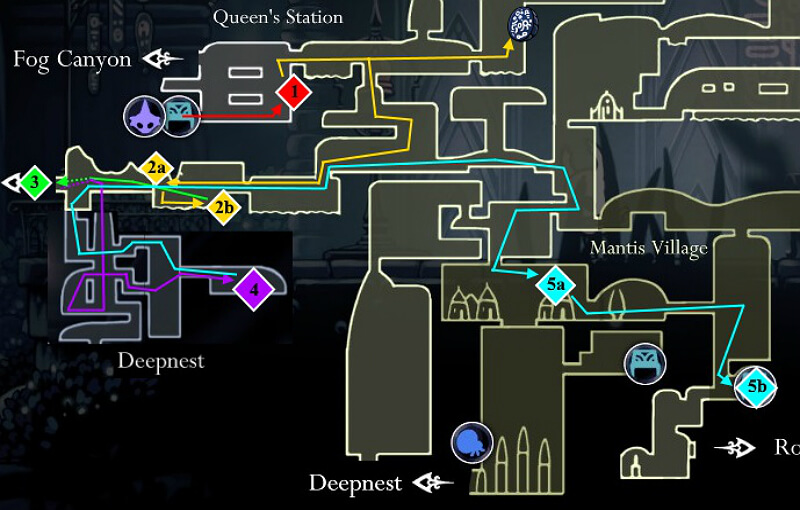
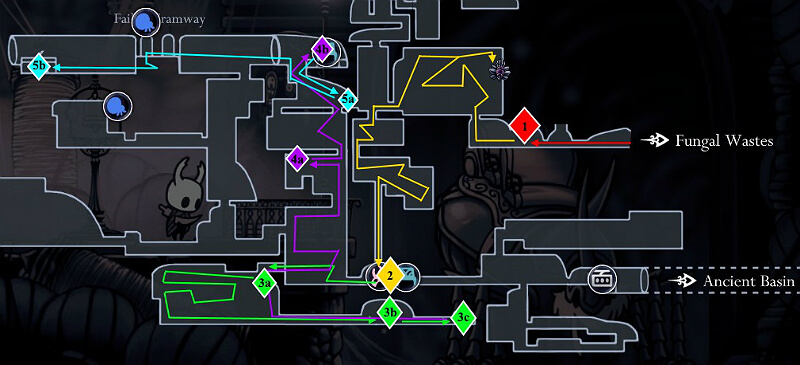
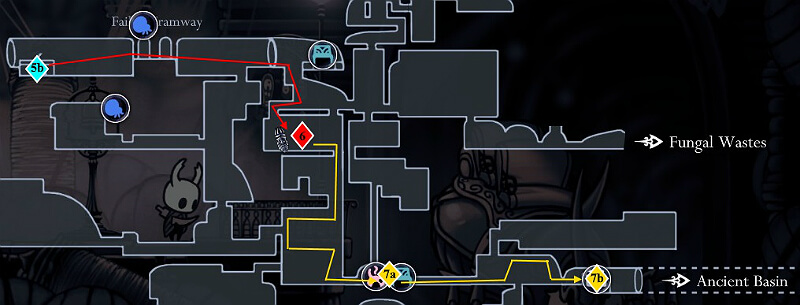
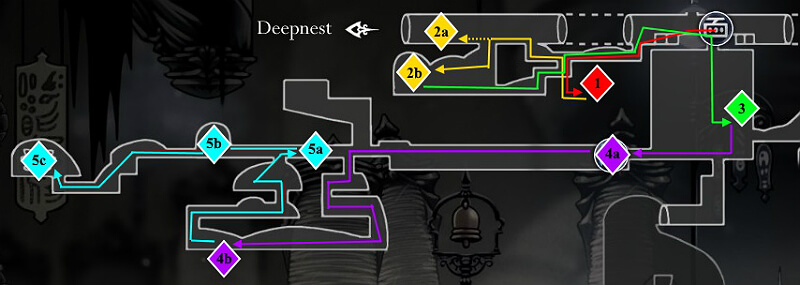
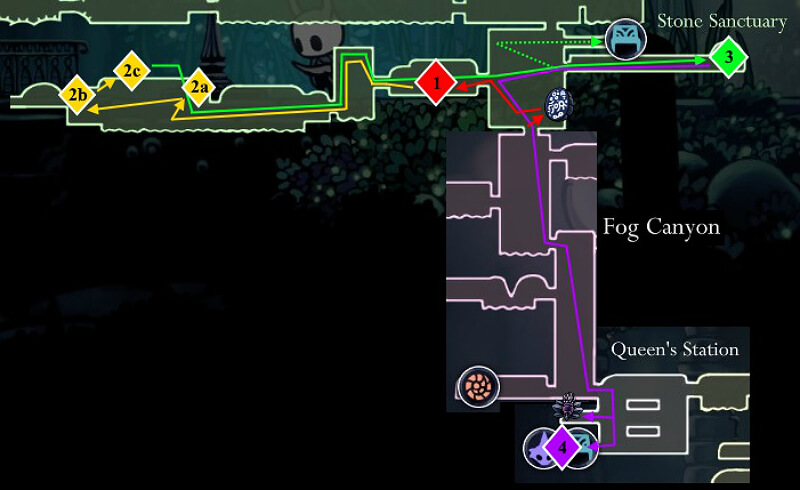
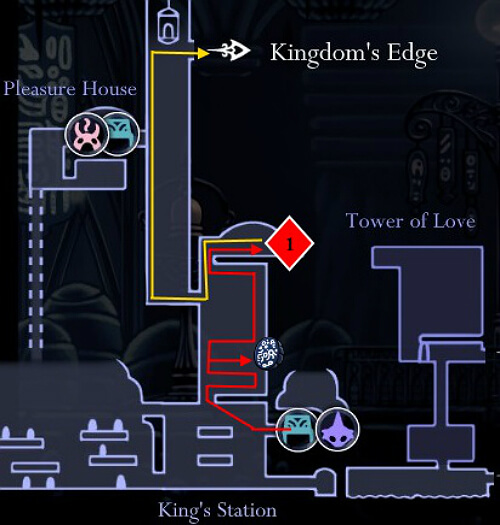
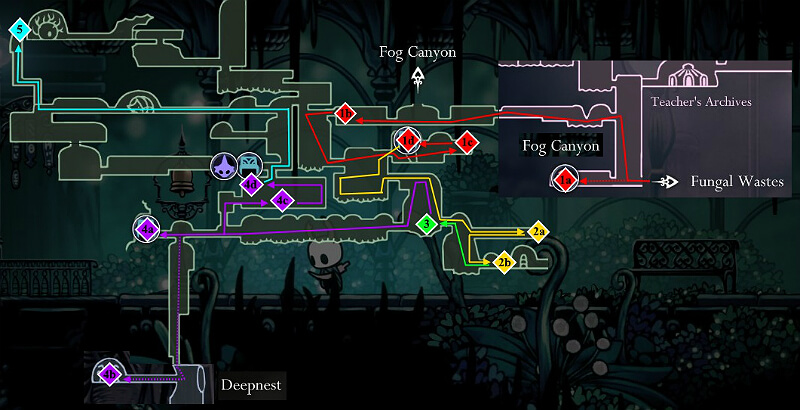
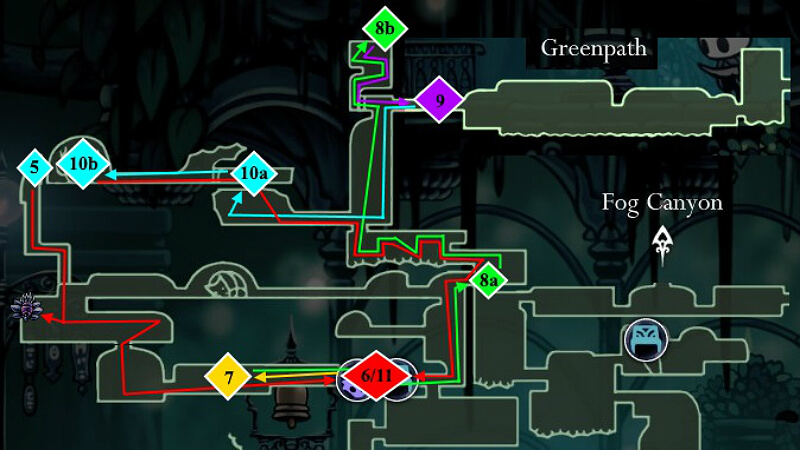
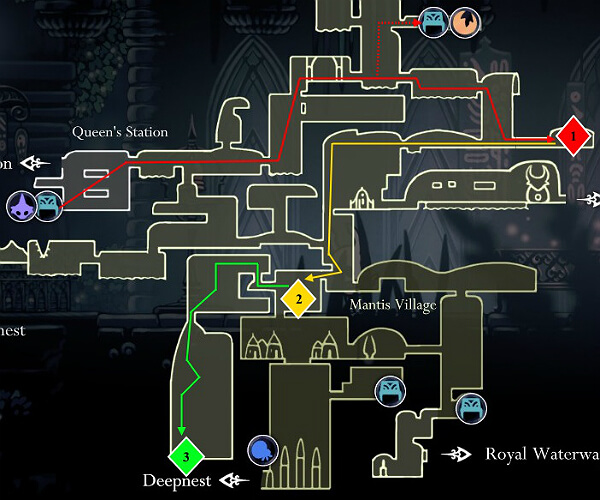
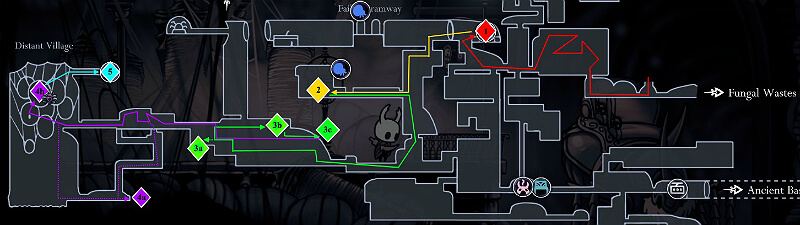
Key to Drawn Routes:
- Each individual map will cover approximately 5 steps of each area.
- The color order of the steps is red (#1) -> yellow (#2) -> green (#3) -> purple (#4) -> blue (#5), with the cycle repeating as necessary (i.e. red = #6, yellow = #7, and so on).
- Diamonds indicate points of interest along each step and are numbered according to their step.
- Dotted lines indicate paths to optional things listed in the route
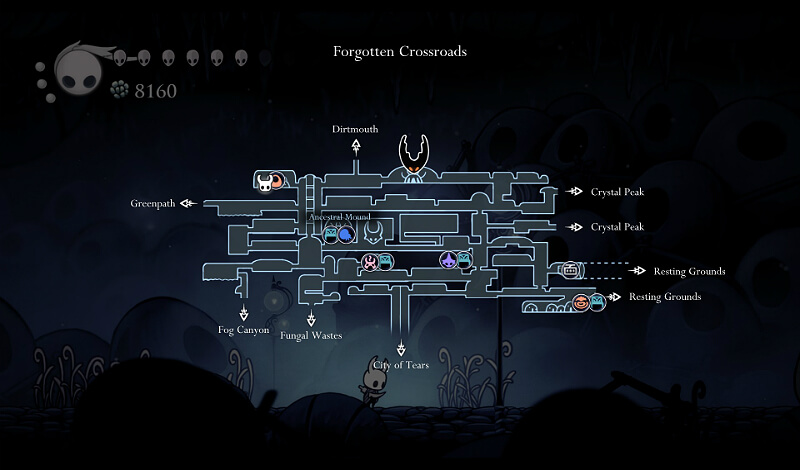
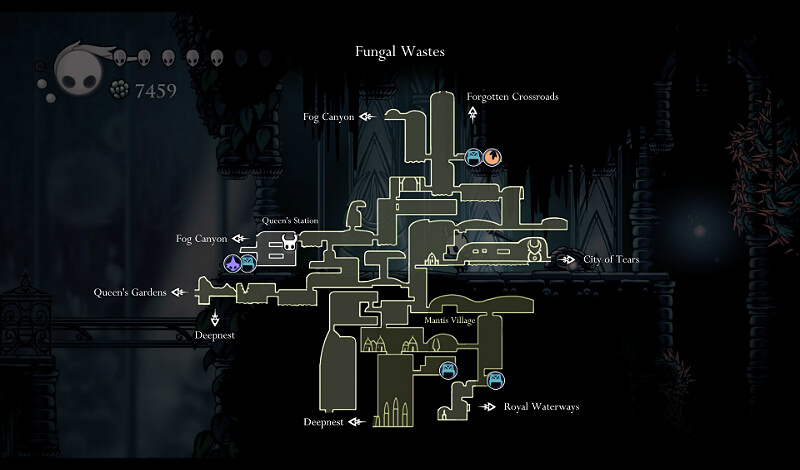
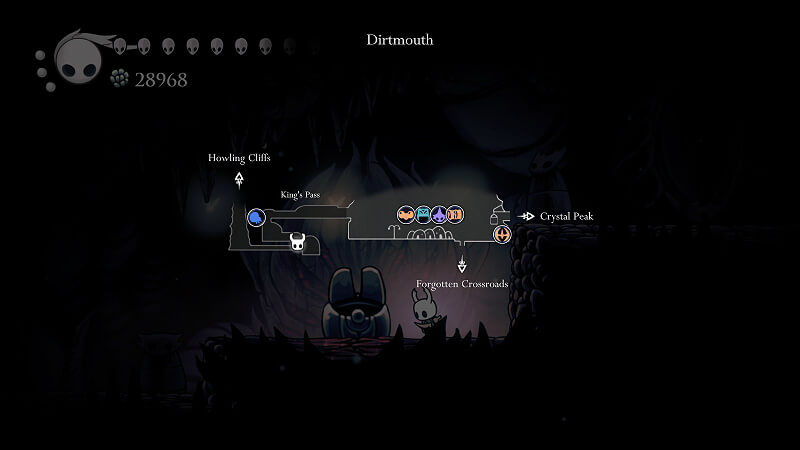
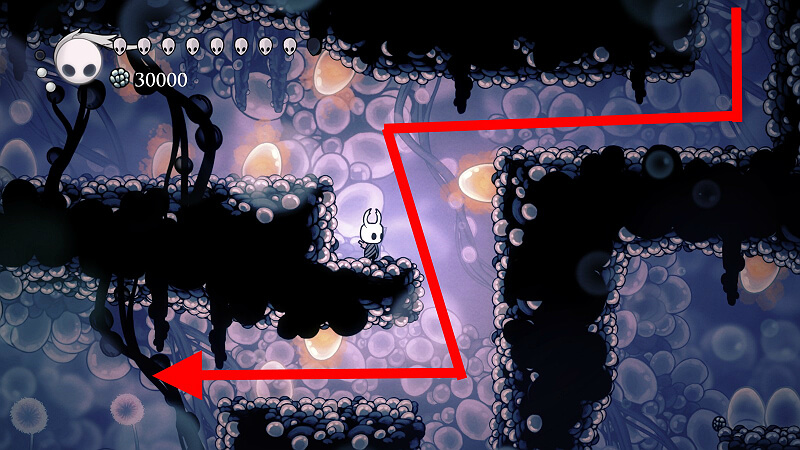
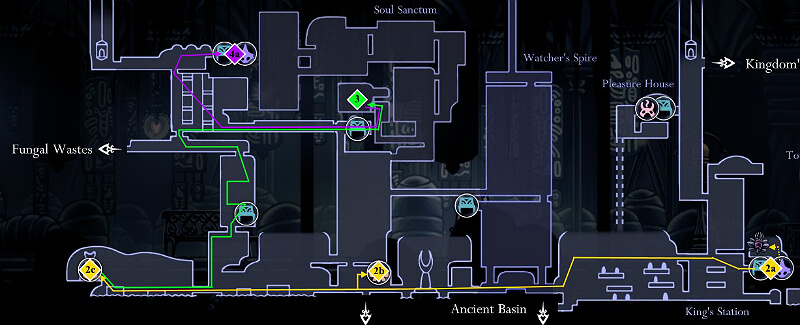
112% Route (Part 1)
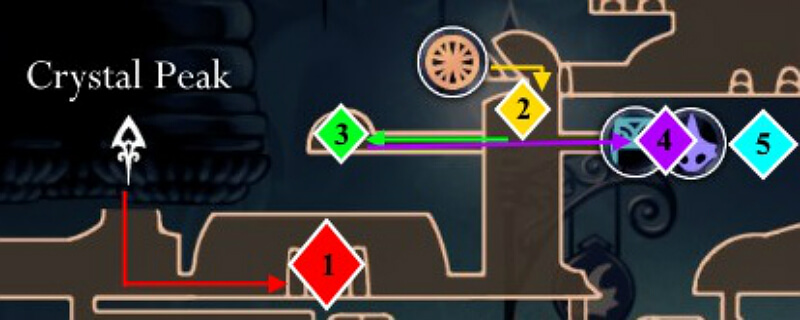
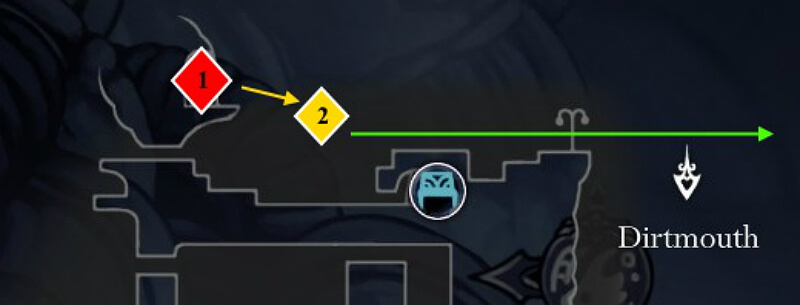
- Spike pogo for Fury of the Fallen charm [1/40]
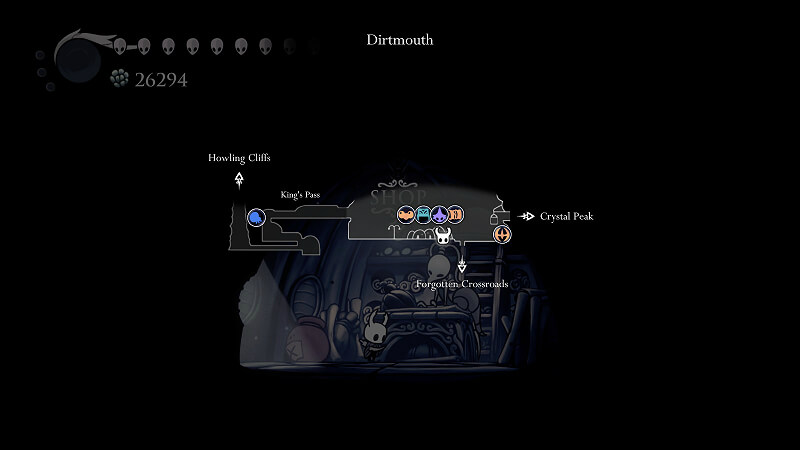
- Fall into Dirtmouth (Optional: talk to Elderbug) -> enter the Crossroads via the well
- (Optional: Quirrel encounter in Black Egg Temple)
- Buy map from Cornifer [30 Geo]
- Grub [1/46] in acid room
- Aspid Hunter enemy gauntlet
- Open Forgotten Crossroads stag station [50 Geo]
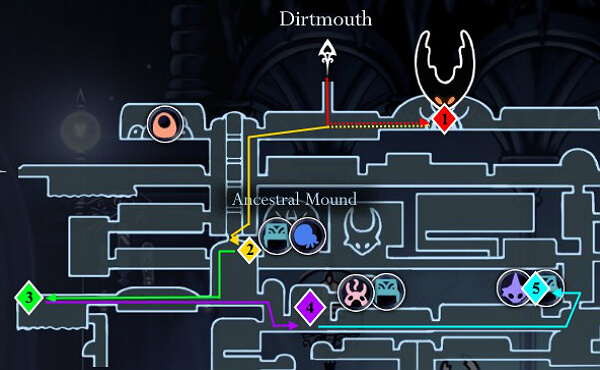
- Collect Grub [2/46] behind breakable wall -> (Optional: Myla encounter in mines section) -> collect 2 Grubs [4/46] (behind Husk Guard, spike pogo)
- Gruz Mother boss [1/17] -> talk to Sly in hut
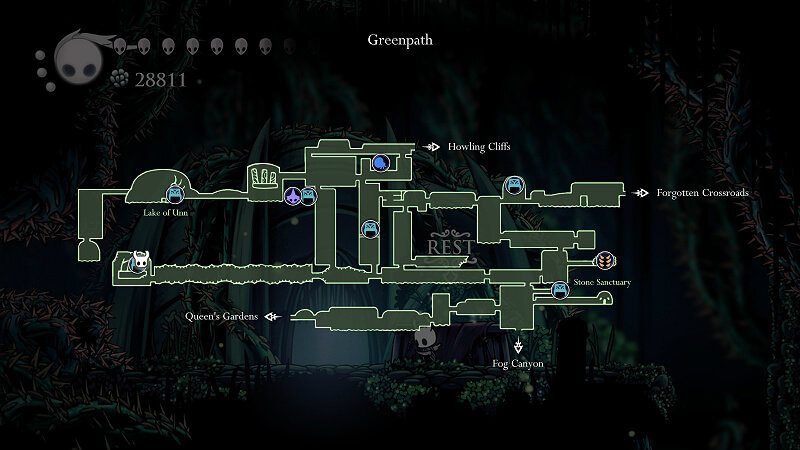
- False Knight boss [2/17], collect City Crest and Geo chest -> Ancestral Mound -> Vengeful Spiritspell [1/6] -> Soul Catcher charm [2/40] after Elder Baldur mini-boss
- Grubfather visit for Geo
- Return to Dirtmouth and buy Wayward Compass charm [3/40], Quill, and Bench Pin from Iselda’s shop [440 Geo]
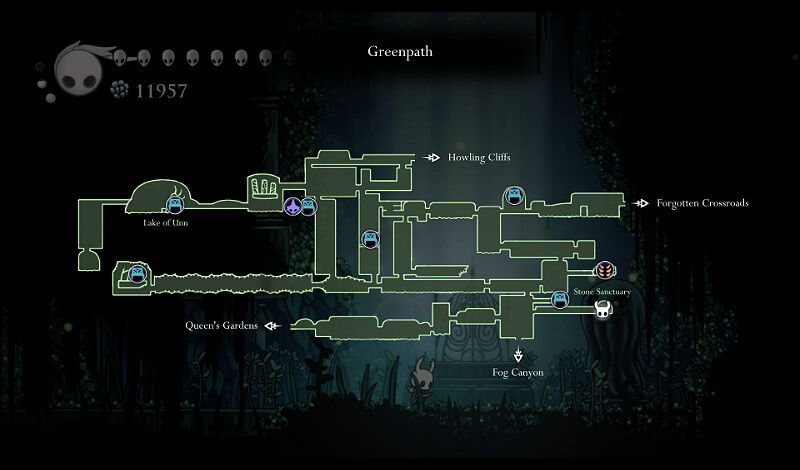
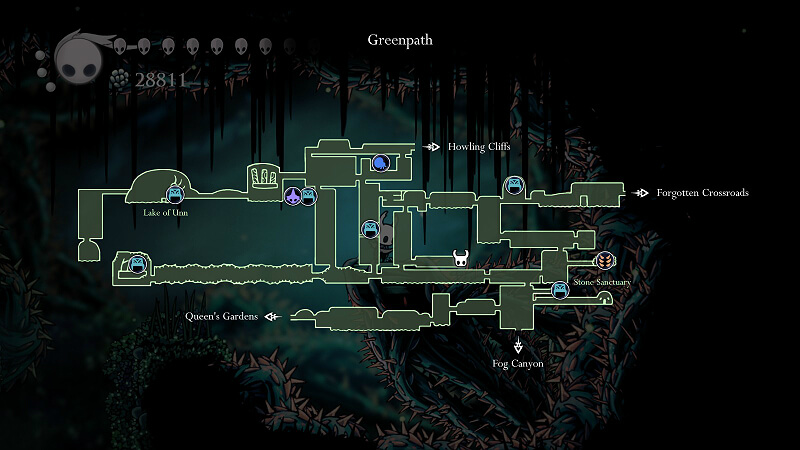
- Beat Elder Baldur mini-boss for Greenpath entrance
- Buy map from Cornifer [60 Geo]; get Grub [5/46] by cutting down hidden platform
- (Optional: Hunter’s Journal); Grub [6/46] in room next to Hunter
- Bench [50 Geo]
- Moss Knight mini-boss
- Save Zote from Vengefly King
(Alternate path: Don’t save Zote and get the “Neglect” achievement by coming back at any point after getting Mantis Claw and hitting Zote’s skull. Note that not saving Zote locks you out of optional Grey Prince Zote boss)
- Grub [7/46] guarded by Moss Knight
- Open Greenpath stag station [140 Geo], sit at bench -> collect Wanderer’s Journal relic behind breakable wall from flower trap -> Hornet boss [3/17] -> Mothwing Cloak ability [1/9]
- (Optional: Head left to Lake of Unn for Quirrel encounter in building)
- Backtrack for Thorns of Agony charm [4/40]
- Drop straight through two rooms without exploring side passages.
- Queen’s Station (Quirrel encounter) -> open Queen’s Station stag station [120 Geo]
- (Optional: Dirtmouth visit for Zote encounter if Zote saved in Greenpath)
- Buy map from Cornifer [75 Geo]
- Hallownest Seal relic -> Two Shrumal Ogre mini-boss for charm notch [1/8]
- Cloth encounter -> Grub [8/46] in bouncy mushroom room -> open shortcut
- Bench in lower right -> Mantis Village -> Mantis Claw ability [2/9]
- Pick up Wanderer’s Journal relic in room above Mantis Village after climbing a vertical shaft with wall jump -> take right path and use City Crest on statue
- Bench (Quirrel encounter)
- Nailsmith for Sharpened Nail upgrade [250 geo, 1/4]
- Collect Hallownest Seal relic on scaffolding -> Relic Seeker Lemm visit for Geo
- Grub [9/46] guarded by Winged Sentry -> Bench [150 Geo] & buy map from Cornifer [90 Geo]
- Head left into City Storerooms (If Zote saved in Greenpath: Zote encounter) -> open shortcut -> Pick up Wanderer’s Journal relic -> open City Storerooms stag station [200 Geo] -> travel back to Dirtmouth
- Buy Mask Shard [150 Geo, 1/16], Gathering Swarm charm [300 Geo, 5/40] from Sly; (Optional: Tiso encounter next to well)
- After dropping down into the well, pick up the Hallownest Seal relic from wall jumping up the well -> Grub [10/46] in middle passage using dash
- Grubfather visit for Geo, Mask Shard [2/16], Grubsong charm [6/40]
- Use wall jump to get to Brooding Mawlek boss [4/17] -> rewards a Mask Shard [3/16]
- Get Mask Shard [4/16, +1 HP] from Goam challenge under hot spring room
- (Optional: New Myla dialogue) -> Take stag to City Storerooms (Tiso encounter if Tiso talked to in Dirtmouth)
- Enter Soul Sanctum after Soul Twister mini-boss
- Open breakable wall shortcut back to bench -> Soul Warrior mini-boss at top of first room
- Collect Spell Twister charm [7/40] from top of area -> Soul Master boss [5/17] for Desolate Dive spell [2/6]
- Collect Geo chest, Hallownest Seal relic, and the Grub [11/46] along the way out of Soul Sanctum
- Take stag to Dirtmouth
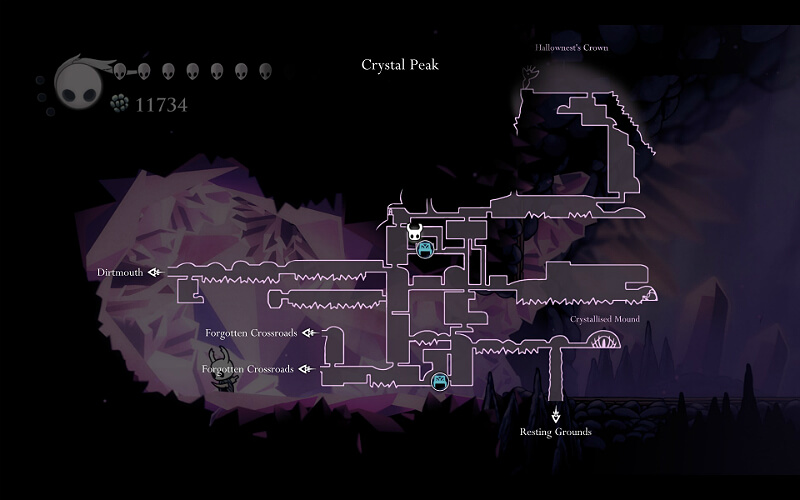
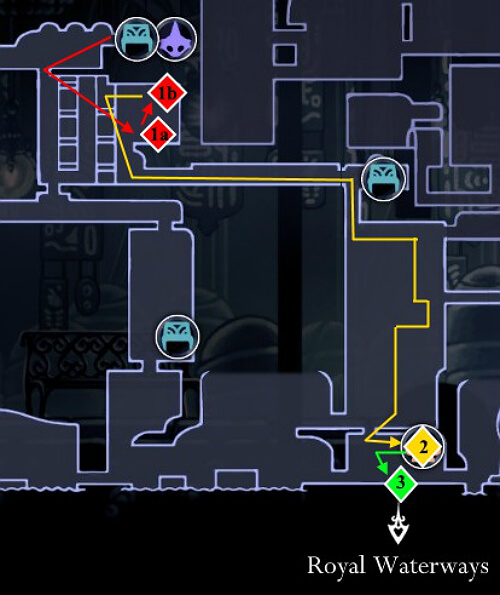
112% Route (Part 2)
- Buy Lumafly Lantern [1800 Geo] from Sly
- Take stag to Crossroads -> Buy charm notch [120 Geo, 2/8] from Salubra
- (Optional: New Myla dialogue) -> Use dive spell on crumbling floor
- (Optional: enter dark room and pay gate fee [50 Geo] for exit back to Crossroads) -> Get bench to bottom right
- Climb up left vertical passage -> Grub [12/46] in conveyer challenge
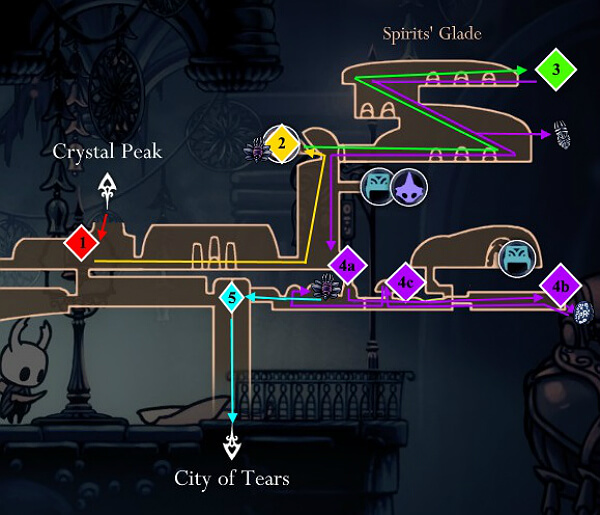
- Buy map from Cornifer [112 Geo]
- Crystal Guardian boss, gives bench
- Go back to previous room -> find Shopkeeper’s Key
- Climb up further (Quirrel encounter), go right, then drop down -> collect Wanderer’s Journal relic -> Crystal Heart ability [3/9]
- Collect 2 Grubs [14/46] (Crystal Heart room, central crusher room)
- Deep Focus charm [8/40] after laser challenge room
- Grub [15/46] in shortcut passage back to Dirtmouth (behind mimic and breakable wall) -> unlock elevator back to Dirtmouth
- Head back to bench (or reload save to skip some backtracking if you sat at the bench) and go down past crusher room to get Grub [16/46]
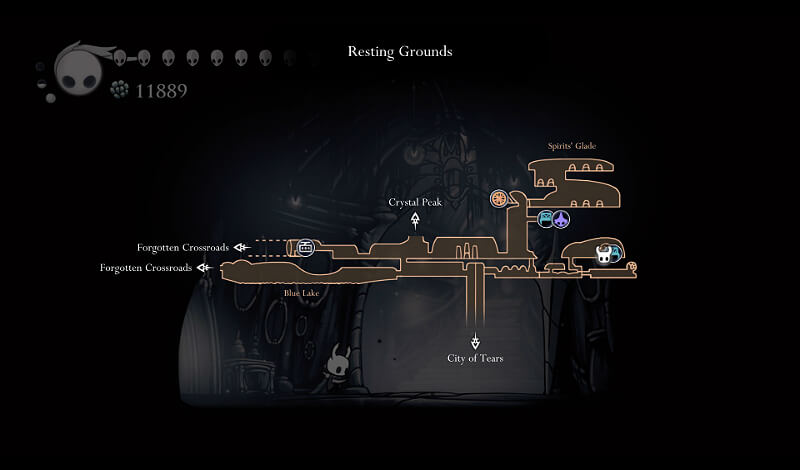
- Pass through dark room in bottom right of area and drop into big pit
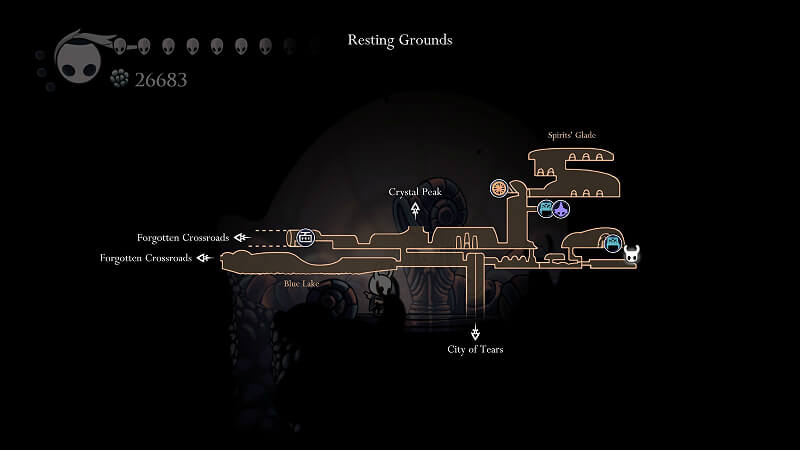
- Pick up Dream Nail ability [4/9]
- Whispering Root for 20 Essence [20/2400]
- Pick up Dreamshield charm [9/40] behind fake wall
- Hit lever to unlock Resting Grounds stag station
- Take stag to City Storerooms
- Whispering Root for 28 Essence [48/2400]; get Simple Key
- Relic Seeker Lemm visit for Geo
- Drop to manhole -> use Simple Key
- (Optional: Open breakable wall to find Tuk for Rancid Eggs)
- Use dive spell on crumbling floor -> sit at bench
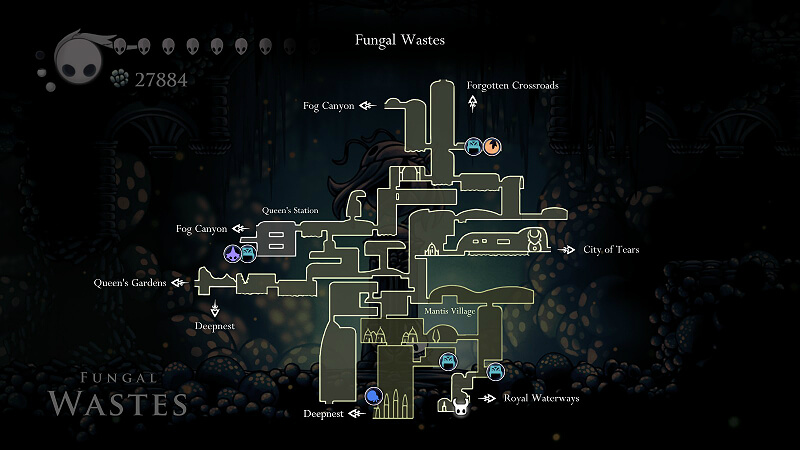
- Head up and left -> buy map from Cornifer [75 Geo] after Hwurmp enemy gauntlet and open Fungal Wastes shortcut
- Short trip to Fungal Wastes for Dashmaster charm [10/40], rescue Bretta after wall jump challenge behind fake wall
- Drop into water and go all the way left -> Mask Shard [5/16]
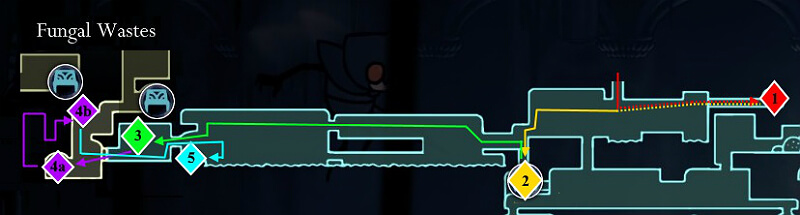
- Collect Grub [17/46] in hidden alcove
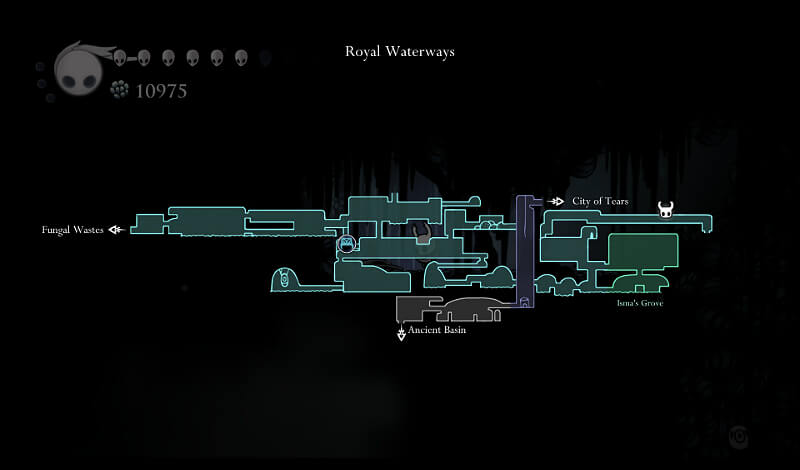
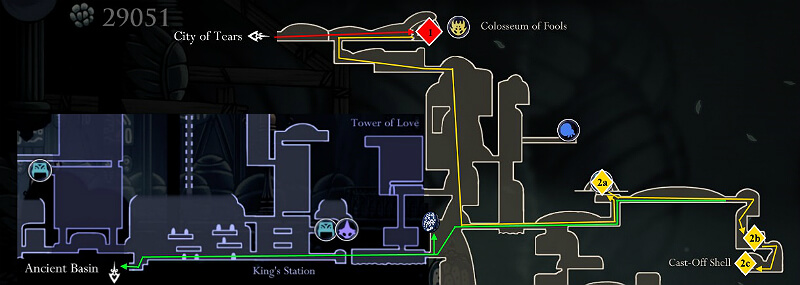
- Head right -> Dung Defender boss [6/17] drops Defender’s Crest charm [11/40] -> hit pump switch -> Use dive spell under pump switch for secret room with King’s Idol relic -> open shortcut into broken elevator shaft
- Head back and go down right -> super dash -> collect Isma’s Tear ability [5/9] after Sentry enemy gauntlet
- Get Grub [18/46] behind Isma -> take shortcut past Eternal Emilitia
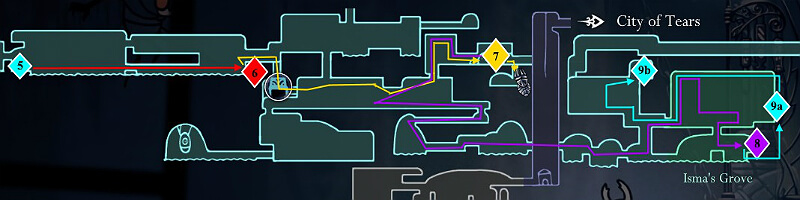
- Open shortcut to left side of city; fountain cutscene, Hornet encounter
- Head right -> Gorgeous Husk for 420 Geo in building with several husk enemies (behind fake wall that’s slightly above ground on right) -> King’s Station stag station [300 geo], sit at bench
- Collect Grub [19/46] guarded by Great Husk Sentry in building (quit and load after freeing the Grub to avoid killing the Sentry)
- Take stag to Queen’s Station

- Collect Mask Shard [6/16] after wall jump challenge
- Collect Wanderer’s Journal relic -> head down left for Grub [20/46] and Spore Shroom charm [12/40] after bouncy mushroom challenge
- (Optional: Moss Prophet encounter)
- Fall into Deepnest for brief visit, collect Grub [21/46] from mimic room behind breakable wall (real one is 3rd from left)
- Unlock rest of Mantis Village by hitting lever -> bench in bottom right of area
- Mantis Lords boss [7/17] -> Mark of Pride charm [13/40], Hallownest Seal relic, Geo chest, and bench in unlocked room
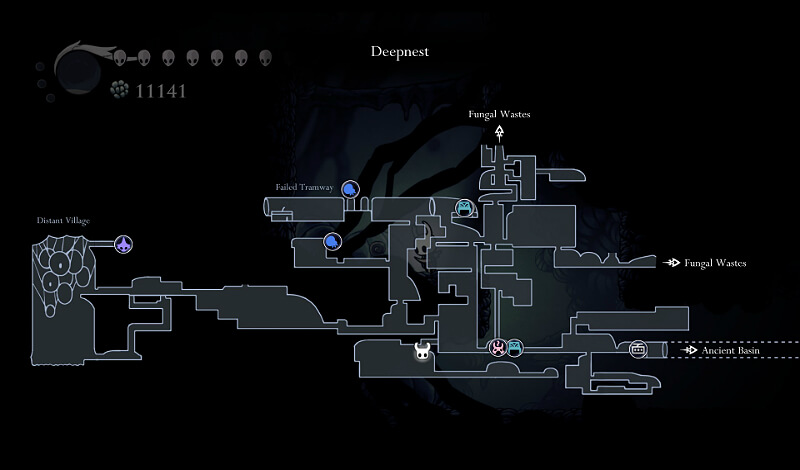
- Enter Deepnest past Mantis Lords

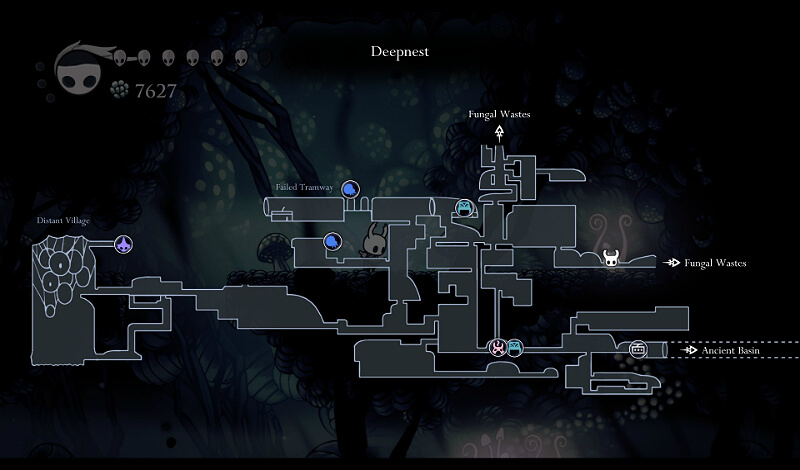
112% Route (Part 3)
- Buy map from Cornifer [38 Geo]
- Collect Hallownest Seal relic -> Circle around and fall down to hot spring, bench
- Super dash -> breakable wall for Grub [22/46] -> Nosk boss [8/17] -> collect Pale Ore [1/6]
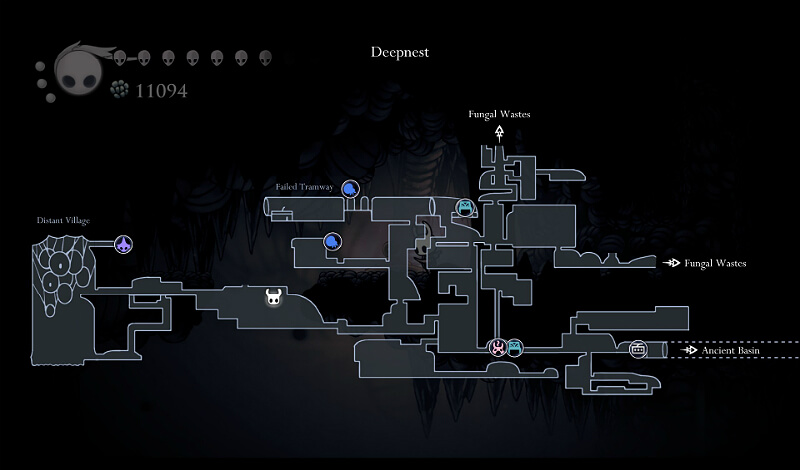
- Circle up/left -> collect Grub [23/46] using super dash -> Failed Tramway bench (Cloth encounter)
- Open shortcut back to first part of Deepnest; get Tram Pass from far left of Failed Tramway
- Corpse Creeper enemy gauntlet -> King’s Idol relic pickup (If Zote saved in Greenpath, optional encounter: rescue Zote)
- Go back down past hot spring (Quirrel encounter) -> Take tram to Ancient Basin
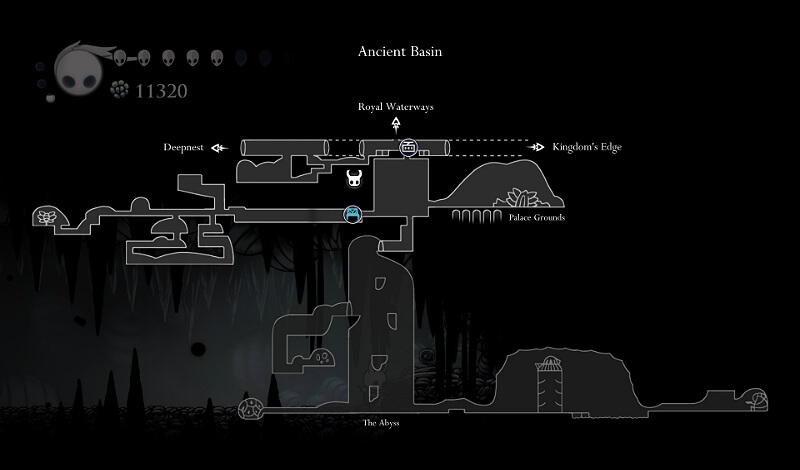
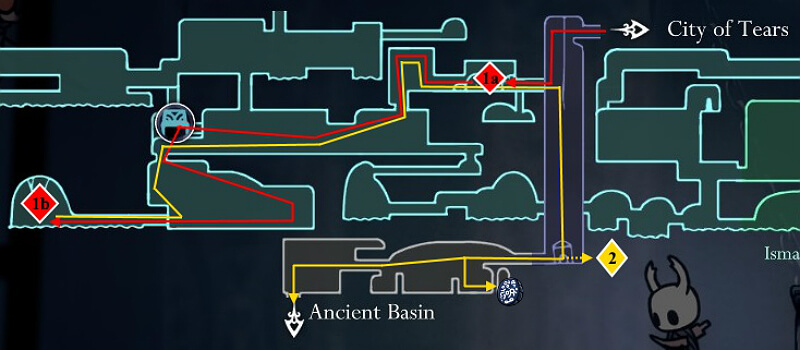
- Left tramway room -> collect Grub [24/46] using dive spell
- (Optional: rescue Cloth by killing all enemies in top left of room) -> collect Pale Ore [2/6] after Lesser Mawlek enemy gauntlet
- Go back to room with tram, fall down lit hole -> buy map from Cornifer [112 Geo]
- Bench [150 Geo] -> super dash, collect Simple Key
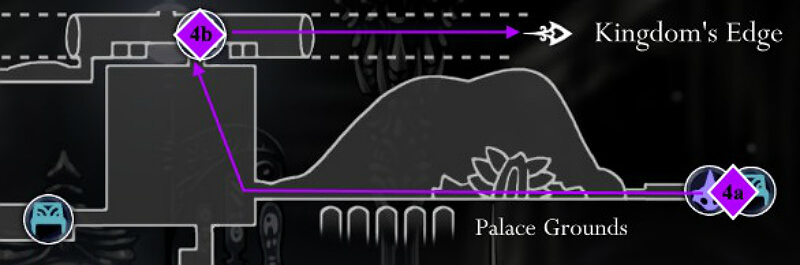
- Open shortcut, Broken Vessel boss [9/17] -> collect Monarch Wings ability [6/9]
- Collect Grub [25/46] in passage leading to Broken Vessel requiring double jump
- Double jump up to Palace Grounds, and open up Hidden Station stag station [300 Geo] -> take stag to Dirtmouth

- Buy Elegant Key [800 Geo] from Sly (automatically turn in Shopkeeper’s Key) -> collect Mask Shard [7/16] from Bretta’s hut
- Take stag to King’s Station; (Optional: collect Hallownest Seal relic using nail pogo on stag station roof spikes) -> Relic Seeker Lemm visit for Geo -> buy Channeled Nail upgrade [800 Geo, 2/4]
- Head back up to Soul Sanctum and use Elegant Key -> get Shade Soul spell upgrade [3/6] after Soul Warrior mini-boss
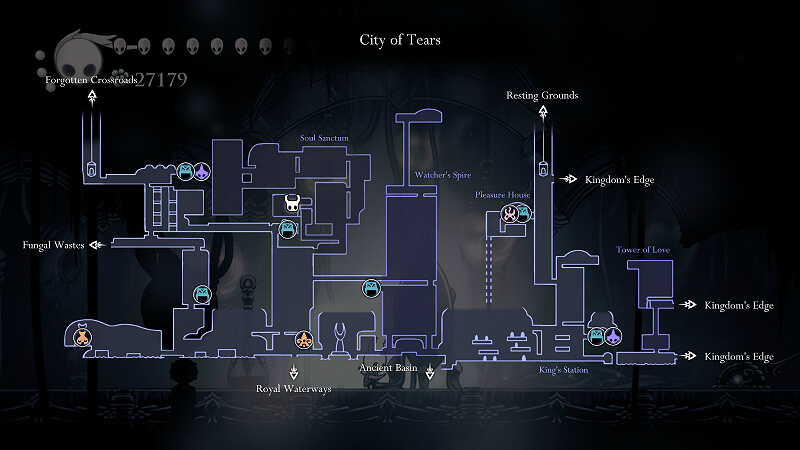
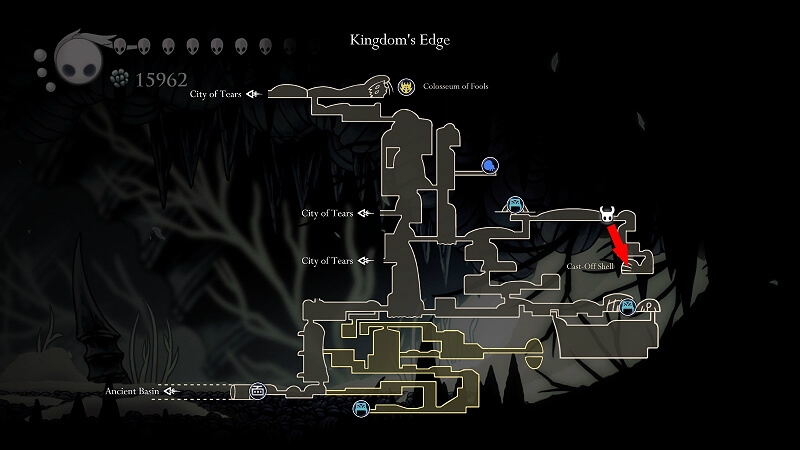
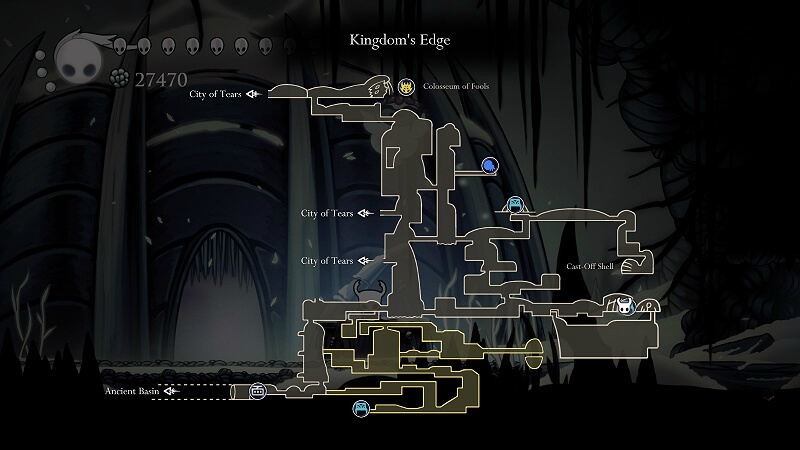
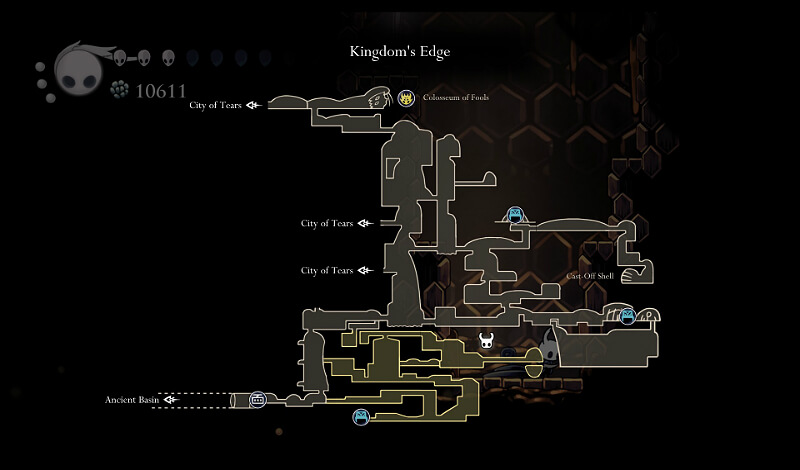
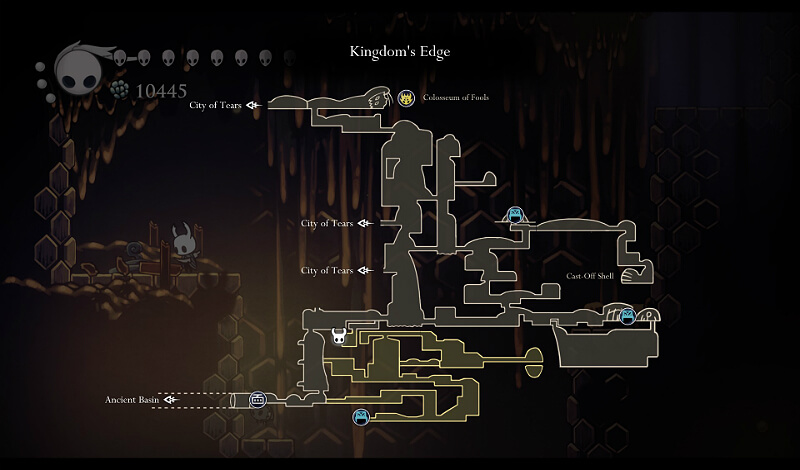
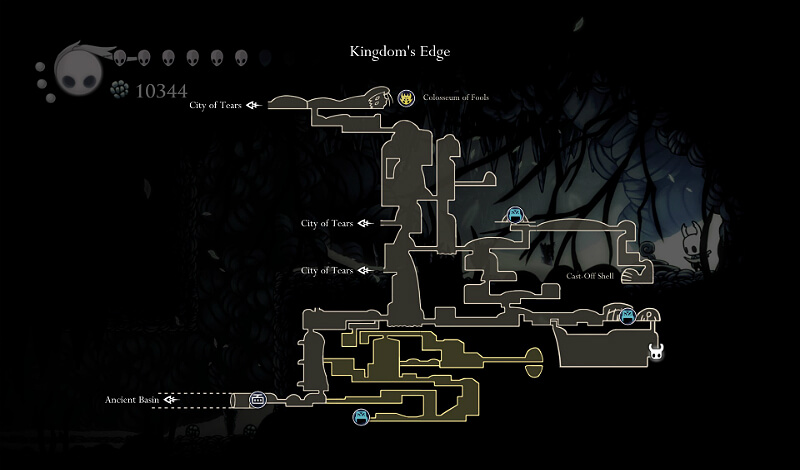
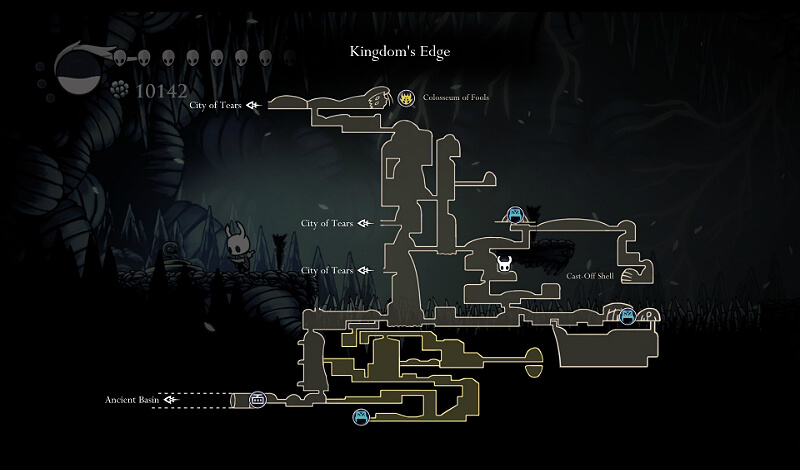
- Go to City Storerooms and take stag to Hidden Station -> take tram further right to Kingdom’s Edge
- Open breakable wall for entrance to Hive -> get bench
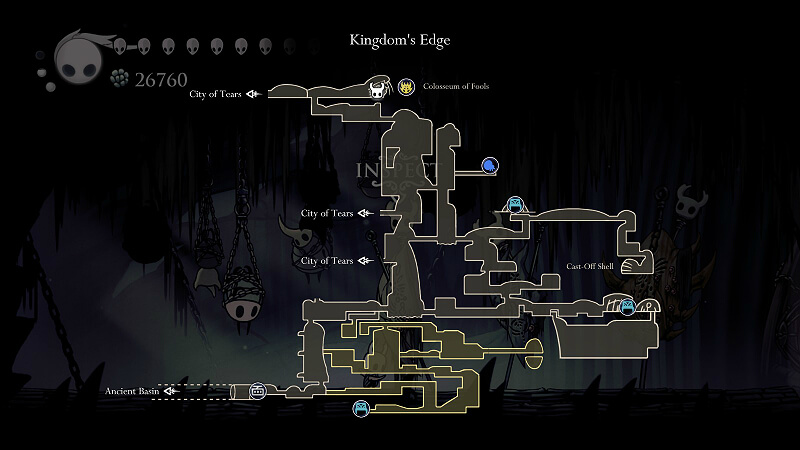
- Whispering Root for 20 Essence [68/2400]
- Collect Grub [26/46] using super dash & double jump
- Use Hive Guardian (big bouncing bee) to open wall to Mask Shard [8/16, +1 HP] -> open shortcut
- Hive Knight boss [10/17] (Optional: Hive Queen Vespa spirit) -> Hiveblood charm [14/40]
- Exit Hive and head up into passage back to Waterways, collect Grub [27/46] with double jump -> (Optional: Open breakable shortcut back to Waterways at end of passage)
- Use dive spell before breakable wall shortcut for Grub [28/46] in Hive sub-section
- Open shortcut to rest of Kingdom’s Edge -> after short climb buy map from Cornifer [112 Geo]
- Head right until you reach Nailmaster Oro’s hut for Dash Slash nail art [800 Geo, 1/3]
- Dive spell to access bottom right room of area, Grub [29/46] after Great Hopper spike room
- (Optional: Several dive spells to reach 420 Geo rock)
- Head left and up to collect Quick Slash charm [15/40]
- Use dive spell to collect Wanderer’s Journal relic -> collect Grub [30/46] on way to bench behind breakable ceiling -> Wanderer’s Journal relic next to bench
- (Optional: In center vertical passage, use double jump to reach Bardoon encounter)
- Whispering Root for 51 Essence [119/2400]
- Open shortcut back to City near Colosseum of Fools and grab Colosseum bench
- King’s Idol relic behind breakable wall with Giant Hopper -> Enter Tower of Love and open shortcut
- Collect Grub [31/46] in watery passage, head left back to King’s Station
- Take stag to Greenpath
- Hallownest Seal relic pickup -> Complete super dash/nail pogo challenge for Nailmaster Sheo’s hut -> Great Slash nail art [2/3]
- Go past Hornet boss room for Lake of Unn, enter secret passage on left side for Shape of Unncharm [16/40]
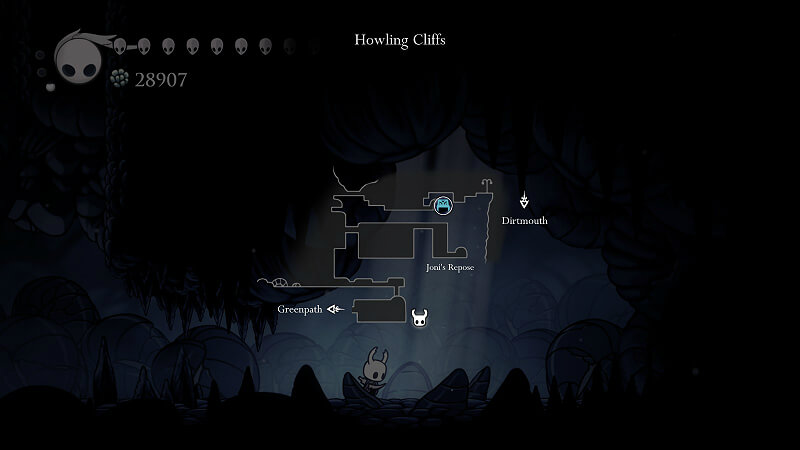
- Head up past Vengefly King room (If you didn’t save Zote in Greenpath, hit skull for achievement) to right, hit open chest and jump into it for 2 Elder Baldurs mini-boss -> collect Baldur Shell charm [17/40]
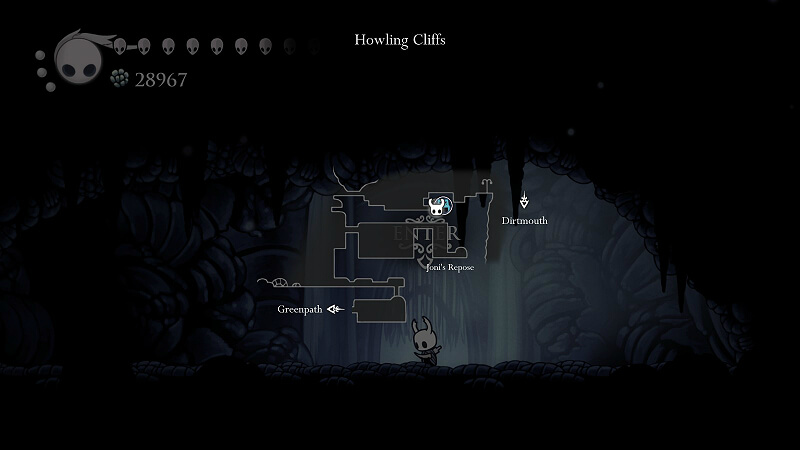
- Wall jump up vertical passage, collect Grub [32/46] before entering Howling Cliffs
- Collect King’s Idol relic -> Whispering Root for 46 Essence [165/2400] -> collect Wanderer’s Journal relic -> Dream Nail corpse -> activate the Nightmare Lantern
- Buy map from Cornifer [75 Geo]
- Continue past Cornifer into dark room for Joni’s Blessing charm [18/40] (Joni spirit)
- Find Nailmaster Mato’s hut for Cyclone Slash nail art [3/3]
- Super dash off cliff to return to Dirtmouth
- Enter large tent and get Grimmchild charm [19/40] from Grimm
- Get Nailmaster’s Glory charm [20/40] from Sly in basement
- (Optional: Gravedigger spirit right of well); Grubfather visit for Geo, Rancid Egg, Hallownest Seal relic, Pale Ore [3/6]
- Buy Resting Grounds map [75 Geo], Stagway & Vendor pins [200 Geo] from Iselda
- Take stag to King’s Station
112% Route (Part 4)
- (Optional: Use Simple Key to open Pleasure House; Wanderer’s Journal relic, Poggy Thorax/Marissa spirits, open shortcut)
- Relic Seeker Lemm visit for Geo
- Upgrade nail to Coiled Nail [2000 Geo, 3/4]
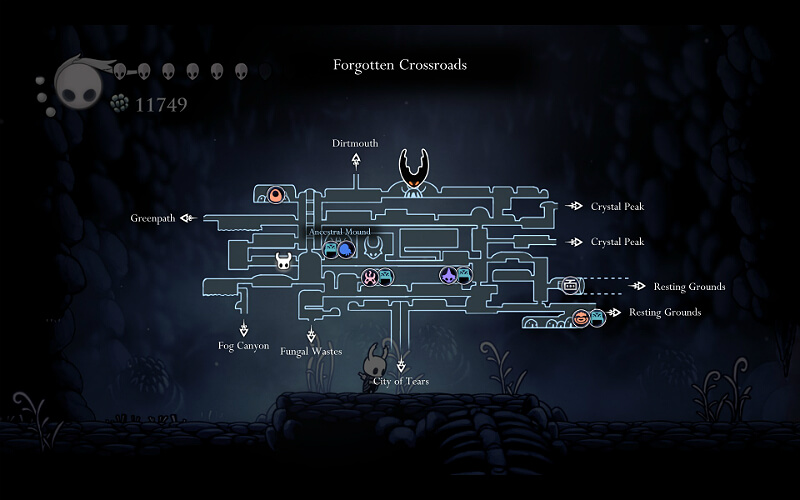
- Unlock elevator back to Crossroads [150 Geo] and take it up to Crossroads
- Collect Vessel Fragment [1/9]
- Head to Salubra’s Shop to buy the Lifeblood Heart, Longnail, Steady Body, Shaman Stone, and Quick Focus charms [1690 Geo, 25/40]; buy 3 charm notches [2800 Geo, 5/8]
- (Optional: Check up on Myla) -> go to Crossroads stag station and take stag back to Dirtmouth and buy 3 Mask Shards [2800 Geo, 11/16], 2 Vessel Fragments [1450 Geo, 3/9, +1 Soul Vessel], Stalwart Shell, Sprintmaster, and Heavy Blow charms [950 Geo, 28/40] from Sly
- Enter well -> breakable ceiling in platform room gives Whispering Root for 29 Essence[194/2400]
- Use double jump in Ancestral Mound near lifeblood cocoon to get Whispering Root for 42 Essence [236/2400]
- (Optional: Use dive spell for Fossilized Goam for Hunter’s Journal)
- Visit Leg Eater in Fungal Wastes, pay 86 Geo to see his stuff, and buy the Fragile Heart, Fragile Greed, and Fragile Strength charms [960 Geo, 31/40] with Defender’s Crest equipped for the Geo discount
(BUG: If you have Defender’s Crest equipped when you first talk to Leg Eater and you pay the 86 Geo for him to sell you stuff, prices will be at original level even though he claims he’s giving a discount. You must exit the room and re-enter to actually get the discount.) - Whispering Root in the connector leading to Fog Canyon gives 20 Essence [256/2400]
- Collect Hallownest Seal relic -> charm notch [6/8] in exploding egg challenge room
- Explore left passage under challenge room -> buy map from Cornifer [150 Geo]
- Backtrack, drop to bottom and take last left passage -> super dash from elevated ledge on right side of Teacher’s Archive room for Grub [33/46]
- Enter Teacher’s Archive (Quirrel encounter outside Archive) and fight Uumuu boss [11/17] -> (Optional: Charged Lumaflys entry for Hunter’s Journal) -> put Monomon the Teacher dreamer [1/3] to rest after Quirrel encounter
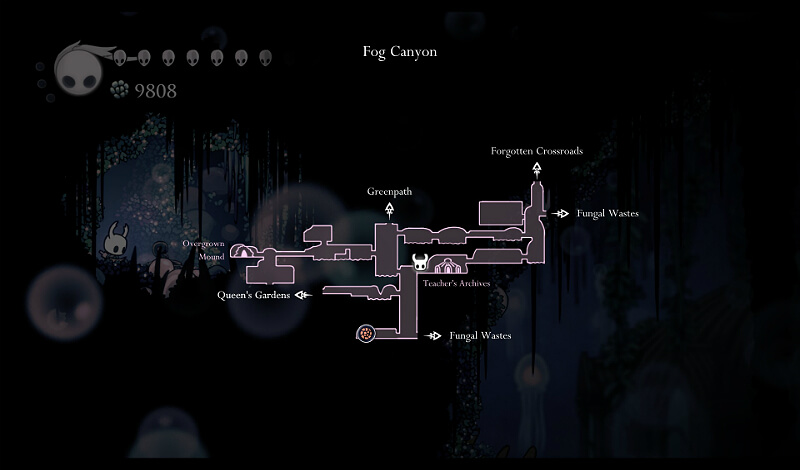
- Open shortcut back to rest of Fog Canyon, take upper left passage -> Hallownest Seal relic pickup -> complete Squit enemy gauntlet in Overgrown Mound for Howling Wraiths spell [4/6]
- Climb back up to Greenpath
- Collect Wanderer’s Journal relic -> Head left; Massive Moss Charger mini-boss
- Collect Geo chest, Grub [34/46], cut down platform, and collect Vessel Fragment [4/9]
- Head right to Stone Sanctuary -> first collect Mask Shard in top right [12/16, +1 HP] -> challenge No Eyes warrior’s grave [1/7] for 200 Essence [456/2400]
- Drop back down through Fog Canyon to Queen’s Station; collect Hallownest Seal relic by double-jumping next to Willoh -> Take stag to King’s Station
- Collect Wanderer’s Journal relic -> Collect Vessel Fragment [5/9] after Sentry enemy gauntlet room above King’s Station
- Climb up elevator shaft to Colosseum
- Complete Trial of the Warrior (If Zote saved in Greenpath & Deepnest: fight Zote as final boss – “Rivalry” achievement) & Trial of the Conqueror [550 Geo, 2/3] for a charm notch [7/8] and Pale Ore [4/6] respectively
- Descend to bench in tent, head right for Hornet boss [12/17] -> collect King’s Brand ability [7/9]
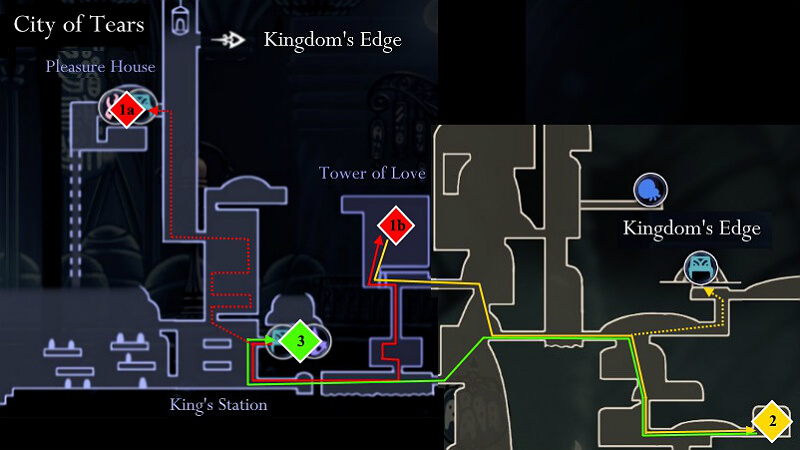
- Wanderer’s Journal relic above breakable planks -> Use King’s Station shortcut to go back to City and enter broken elevator shaft
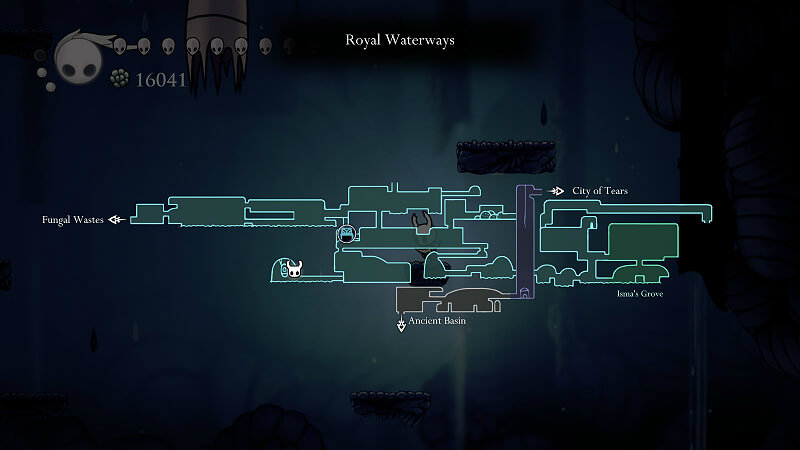
- Pass through Dung Defender’s room (Dung Defender encounter) -> use dive spell in room under bench to enter sub-area of Waterways -> beat Flukemarm boss for Flukenest charm [32/40]
- Return to broken elevator shaft to fall down into Ancient Basin; (Optional: Whispering Root for 35 Essence) -> Collect Wanderer’s Journal relic
112% Route (Part 5)
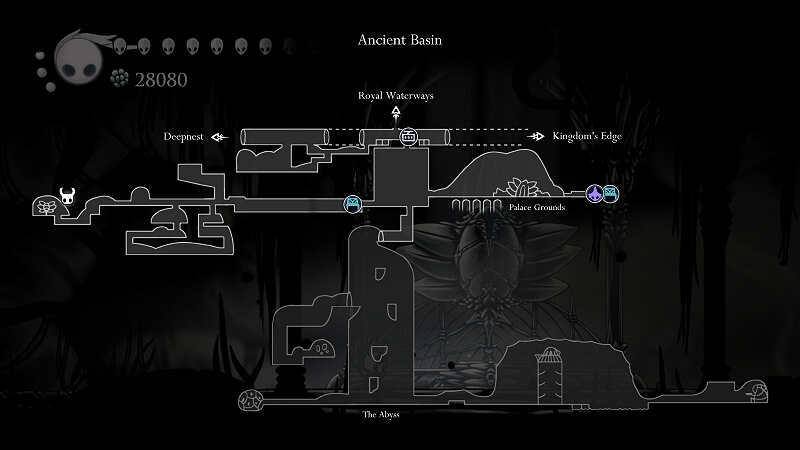
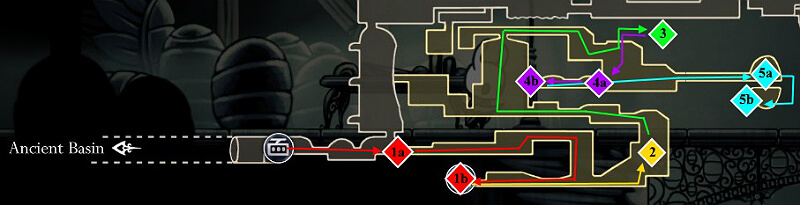
- Bench and equip Fragile Heart & Joni’s Blessing & Lifeblood Heart (1 Lifeblood mask safety margin) -> head down and unlock the Abyss
- Go past Lifeblood door (15 Lifeblood masks to open) to acquire Lifeblood Core charm [33/40] (Note: At fork, take left path for permanently missable Arcane Egg relic [not required for completion]; door cannot be re-opened after charm pick-up)
- At bottom of Abyss, head left until dead-end room -> use Howling Wraiths to receive Abyss Shriek spell upgrade [5/6]
- Head right and climb up to top of lighthouse to turn light on
- Continue right and acquire Shade Cloak ability [8/9] -> Arcane Egg relic pickup using Shade Cloak -> (Optional: Void Tendrils entry for Hunter’s Journal behind fake ceiling and black barrier)
- Climb back up to top of Abyss (Hornet encounter), call tram (re-equip regular charm set) and go to Deepnest
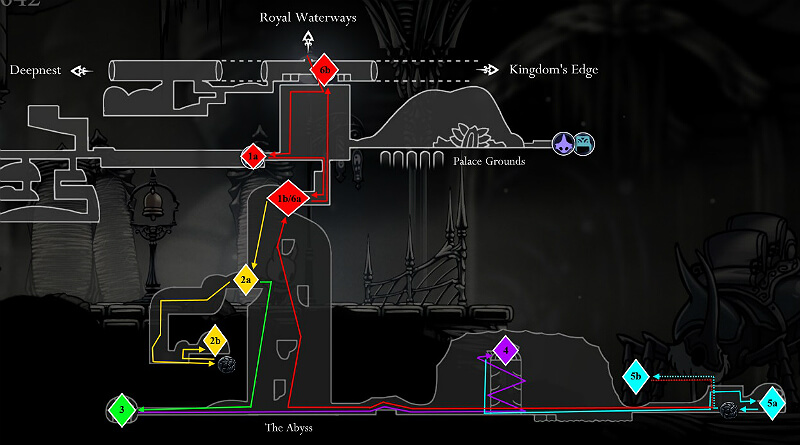
- Head down to get Sharp Shadow charm [34/40] after shade dash i-frame challenge room; (Optional: Garpede entry for Hunter’s journal behind fake wall)
- Head up for garpede nail pogo challenge room to get a Vessel Fragment [6/9, +1 Soul Vessel]
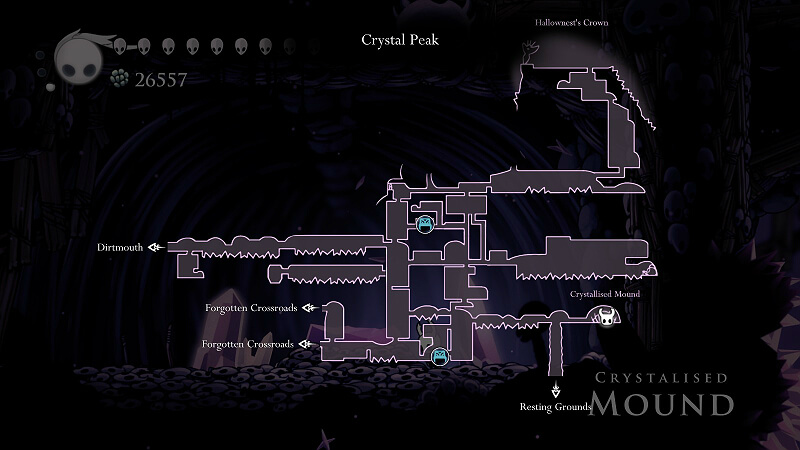
- Take tram back to Ancient Basin -> take stag from Hidden Station to Dirtmouth -> use elevator to get up to Crystal Peak
- Collect King’s Idol relic -> Double jump up passage in upper room with bench for Crystal Guardian boss round 2, collect Mask Shard [13/16] as reward
- Head to upper right of area and follow ground level of room to Grub [35/46]
- Return to previous room and hit Whispering Root for 21 Essence [477/2400]
- Climb up to reach Hallownest’s Crown and collect Pale Ore [5/6]
- Drop all the way down to bottom right and super dash across to Crystallised Mound
- Dive spell to enter mound, collect Grub [36/46] and Descending Dark spell upgrade [6/6]
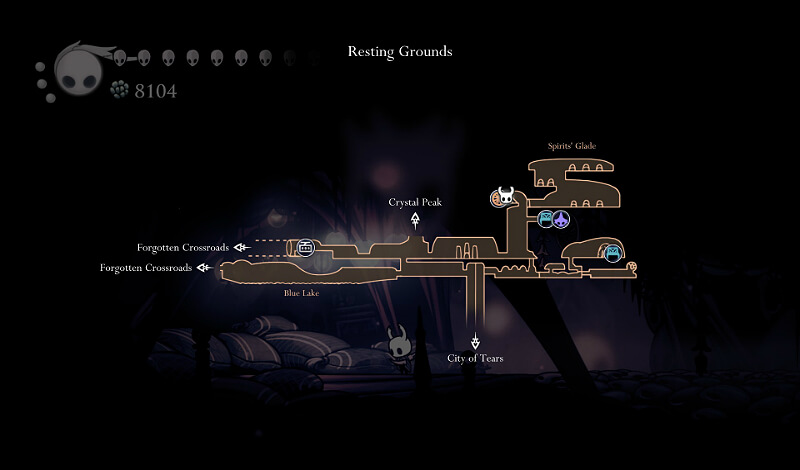
- Fall into Resting Grounds
- Challenge Xero warrior’s grave [2/7] and collect 100 Essence [577/2400]
- Visit Seer to collect a Hallownest Seal relic, unlock the Glade of Hope, collect Pale Ore [6/6] and collect the Dream Wielder charm [35/40]
- Whispering Root in top right of Glade of Hope behind fake wall gives 34 Essence [611/2400]; King’s Idol relic in hidden room at top of waterfall; (Optional: 19 spirits in Glade of Hope [Warning: Revek will attack you if you Dream Nail them])
- Use dive spell to open up crypts from broken coffin -> collect Soul Eater charm [36/40], Wanderer’s Journal relic, Grub [37/46], and Hallownest Seal relic
- Take elevator down to City
- Relic Seeker Lemm encounter next to fountain -> Relic Seeker Lemm visit for Geo
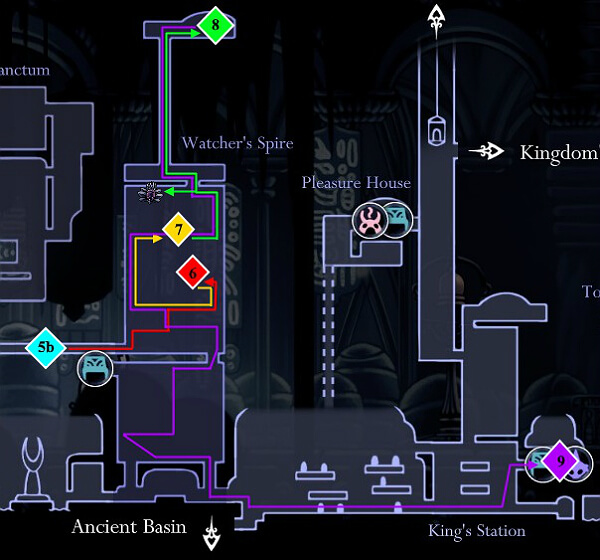
- Nailsmith for final nail upgrade to Pure Nail [4000 Geo, 4/4]
- Kill the Nailsmith (“Purity” achievement)
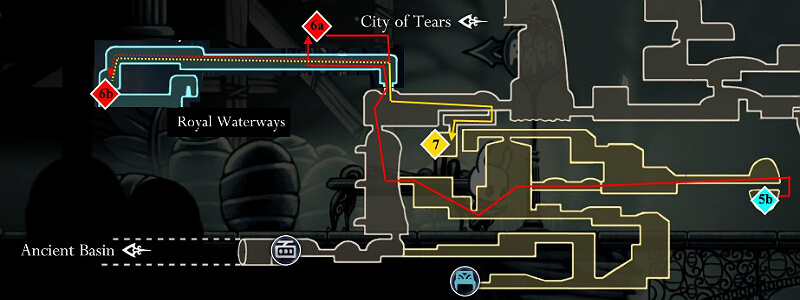
(Alternate path: Spare the Nailsmith -> visit Nailmaster Sheo’s hut in Greenpath, see Leg 18 step #1 to get “Happy Couple” achievement) - Head up middle building under Dreamer using double jump, grab bench,
- Complete Lance Sentry/Great Husk sentry room to unlock doors; head up and open shortcut in left passageway to Soul Sanctum building
- Continue up and grab the Grub [38/46] guarded by the Great Husk Sentry and Lance Sentry
- Fight the Watcher Knight boss [13/17]
- Collect Hallownest Seal relic & Geo chest -> put Lurien the Watcher dreamer [2/3] to rest
- Take stag from King’s Station to Queen’s Station
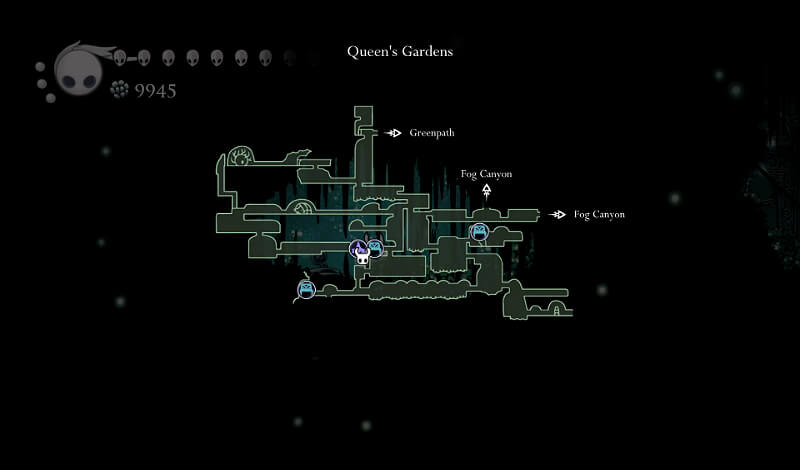
- (Optional: If you have more than 3400 Geo and you used a Simple Key to open the Pleasure House in the City of Tears, use 100 Geo to open account with Millebelle & put in at least 2550 Geo -> sit at Queen’s Station bench -> return and knock down cardboard bank) -> enter Queen’s Gardens; (If Cloth saved in Ancient Basin: Cloth encounter) -> buy map from Cornifer [150 Geo] and take bench after Mantis Petra enemy gauntlet (Optional: Caelif & Fera Orthop spirit)
- Collect Love Key and open shortcut back to Fungal Wastes; (Optional: Inspect Moss Prophet)
- Backtrack and get Whispering Root for 29 Essence [640/2400]
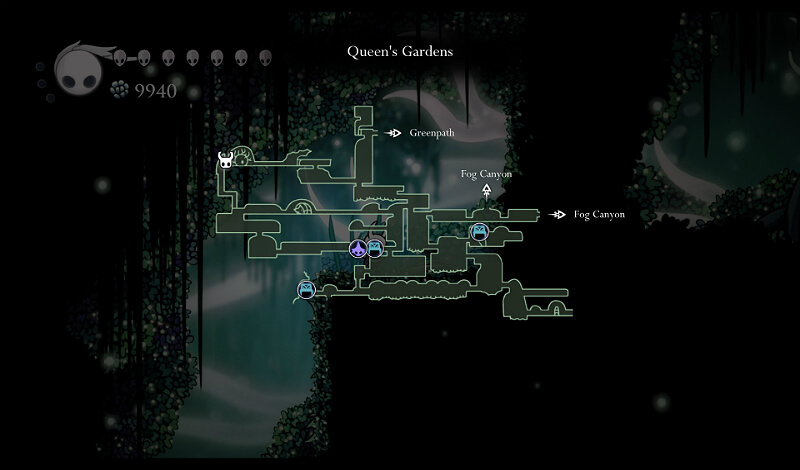
- Get bench [150 Geo] -> (Optional: side-trip to Deepnest for Mask Maker encounter, dive spell on Mask Maker for extra dialogue) -> Mantis Traitor/Mantis Petra/Spiny Husk enemy gauntlet -> collect Grub [39/46] behind fake wall
- After room with jumping bugs, head up through hidden passage with many booby-trap plants for Grub [40/46]
- Hallownest Seal relic pickup -> unlock Queen’s Gardens stag station [200 Geo], hit lever to open shortcut, and use bench
- Challenge Marmu warrior’s grave [3/7] for 150 Essence [790/2400]
- Continue up in area -> open shortcut -> get Grub [41/46] after super dash challenge room
- Take a quick side-trip to collect the Whispering Root in Greenpath for 44 Essence [834/2400]
- Backtrack and head left to fight Traitor Lord boss [14/17] (If Cloth saved in Ancient Basin: Cloth joins fight) -> White Lady gives White Fragment [36.5/40]
- Take stag from Queen’s Garden to Queen’s Station
- Challenge Elder Hu warrior’s grave [4/7] on the right side of the area for 100 Essence [934/2400]
- Get the Whispering Root in the room above Mantis Village for 18 Essence [952/2400]
- Use double jump to access Fungal Core, fall all the way down to collect the Mask Shard [14/16] at the entrance to Deepnest
- Walk to the Failed Tramway bench
- Challenge Galien warrior’s grave [5/7] for 200 Essence [1152/2400]
- Head down left to enter big room on the left side of Deepnest -> (Optional: Whispering Root for 45 Essence) -> get the Grub [42/46] -> pick up Weaversong charm [37.5/40] in Weaver’s Den (entrance is behind a breakable wall and Stalking Devout)
- Continue left into Distant Village (Optional: side-trip for Mid-Wife encounter) -> complete the Beast’s Den for Grub [43/46] and to put Herrah the Beast dreamer [3/3] to rest (Hornet encounter)
(Note: Must get trapped to access permanently missable Hallownest Seal relic [not required for completion]) - Unlock the Distant Village stag station [250 Geo] and travel to the newly unlocked Stag Nest
112% Route (Part 6)
- Collect the Vessel Fragment [7/9]; (Optional: inspect the broken egg shell in top left of Stag Nest)
- Fall down outside Stag Nest and challenge Gorb warrior’s grave [6/7] for 100 Essence[1252/2400]
- Super dash to Dirtmouth and take stag to King’s Station
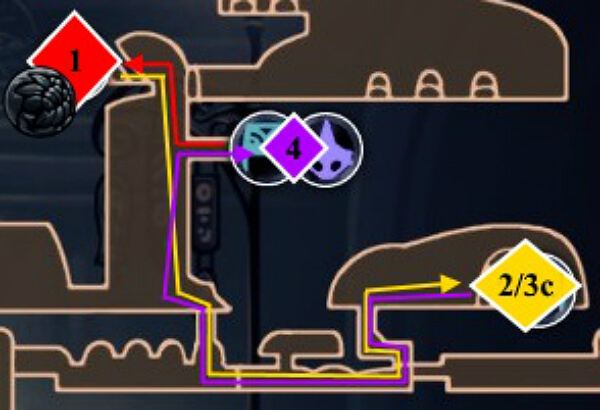
- (Optional: If Geo was given to Millebelle, climb up to the Pleasure House’s hot spring and whack your nail on her to get what you deposited x 1.5 Geo back) -> enter the Tower of Love using the Love Key and fight The Collector boss [15/17] for last 3 Grubs [46/46] and Collector’s Map (check overall map to see if there are any missing grubs)
- Head right into Kingdom’s Edge -> go past a shadow barrier to challenge Markoth warrior’s grave [7/7] for 250 Essence [1502/2400]
- Head left back to the City and take the King’s Station stagway to Dirtmouth to collect King’s Idol relic and Grubberfly’s Elegy charm [38.5/40] from the Grubfather
- Take stag to Resting Grounds
- Visit to Seer gives you a Vessel Fragment [8/9], the Dream Gate ability, an Arcane Egg relic, and a Mask Shard [15/16]
- Open breakable ceiling above Geo chest -> Grey Mourner
- Start Delicate Flower quest; 2 suggested routes mapped below – dotted path has fewer environment hazards, but slightly longer (Optional: clear path of enemies without using benches before starting quest to make journey safer) -> (Quirrel encounter at Blue Lake – “Witness” achievement; Tiso encounter at Blue Lake if Tiso talked to at both previous encounters; Optional: give flower to Elderbug, but must restart quest) -> place flower at Traitor Lord’s child’s grave in Queen’s Garden and take stag back to Grey Mourner (or reload save if no benches were used during quest) for final Mask Shard [16/16, +1 HP] – “Solace” achievement
- Use stag to go to Crossroads
- In passage to False Knight boss room, use super dash in passage behind breakable wall and beat Aspid Hunter/Aspid Mother enemy gauntlet for Glowing Womb charm [39.5/40]
- Open breakable wall above False Knight boss room and fight Failed Champion dream boss for 300 Essence [1802/2400]
- Take stag to Resting Grounds and visit Seer to get Awoken Dream Nail ability [9/9] -> take stag to King’s Station

- Go down broken elevator shaft to Dung Defender room -> fight White Defender dream boss for 300 Essence [2102/2400] (Optional: Refight multiple times for extra dialogue)
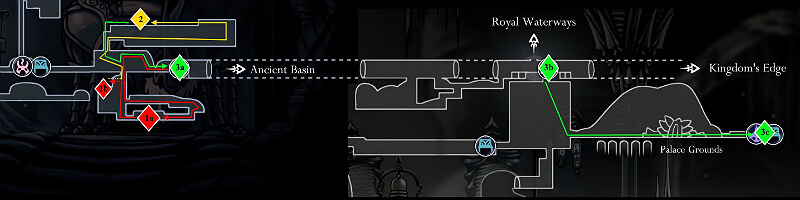
- Continue down broken elevator shaft -> (If Cloth not already saved, optional: Save Cloth in left tramway room now -> ends up in Dirtmouth) -> pay 3000 Geo to Fountain for final Vessel Fragment [9/9, +1 Soul Vessel]
- Ancient Basin bench -> Fight Lost Kin dream boss for 400 Essence [2502/2400]
- Use Awoken Dream Nail to access White Palace from dead Kingsmould in Palace Grounds -> complete White Palace for other White Fragment to complete Kingsoul charm [40/40]
- (Optional: head into Abyss after equipping Kingsoul to unlock a hidden sub-area; Arcane Egg relic in bottom left of sub-area; use Dream Nail on the cracked black egg at the end of the sub-area to transform Kingsoul into Void Heart for alternate endings; Note: Locks you out of the “normal” ending achievement [The Hollow Knight])
- Go to Hidden Station and take stag to Resting Grounds -> talk to Seer for Ascension after collecting 2400 Essence; (Optional: Super dash across Blue Lake to Salubra’s shop for Salubra’s Blessing [800 Geo; “Blessed” achievement] and go to Crossroads stag station) -> take stag to Dirtmouth
- (Optional: Equip 3 Fragile charms and talk to Divine in smaller tent to convert them to Unbreakable versions [12,000, 9,000, and 15,000 geo for Heart, Greed, and Strength respectively]; sell extra relics at Relic Seeker Lemm for lots of quick Geo)
- Equip Grimmchild charm and set Dream Gate next to bench
- Collect first set of 3 flames (using Dream Gate to get back to Dirtmouth after each one) and talk to Grimm
- Collect second set of 3 flames (using Dream Gate to get back to Dirtmouth after each one) and fight Grimm boss [16/17] for charm notch [8/8]
- Collect final set of 3 flames (using Dream Gate to get back to Dirtmouth after each one) and fight Nightmare King boss [17/17] – “Ritual” achievement
(Alternate path: Visiting the flame (carried by Brumm) in Deepnest and then going to the Nightmare Lantern in Howling Cliffs allows you to banish the Grimm Troupe [17/17] -> talk to new bug in Dirtmouth (Nymm) who gives you Carefree Melody charm [40/40] to replace the Grimmchild charm you lose by banishing the Troupe – “Banishment” achievement)
Note (Fragile charms): Divine disappears if you choose to banish the Grimm Troupe, but you can pick up any Fragile charm she still had from the ground where her tent used to be.
- Take stag to King’s Station -> climb up elevator to reach Colosseum (Tiso encounter if Tiso talked to at all 3 previous encounters), complete Trial of the Fool [800 Geo, 3/3]
- (Optional: If you used a Simple Key to open the Pleasure House, collect King’s Idol relic -> defeat Pale Lurker for Simple Key)
- Go to King’s Station -> take stag to City Storerooms; Soul Tyrant dream boss in Soul Sanctum
- Drop down to Royal Waterways -> use Simple Key on coffin in Junk Pit, pick up Godtuner -> Dream nail to enter Godhome and defeat Pantheon of the Master, Pantheon of the Artist, Pantheon of the Sage, and Pantheon of the Knight; (Optional: if have Void Heart, complete Pantheon of Hallownest for Embrace the Void ending)

- Go to City Storerooms -> take stag to Dirtmouth; (Optional: Grey Prince Zote dream boss if you’ve saved Zote in Greenpath/Deepnest and fought Zote in Colosseum [“Dark Romance” achievement for first success]; multiple fights gradually change Bretta’s impression of Zote)
- Enter Black Egg Temple (If have Void Heart: Hornet encounter) -> final boss(es)
Original Link – Continuation of discussion


Add comment