
When attempting the 3HR speedrun myself, I had jotted down steps to help me along. I thought I would share this with everyone else attempting this who, like me, is really not much of a speedrunner and who would just like to have an easy guide to follow.
NOTE: **This achievement has changed and is now 5 hours instead of 3.**
Guide Purpose

I want to be clear that this guide is NOT an absolute mega speedrun guide. 100% guaranteed that there are faster routes through the game, especially when using glitches. This is simply for the average person who wants to reach the end of the game quickly enough to receive the 3HR in-game achievement.
That being said, this guide will also focus on a few key items and locations that will make continuing the game for the 100% completion in 20HRs achievement far easier/quicker.
This guide assumes that you have a basic understanding of the game’s mechanics. Ideally, you would have played through it at least once. This is so that when I say specific charm names or locations, you are not confused. There will be no boss fight tips here.
PLEASE NOTE
I will be using screenshots of area maps to demonstrate the path through specific locations. (The line does not represent a PIXEL PERFECT path, just general)
I will also be mentioning specific Charms and Movement abilities by name, which I would consider to be spoilers. Hollow Knight is a fantastic game with tons of things to discover. I cannot emphasize this enough, play the game through at least once before following/reading this guide.
Important Notes

While doing this, I HIGHLY recommend that you kill any enemies in your path that do not require any significant amount of time, as the game currency Geos are super important for this run. I will do my best to notify how much Geo you might require for an area so that you do not get stuck.
Other than that, the only other important thing to mention is that if you see a bench, sit on it. Saving often is pretty important in case you happen to slip up and die. While this may seem obvious to some, you would be surprised by how many people would skip a bench that takes two seconds to save at, only to die and spend five minutes making the time back up.
NOTE:
I’ll be adding goal times for each leg so you’ll know around how you should be doing. I took it pretty easy testing out the run, so the goals should be easily reachable unless you unexpectedly die.
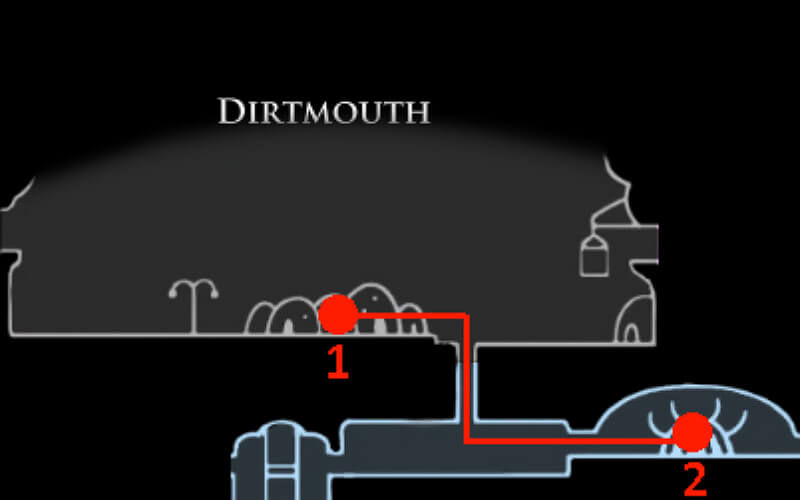
Leg 1 – Vengeful Spirit
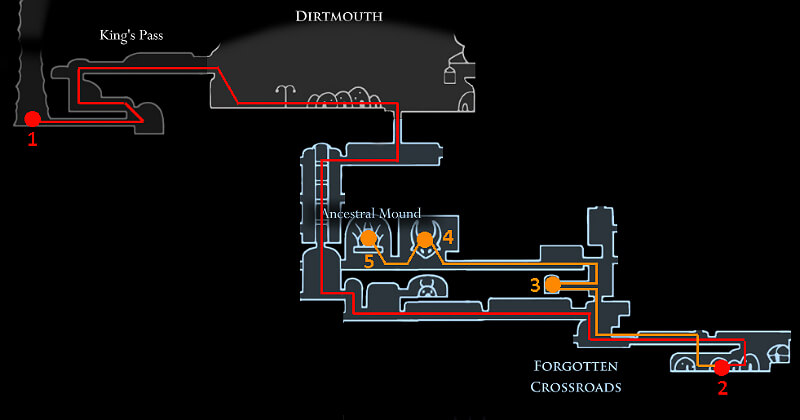
- The beginning. Follow the basic path down the left side of the Forgotten Crossroads.
- The open hut here will have the Dirtmouth merchant, Sly. Talk to him to wake him up.
- Pay some Geo to unlock the Stag Station.
- Defeat the False Knight, make sure to get the Geo chest before leaving the room.
- Unlock the Vengeful Spirit spell at the Shaman’s hut.
Goal time to finish leg: 15M (Saving at bench after getting Vengeful Spirit)
Total run time: 15M
Leg 2 – Mothwing Cloak (Dash)
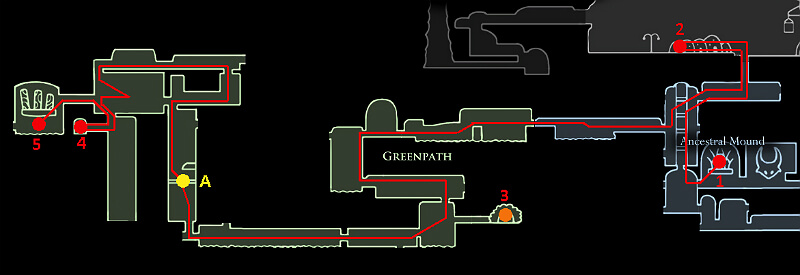
- Where you should be, head back to Dirtmouth merchant Sly.
- Buy the Gathering Swarm Charm. You should have enough Geo with the chest. **
- OPTIONAL – You can pick up the Hunter’s Journal here if you want, it takes at most 15 seconds.
- There will be a toll gate that requires some Geo, shouldn’t be a big deal for you.
- Unlock the Stag Station.
- Fight Hornet and take the Mothwing Cloak.
** Gathering Swarm in my opinion is probably the most important Charm for this entire run other than Dash Master. You won’t have to stick around to pick up Geo and ensure that you get every bit of it that drops (that doesn’t land in acid at least)
For the goal time here, I’m including time to save Zote.
Goal time to finish leg: 15M (Saving at Stag Station bench after beating Hornet)
Total run time: 30M
Leg 3 – Dash Master and Mantis Claw
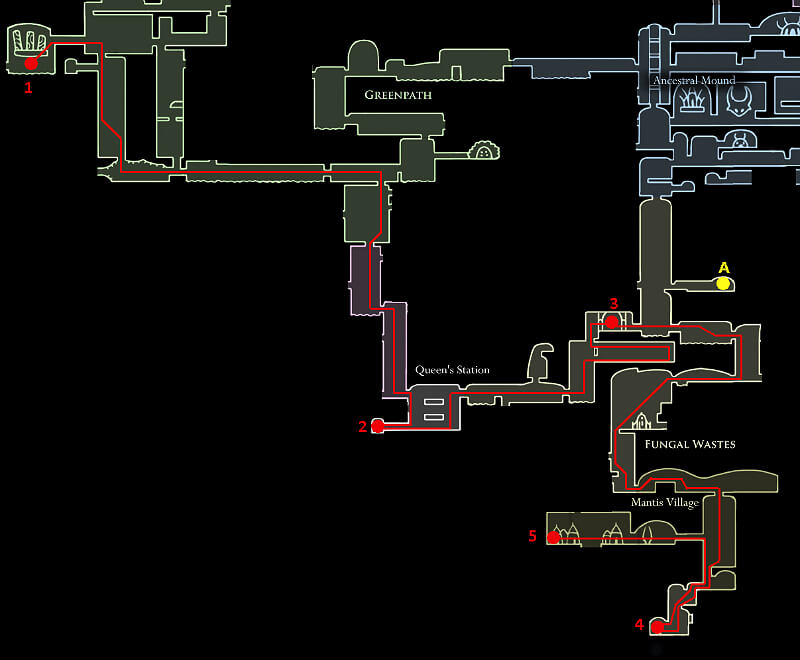
- Where you are.
- Unlock the Stag Station.
- Farming Room. **
- You can purchase the Fragil Greed Charm here for 250 Geo if you feel confident enough.
- Pick up the Dash Master Charm ***
- Grab the Mantis Claw ability.
** After passing through this room, you can revisit it to fight one big mushroom. The mushroom drops 45 Geo and takes roughly 15 seconds to kill once you are used to his patterns. This is a great farm spot if you feel you are short on Geo.
*** Dash Master is a great Charm that will let you fly through rooms pretty quickly. While it may not be required, I consider it a great pickup in the long run.
Goal time to finish leg: 10M (As soon as I got the claw)
Total run time: 40M
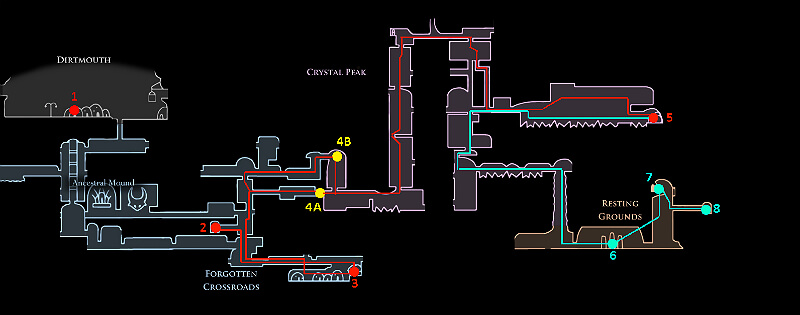
Leg 4 – Desolate Dive
I’ll start this section off by mentioning that the Desolate Dive spell isn’t required for this run. The main reason I travel through the Soul Sanctum and fight the Soul Master is for his Geo chest, and to be able to afford the Lumafly Lantern. Feel free to farm around 2000 Geo if you want to skip the Soul Sanctum entirely.
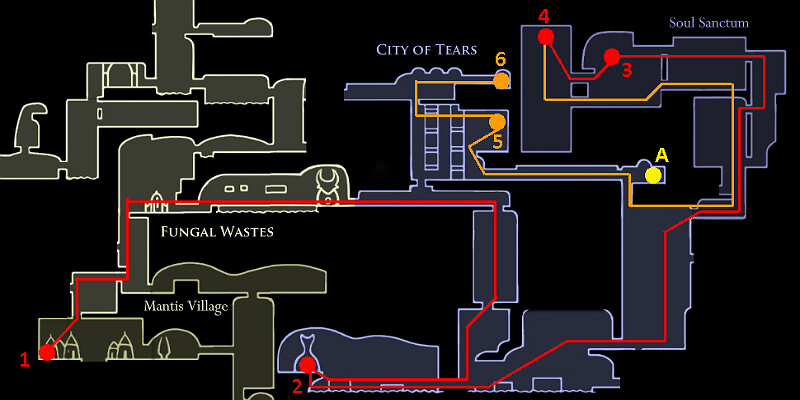
- Where you are.
- The first nail upgrade of the game does not required a pale ore, simply 250 Geo. **
A – There is an optional bench here. If you are going to Soul Sanctum, hit this up first just in case. - Soul Master fight and Desolate Dive magic.
- Geo chest, sweet sweet Geos.
- Simple Key location. ***
- Unlock Stag Station.
** Nail upgrades immensely speed up boss times, and are definitely worth getting.
*** This simple key is essential for accessing the Royal Waterways without spending the Geo to buy a simple key from Sly.
NOTE:
There is a vendor will buy any Wanderer’s Journals, Hallownest Crests you may have found for decent amounts of Geo. This can help immensely if you did happen to pick any up after going through the Soul Sanctum. he is located two rooms down from the bench marked as A.
Goal time to finish leg: 15M (Saving at bench at #6, Stag Station)
Total run time: 55M
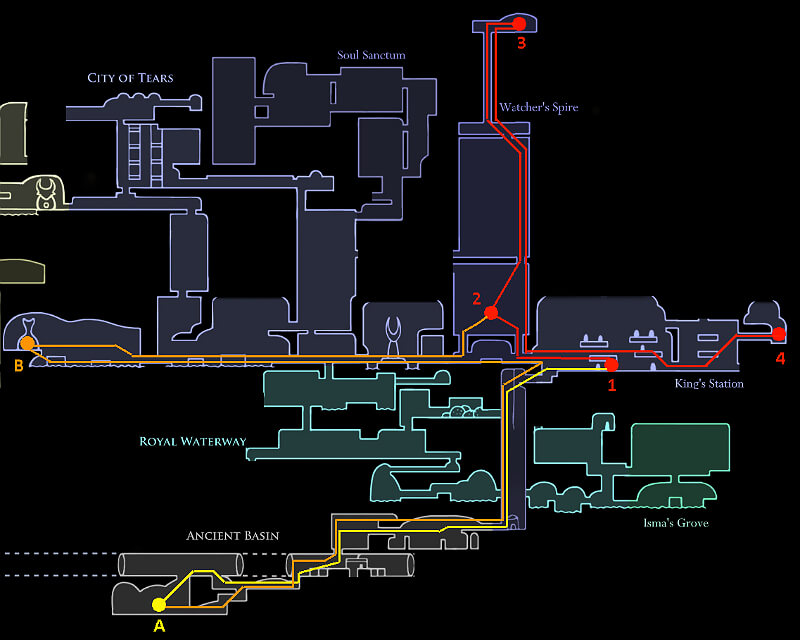
Leg 5 – Lumafly Lantern and Crystal Dash
- From the Stag in Leg 4, go to Dirtmouth and buy the Lumafly Lantern. (1800 Geo) **
- Take the Stag to the Forgotten Crossroads unlocked in Leg 1 and head to Crystal Peak.
- OPTIONAL: Head down to the merchant Salubra using Mantis Claw, buy charms. **
- A – This entrance to the mines requires the Lantern and some Geo to unlock the gate.
B – This entrance simply requires Desolate Dive. - Climb all the way up and half way back down to reach Crystal Dash.
- Climb all the way down on the right side to reach the Resting Grounds, get the Dream Nail.
- You are automatically moved to this bugs hut.
- Unlock the Stag here. (Free)
** The Lumafly Lantern isn’t required at this point in time, however I choose to buy it at this point to save time later. This item will make certain areas in Crystal Peak far easier. You will need this item before Leg 9 in order to open a gate in Deepnest.
*** The merchant Salubra has many very good Charms that can make your run that much easier such as LongNail (300 Geo) or Steady Body (120 Geo). None of her charms are required for this run, but having them can make not dying that much easier. Buy whatever you want and can afford.
Goal time to finish leg: 15M (Saving at bench at in resting grounds Stag Station)
Total run time: 1H 10M
Leg 6 – Acid Resistance

- Take the Stag to the City Storerooms.
- Unlock this door using the Simple Key we picked up in Leg 4.
- Beat up the Dung Defender and hit the switch to drain the acid.
- Pick up Acid Resistance.
- Head out of the Royal Waterway via the Laughing Bugs house.
Goal time to finish leg: 10M (At picking up Acid Resistance)
Total run time: 1H 20M
Leg 7 – The Watcher
If you’ve followed the guide up to this point, we are now going entering the last stages of the run. You should have all the tools to complete the next legs without issues.
- Where you are.
A – This route is completely optional, but will lead you to a pale ore for a nail upgrade. **
B – The second nail upgrade. (800 Geo) - The ledge. ***
- The Watcher.
- Unlock the Stag Station.
** While nail upgrades are completely optional, they speed up boss fights immensely. This one is the relatively easy to pick up, but will cost you time. (Took me about 8 minutes)
*** At the height of your jump use your downslash to bounce off of the environment jugs to get enough height to reach the ledge to grip with your mantis claws (wall jump) ability. It may take a few tries of leaving/re-entering the area, but it is entirely possible.
Goal time to finish leg: 25M (Saving at King’s Station)
Total run time: 1H 45M
Leg 8 – The Teacher
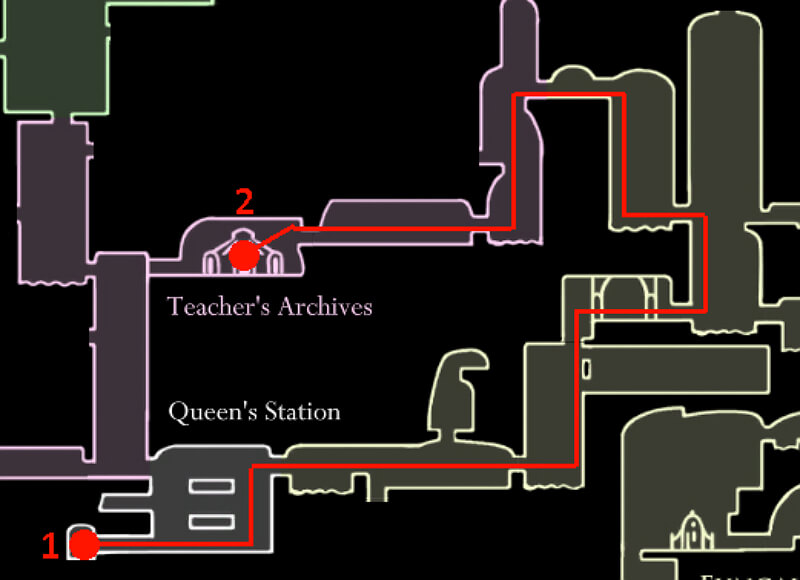
- Take the Stag from Kings Station to Queens Station.
- Follow the path to the Teacher’s Archives. **
** This place is super straight forward. My only advice is that is soon as you enter it to save at the bench at the top of the first room. After beating the jelly fish, find the Teacher’s tube and talk to the NPC there, then dream nail the Teacher.
Goal time to finish leg: 15M (Saving at the Bench on the way out of the Teacher’s Archives)
Total run time: 2H 0M
Leg 9 – The Beast
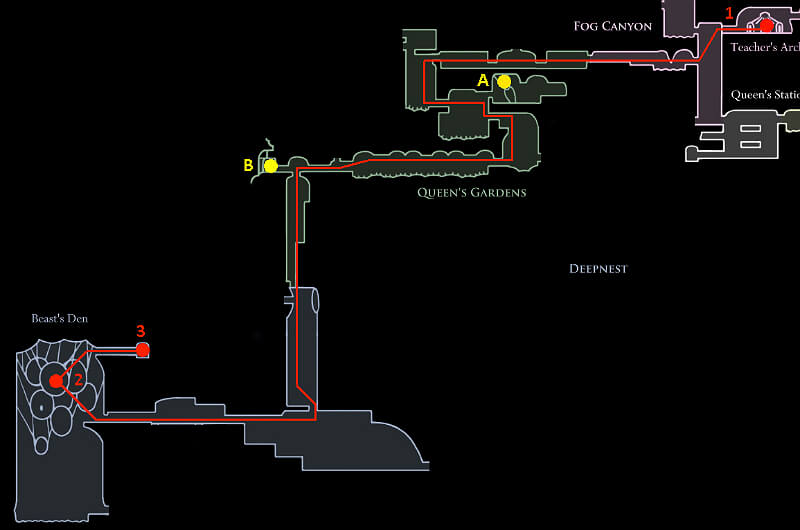
- Where you are.
A – Optional bench. **
B – Optional bench. ** - The Beast’s Den. While it is a small maze-like place, it largely only has one non-dead end path.
- Unlock the Stag Station.
** Queen’s Gardens can be a rough place, I advise to hit both benches if possible just in case. This is emphasized a bit more on B bench, as going into to Deepnest can also suck sometimes.
Goal time to finish leg: 25M (Saving at Dirthmouth after completing the Beast’s Den)
Total run time: 2H 25M
Leg 10 – The End
- Head back to Dirthmouth using the Stag. Save and do whatever you want to do in town.
- Go to the end and beat the game!
Goal time to finish leg: 15M (After defeating the last boss.)
Total run time: 2H 40M
Following this guide, I was able to complete the game in 2H and 02M on steel soul mode. Playing the game through at least once will help immensely in your runs to learn boss fights and the area layouts. Good luck!
Original Link – Continuation of discussion


Add comment